Advertisement
Quick Links
Advertisement

Summary of Contents for MedKlinn O3 Hydro 10
- Page 1 O3 Hydro 10 / 20 USER MANUAL...
-
Page 2: Table Of Contents
TABLE OF CONTENT 1. Safety Precautions 2. Device Identi cation 3. System Overview 4. Control Panel Identi cation 5. Fault Indicator 6. Geting Started 7. Installation Of Device... -
Page 3: Safety Precautions
User. Opening the device or tampering with it in any way will cause the Warranty to become void. If you encounter any problems with the device, please contact the nearest authorized Medklinn Service Centre. - Page 4 NOTE – Radio, TV or sensitive equipment interference: If the device should cause interference to radio, television reception or any sensitive equipment, try to correct the interference by one or more of the following measures: Reorient or relocate the receiving antenna. Increase the distance between the device and radio/TV receiver/sensitive equipment.
-
Page 5: Device Identi Cation
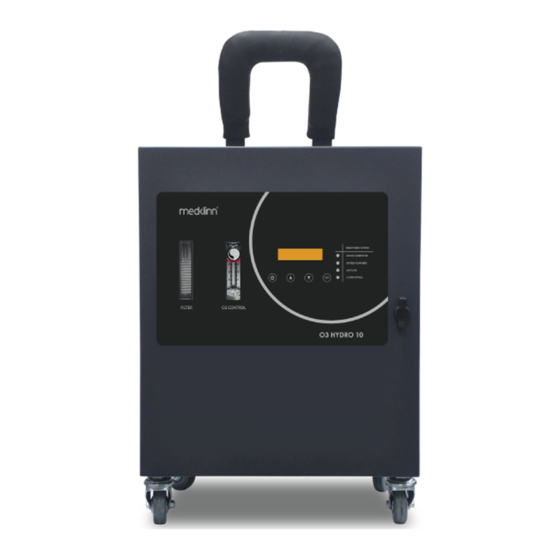
Control panel system To ease in moving the device Power button Castor wheel and allow the device to be stationary (lockable) Door Door of the device Castor wheel Door Lock Lock the device’s door Medklinn O3 Hydro 10 /20 (Front View) - Page 6 Device Identi cation Functional parts Water outlet Ozone water ows out from here Water outlet Medklinn O3 Hydro 10 /20 (Left Side View)
- Page 7 The power rating of the power Power plug plug is 220/240v Power plug Water source ows in through Water inlet here Booster pump To boost the ow of the water (Optional) source Water inlet Booster pump Medklinn O3 Hydro 10 /20 (Right Side View)
- Page 8 Device Identi cation Hose outlet Hose Quick plug (Female) Hose 1 Hose 2 Medklinn O3 Hydro 10 /20 Accessories Functional parts Quick plug (Female) Secures the hose to the water source and device Hose outlet: Focuses the spray pattern of the water...
-
Page 9: System Overview
Dissolves oil and grease When the Medklinn O3 Hydro 10 / Hydro 20 operates, the air is drawn into the device through the HEPA lter. This air is forced through a ne mesh lter that traps pollutants before passing into the oxygen tank, which separates the nitrogen from the air, resulting only oxygen is passed through The concentrated oxygen is nally supplied to the ozone module which breaks it down to ozone (O3) with the use of electricity. -
Page 10: Control Panel Identi Cation
Control Panel Identi cation Fault Indicators Ozone Points to a problem with the ozone generator generator: Oxygen Points to a problem with the chamber: oxygen chamber Points to a problem with the Air ow: air ow Power Down button button button button Shows that an alarm bypass... -
Page 11: Fault Indicator
Fault Indicators on the Control Panel Fault indicators appear to notify the user that there is a problem with the device. It is also accompanied with a buzzer sound. It directs the user to which component has failed. Ozone Generator Fault Condition: Buzzer sound emitted, red light on Ozone Generator, Display Screen shows ALARM: O3, Press v (Down) to mute. - Page 12 2. Contact the nearest Medklinn service centre to arrange for maintenance service immediately. Call dealer for service 3. Meanwhile, the device will still continue to operate for the time stated on the Display Screen. Mode: Temporary Remain: 30 days...
- Page 13 Display Screen shows ALARM: O2, Press v (Down) to mute. Alarm: O2 Press v to mute Steps to take: 1. Press Down to switch o the alarm. 2. Contact the nearest Medklinn service centre to arrange for maintenance service immediately. Call dealer for service...
- Page 14 3. Meanwhile, the device will still continue to operate for the time stated on the Display Screen. Mode: Temporary Remain: 30 days Air Flow Fault Condition: Buzzer sound emitted, red light on Air Flow, Display Screen shows Mode: Stopped, Call for service, device has stopped operating. Mode: Stopped Call for service...
- Page 15 (without the fault status above). The fault is resolved when the device is operating in normal mode after 40 seconds. 3. If it is not, press Power to switch the device o and contact the nearest Medklinn service centre to arrange for maintenance service immediately.
-
Page 16: Geting Started
Getting Started: Connecting the hose Using Quick Plug 1. Connect a Quick Plug (Male) to the water source pipe with male threaded end. ¾” Pipe with male Quick Plug (Male) threaded end (water source) NOTE: Make sure that there is enough Te on tape when attaching the Quick Plug (Male) to the threaded end of the pipe to avoid leakage at that point 2. - Page 17 3. Connect the other quick plug (female) to the device’s water inlet. 4. Connect the second hose’s quick plug (female) to the device`s Water Outlet. 5. Switch on the device by pressing the power button. 6. Monitor the device status and oxygen ow by pressing up/ down button.
- Page 18 NOTE: MODE: Mode: Standby Mode: Normal Flow: 1 LPM STANDBY – indicates that the NORMAL – indicates that the FLOW – shows the ow device has no water ow device is functioning rate of the oxygen To a water tap 1.
- Page 19 3. Connect the hose to the water tap. Insert the hose clip to the hose before connecting to the water tap. Tighten the connection by using the hose Hose Clip clip with a screwdriver. Ensure it is tight and water will not leak out when the tap is turned on.
- Page 20 Controlling the ozone level into the water The Medklinn O3 Jetspray Hydro 10 / 20 ozone level is controlled by turning the knob of the O2 Control to increase or decrease the level ozone generation. It is advisable to keep the ow rate between 1 - 1.5 lpm.
- Page 21 Locking/unlocking the castor wheel 1. Make sure that the castor wheel is facing outward. Clipping Wheel 2. To lock the castor wheel, the clipping must be pressed downwards. Pressed Pulled clipping clipping down up to unlock to lock 3. To unlock the castor wheel, the clipping must be pulled upwards. 4.
-
Page 22: Installation Of Device
NOTE: Leave a distance of 1.5 cm screw length from the wall. Do not screw all the way in. The length allows the device to be hooked on safely. 2. Hook the Medklinn O3 Hydro 10 / 20 mounting slots onto the screws. M3 screw...
Need help?
Do you have a question about the O3 Hydro 10 and is the answer not in the manual?
Questions and answers