Table of Contents
Advertisement
Quick Links
Advertisement
Table of Contents

Subscribe to Our Youtube Channel
Summary of Contents for Sense Solar
- Page 1 ® Solar Install Guide...
- Page 2 If it does cause interference we recommend: reorienting or relocating the 3. Do not try to open the Sense monitor, receiving antenna, or increasing the separation touch any internal parts, or try to repair it. between the device and the receiver.
- Page 5 4. Use the app to complete setup Sense monitor When installing Sense, you must be generating at least 150 watts to calibrate the system correctly. If upgrading to solar, do not remove the existing sensors. Check compatibility at sense.com/works. Solar sensors Current sensors...
- Page 6 Turn o power Open the door to the electric panel and turn o the main breaker and power to the incoming solar feed. This helps protect you during installation. Don’t forget your ashlight!
- Page 7 Remove panel cover Remove the screws securing the panel cover to access the circuit breakers. If solar is in a subpanel, remove the subpanel cover. Warning: The service mains are always live!
- Page 8 Ensure the power is o before prying open the cap on the middle port of open the middle port. the Sense monitor. This will be used Then skip to step 8. to connect the solar sensors. Warning: Do not use screwdriver on live equipment.
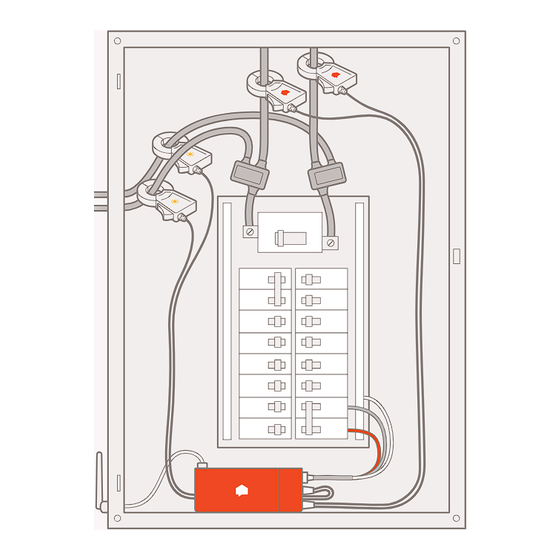
- Page 9 Find a spot for your Sense What if there is no room? The Sense monitor is designed to t within Use the mounting bracket provided. your main panel in order to monitor your See more installation con gurations whole home energy consumption. Find an at help.sense.com.
- Page 10 Install the antenna Using the back of a screwdriver, punch out the knockout cover in the electric panel. Then, insert the antenna. Antenna Knob Insert Extension cable Extension cable knob...
- Page 11 Connect Connect the power cable, antenna, and current sensors to the monitor. The solar sensors, labelled should only be used for solar. Insert the current sensors into the outer port. The middle port is only for solar sensors.
- Page 12 Clamp sensors around service mains Clamp the current sensors around the service mains so that both Sense labels face the same direction. The direction of the sensors does not matter, as long as they are the same. As a safety...
- Page 13 Connect the solar sensors Connect the solar sensors, labeled with to the middle port on the monitor.
- Page 14 Upgrading current setup to solar? Clamp the solar sensors around the Please skip to step 11. wires to the incoming solar feed so that both labels face the same direction. The direction of the sensors does not matter, as long as they are the same.
- Page 15 240V breaker and the white wire 240V breaker. Do not use a tandem to the neutral bus bar. Sense draws less breaker, unless it is 240V. Learn more than 0.1A, so you should use the smallest at help.sense.com.
- Page 16 Replace the panel cover carefully to Reattach each sensor to ensure that there is no pressure on the same service main as before to the sensor clamps that would cause avoid disrupting device detection. them to open. Label the Sense breakers with the included sticker.
- Page 17 Turn o power to the sounds listed below. It will take about a main breaker and solar feed. Disconnect minute before hearing a sound. Visit the sensors from the service mains and help.sense.com for sound samples and...
- Page 18 Upgrading to solar? Install the Sense app by visiting Go to Settings / Sense Monitor sense.com/app. Click “Get Started” and / Setup Solar and follow the solar follow the on-screen instructions. The setup procedure. app will guide you through the Wi-Fi setup and account creation process.
- Page 19 Caution: The Sense monitor should be installed by a quali ed professional. Before installing, please read and review the safety warnings. Technical Speci cations Monitor Speci cations Sense is a home energy monitoring device. Compatibility: 120VAC (90v-130v) It is used to measure the current and Power Use: <...
- Page 20 See what’s up. Know what’s on. ™...
Need help?
Do you have a question about the Solar and is the answer not in the manual?
Questions and answers