
Summary of Contents for GLOBAL BEAR PDOJ-M-NSF
- Page 1 PDOJ-M-NSF Single Serving Ice Shaver User Manual Brought to you by SAC FOOD SUPPLIES, INC.
-
Page 2: Table Of Contents
Table of Contents Features………………………………………………..1 Machine Overview ....…………………….2 Assembly Steps………………………………………3 Operating Instructions………………………………4 Blade Installation……………………………………..8 Trouble Shooting…………………………………….10 Routine Maintenance………………………………..11 Cleaning the Ice Shaver……………….……11 Lubricating the Center Shaft………….…...13 Manufacturer’s Warranty…………………………...15... -
Page 3: Features
Features PDOJ-M-NSF Single Serving Ice Shaver Color Black Spots International Certification NSF / CE / KC Shaving Speed 10-20sec / serving (4-8oz) Power 90W / 120V / 60Hz Dimension (W x D x H) 8” x 14” x 28” Net Weight... -
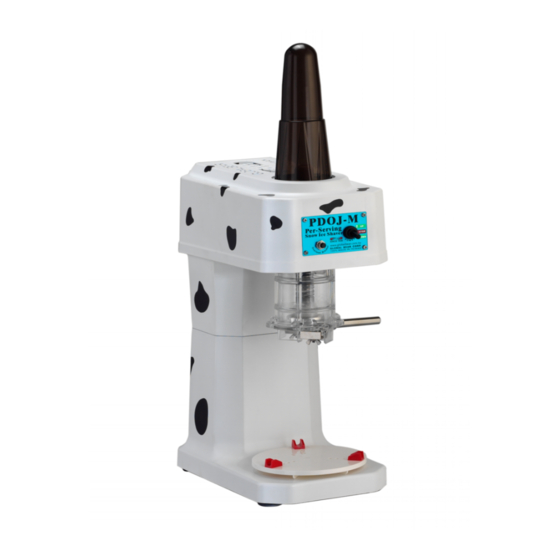
Page 4: Machine Overview
Machine Overview Center Shaft Cover Power Switch Overload Breaker Ice Block Chamber Handle Shaving Plate Plate Position Fixture Rotator Base... -
Page 5: Assembly Steps
Assembly Steps 1. Align the red dot on the Shaving Plate and the red dot on the Ice Block Chamber. Push the Shaving Plate against the Ice Block Chamber and turn the Shaving Plate clockwise to lock these two devices together. 2. -
Page 6: Operating Instructions
Operating Instructions 1. Place your serving container at the center of the Rotator Base. 2. Hold the handle and rotate it in a counter-clockwise direction to remove the Shaving Plate. - Page 7 Operating Instructions (cont.) Place a single serving of ice block on the Shaving Plate. Align the red dots on both the Ice Block Chamber and the Shaving Plate. Then, while pushing the Shaving Plate upward, rotate the Shaving Plate in a clockwise direction to attach it back to the bottom of the Ice Block Chamber.
- Page 8 Operating Instructions (cont.) 6. Push the Power Switch all the way down to start the shaving process.
- Page 9 Operating Instructions (cont.) 7. When shaving completes, push the Power Switch fully upward to raise the Center Shaft. 8. To stop the shaver, push the Power Switch to its center position. 9. Rotate the Shaving Plate in counter-clockwise direction to remove the Shaving Plate.
-
Page 10: Blade Installation
Blade Installation 1. Place the Blade on the back of the Shaving Plate with the Logo side down as shown in the picture and along the back edge. 2. Place the Blade Holder on top of the Blade, checking that the Blade is sitting on the back edge. - Page 11 Blade Installation (cont.) Things to check for: 1. Logo side of the blade is faced down. 2. The Blade is sitting on the back edge. 3. The Blade is slightly above the shaving surface. Strongly tighten the butterfly nut by hand to fully secure the Blade and the Blade Holder.
-
Page 12: Trouble Shooting
Trouble Shooting Cause Solution/Action Problem The shaver won't start. The unit is not Make sure the shaver is plugged into a properly connected to a power supply. power supply. The power socket Connect the shaver to in use has no another wall socket that electricity. -
Page 13: Routine Maintenance
Routine Maintenance 1. Rotate the Ice Block Chamber in a counter- clockwise direction to remove the Ice Block Chamber and Shaving Plate together. Separate the Shaving Plate from the Ice Block Chamber. Clean and rinse the Ice Chamber and Shaving Block Plate with water. -
Page 14: Cleaning The Ice Shaver
Routine Maintenance (cont.) Cleaning the Ice Shaver Snow ice is made of water and other ingredients, so the Ice Chamber and the Shaving Plate must be cleaned at least every 30 minutes when operating in any setting. 1. Refer to Routine Maintenance on Page 11 to clean the Shaving Plate, the Ice Block Chamber and the Ice Driving Plate. -
Page 15: Lubricating The Center Shaft
Routine Maintenance (cont.) Lubricating the Center Shaft When the Center Shaft lacks lubrication, friction between the thread and the gear inside the shaver will cause the machine to produce unusual noises during operation (often a squeaking noise). Therefore, lubricant should be applied to the Center Shaft weekly even if you are not experiencing any problem with the shaver or hearing any noise from the shaver. - Page 16 Routine Maintenance (cont.) Apply food grade grease to the threads on the Center Shaft. Make sure that the thread gaps on the Center Shaft are fully filled with grease. 4. Push the Power Switch fully downward to lower the Center Shaft to the bottom.
-
Page 17: Manufacturer's Warranty
Manufacturer’s Warranty The PDOJ-M-NSF is covered under a one-year limited manufacturer warranty. Please note that the warranty does not cover the replacement of the shaving Blade or other consumable parts. Replacements sold separately. Warranty also does not cover any physical damage, damage caused by improper or abnormal use, or damage to the motor associated with the use of an extension cord.
Need help?
Do you have a question about the PDOJ-M-NSF and is the answer not in the manual?
Questions and answers