Advertisement
Advertisement
Table of Contents

Related Manuals for HAPPIER CAMPER HC1

Summary of Contents for HAPPIER CAMPER HC1
- Page 2 THE BASICS...
-
Page 3: What's Included
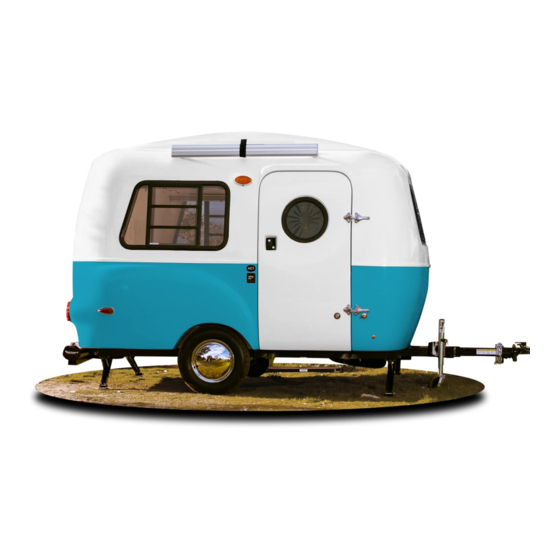
THE HAPPIER CAMPER Delivering modern adventure and ground-breaking flexibility in an ultra-light package, the HC1 is the result of a lifetime of enthusiasm and years of careful design. Each camper comes standard with a huge rear hatch, wide entry door, classic fenders, modular floor grid, and large panoramic windows. - Page 4 CAMPER SPECIFICATIONS WITH A/C 8'4" STANDARD CAMPER BACK FRONT 6'1" 62" PASSENGER VIEW VIEW VIEW 54.5" RETRACTABLE WHEEL JACK 7'8" 30.5" 53.5" STABILIZERS 6'11" RIGID FRAME W/ TORSION AXLE & GWR OF 3500 LBS. ROOFTOP FAN OR A/C STANDARD CAMPER LIFTED CAMPER GAS LIFT DRIVER VIEW...
- Page 5 AC PORT DC PORTS STORAGE USB / DC PORT The modular floor of the HC1 is made of 1.5" thick honeycomb fiberglass. Grooves are embedded in the floor to hold the Adaptiv cube components in place — just like Lego ®...
-
Page 6: Filling The Water Tank
INTERIOR ADD-ONS ADAPTIV KITCHENETTE FILLING THE WATER TANK The kitchenette package includes water fixtures, stove top, and storage. It comes The water tank can be filled in two ways: 1. Connect an external hose to fresh water equipped with an electric water pump, a glass fold up sink, two extension fold up inlet located on the back of the kitchenette (see pg 15). -
Page 7: Emptying The Water Tank
EMPTYING THE WATER TANK FILL THE WATER TANK WITH WATER FIRST BEFORE TURNING ON DO NOT RUN THE WATER PUMP WITHOUT WATER Ensure the fixtures and hoses are connected. Remove the drainage cap on the exterior of the camper on the driver’s side. Turn the faucet knob to the blue marking, which will switch the faucet to waker tank usage, allowing the water to empty the tank via the SINK INSTRUCTIONS sink basin and exit out the exterior driver side port when in use. - Page 8 Simply set the cubes in the desired position and slide the table top COUNTER TOP LID COOLER CUBE TOILET between them. You can set a bed or a sitting area with this method. For all add-ons download the HC1 catalogue at happiercamper.com...
-
Page 9: Power Information
THE CONVERTER PANEL POWER INFORMATION The HC1 is equipped with 12-Volt DC (Direct Current) and shore power AC (Alternative Current) systems. The primary source of power is 12-Volt. It powers all components USB & DC PORT MAIN AC PORTS except the air conditioner and AC outlets. Shore power, or AC power, is electricity your HC1 receives when plugged into a campground electrical hookup, rather than from the trailer’s battery. -
Page 10: Air Conditioner
It runs off battery power and uses propane gas to generate heat. The interior space heats quickly and contains an insulation R value of 10. FIBERGLASS *For detailed operating instructions please refer to the manufacturer’s manual. For all add-ons download the HC1 catalogue at happiercamper.com... - Page 11 HIT THE ROAD...
-
Page 12: Vehicle Requirements
Ensure your side door, rear hatch, roof fan and windows are closed and locked HC1 BASE DRY = 1100 LBS MAKE SURE YOU HAVE A VEHICLE HC1 BASE = 1300 LBS THAT CAN TOW AT LEAST 1500 LBS. -
Page 13: Towing Instructions
The e-brake mechanism is located just under extra security). the tongue on the driver side. Ensure the black plastic e-brake “key” is plugged in before hauling your HC1. TAB HANDLE 2" BALL To ensure your emergency brakes don’t engage E-BRAKE... - Page 14 SECURING THE INSIDE TRAILER TIRES TIRES / AIR PRESSURE Ensure modular components are secured in place; use hardware when needed. Air pressure is the most important factor in determining tire life, and under-inflation is Do not open and close the hatch from the side as this may damage the gas lifts. the number one cause of trailer tire failure.
- Page 15 ONCE AT THE SITE SECURING THE CAMPER To help reduce the chance of theft make sure to pull the pin key from the tongue mid- point and place a heavy duty pad-lock. Store the pin inside your vehicle or place it in the swing back tongue receiver with the tongue in the fold-in position.
- Page 16 KEEP YOUR CAMPER HAPPY...
-
Page 17: Maintenance
Fiberglass should be maintained on a COMPLETE MAINTENANCE PROCEDURES, PLEASE CONTACT HAPPIER CAMPER. with marine-grade, UV-resistant regular basis. If the HC1 exposure to the WE ASSUME NO LIABILITY FOR INJURIES OR DAMAGES INCURRED AS A RESULT Sunbrella™ fabric. Simply unzip the elements is minimal, the fiberglass can OF IMPROPER, UNAUTHORIZED SERVICING. - Page 18 FINAL TIPS LEAVE NO TRACE CRITTER-PROOF YOUR CAMPSITE Leave your site as clean or cleaner To minimize the chance of encountering bears, raccoons, and other critters at than you found it. Anything you bring in you should take out with you. your campsite, pack food in odor proof bags or containers, use air tight bags OUTDOOR PROTECTION...
- Page 19 NOTES + SKETCHES NOTES + SKETCHES...
- Page 20 NOTES + SKETCHES NOTES + SKETCHES...
Need help?
Do you have a question about the HC1 and is the answer not in the manual?
Questions and answers