
Summary of Contents for Cowlacious Designs Scary Terry ST-400
- Page 1 Scary Terry’s Audio Servo Driver™ ST-400 Rev.1 Circuit Board Cowlacious Designs™ By Computer & Electronic Services...
- Page 2 Scary Terry has allowed us at Computer & Electronic Services to produce a Cowlacious Designs circuit board from his original design. Over the years we have changed it a little bit, but the main circuitry is still Terry’s! We thank...
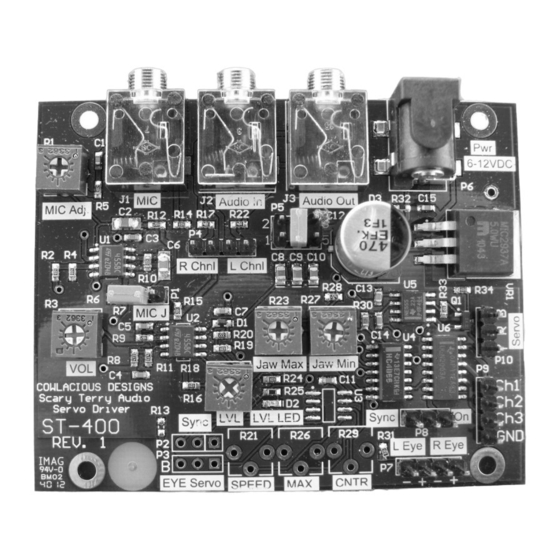
- Page 3 ST-400 Rev. 1 Overview Selects the Audio Channel(s) used for Line In Jack driving the servo. Line Out Jack Power Connector MiC Input (PC microphone) Power Indicator MIC Sensitivity Adjustment Response Time Adjustment Shorting this Header header sends MIC audio to circuit.
- Page 4 Testing and Adjustment (Note: Please see connection diagrams on the following pages.) Connect your servo to the servo header. Make sure you properly orient your servo connector with the header. The header is marked with “Y R B”, where Y is for Yellow, R is for Red or positive, and B is for Black or Negative.
- Page 5 PLEASE NOTE: Both channels of the audio are always passed on to the “Audio Out” jack. The “Audio Out” jack can connect to an external set of powered comput- er speakers, powered MP3 speakers, or it can feed the Aux or Line-In jack of an amplifier that has speakers connected to it.
- Page 6 Using A Microphone You can use a PC or headset type electret condenser microphone with this product to control the jaw move- ment. To use a mic: Make sure no audio cables are plugged into the Line In jack. ...
- Page 7 SUPPLIED DEVICES LED AUDIO EYES The L Eye & R Eye connections can be set so that the LED Eyes are always on or so that they flash with the audio. Setting the red shorting jumper of P7 across the middle pin and the “On” pin will make the eyes flash with the audio.
- Page 8 Special Thanks to Scary Terry (Terry Simmons) for letting us use his original design for this product! We hope you enjoy it! Computer & Electronic Services Cowlacious Designs 255 Distribution Dr. #203 Sparks, NV 89441 (775) 425-9151 www.cowlacious.com...
Need help?
Do you have a question about the Scary Terry ST-400 and is the answer not in the manual?
Questions and answers