Advertisement
Available languages
Available languages
Quick Links
Advertisement

Subscribe to Our Youtube Channel
Summary of Contents for Arobs Smailo Action Wi Fi Cam
- Page 2 Importator şi distribuitor AROBS Transilvania Software Cluj-Napoca, Str. Săpătorilor Nr. 5, T: 0364 730 907, F: 0264 598 426 info@smailo.ro, service@arobs.ro, www.arobs.ro, www.gps-auto.ro...
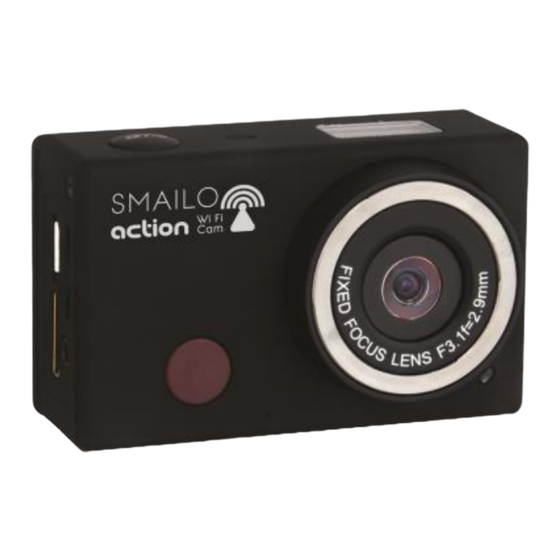
- Page 3 Vă mulţumim pentru alegerea acestui produs marca Smailo. Înainte de a începe să folosiți camera video Smailo, vă rugăm să citiți acest manual cu atenție pentru a maximiza performanțele și a prelungi durata de viață a produsului. Aspect și butoane...
- Page 4 Buton diafragmă 8. Port micro USB Microfon 9. Port mini HDMI Ecran LCD 10. Slot card micro SD Obiectiv 11. Microfon extern Comutator și indicator (roșu) Wi-Fi 12. Buton capac baterie Buton pornire/mod 13. Indicator LED Receptor semnal infraroșu...
- Page 5 Ilustrare ecran LCD Porniți camera Wi-FI, LCD-ul va afișa următoarea stare și următoarele setări: 1. Mod cameră foto 2. Mod înregistrare video (implicit) 3. Icoană Wi-Fi (afișată când este activat) 4. Icoană card TF (afișată când este încărcat)
- Page 6 5. Icoană rezoluție: În mod cameră foto, HI reprezintă 8 megapixeli (3264x2448), iar în mod înregistrare video, reprezintă FHD (1920x1080, 30fps); În mod cameră foto, LO reprezintă 5 megapixeli (2592x1920), a iar în mod înregistrare video, reprezintă 720P (1280x720, 30fps); HILO este afișat doar în modul înregistrare video, reprezentând 720P (1280x720, 60fps).
- Page 7 Schema logică a modurilor de funcționare După ce porniți camera, puteți apăsa butonul pornire/mod pentru a comuta, pe rând, între următoarele moduri: Mod video (720P, 60fps) Mod video (720P, 30fps) Mod previzualizare video (1080P implicit) Mod cameră foto (5MP) Mod cameră foto (8MP)
- Page 8 În modul video, apăsați butonul diafragmei pentru a începe înregistrarea, LED-ul pâlpâie, apoi apăsați-l din nou pentru a opri; În modul cameră foto, apăsați butonul diafragmei pentru a face poze. Utilizarea camerei Wi-Fi Când folosiți camera pentru prima oară, vă rugăm să: 1.
- Page 9 Este recomandată utilizarea unui card de mare viteză cel puțin de clasa 4. Când folosiți funcția de temporizare sau când faceți înregistrări video în mod profesional, este necesar un card clasa 10. Opriți camera înainte de a introduce sau a scoate cardul 2.
- Page 10 Pasul 1. Apăsați butonul capacului bateriei în poziția deblocat ( ), și îndepărtați capacul bateriei, conform figurii 1. Pasul 2. Introduceți bateria cu litiu în slotul bateriei. Asigurați-vă că electrozii bateriei corespund ), conform figurii 2 și figurii 3. cu simbolurile de pe carcasa camerei ( Pasul 3.
- Page 11 2.2 Încărcarea bateriei Camera utilizează o baterie cu litiu reîncărcabilă. Când camera este oprită, conectați-o la PC prin cablul USB pentru a reîncărca bateria. În timpul încărcării, indicatorul de stare (albastru) se va aprinde și se va stinge când încărcarea se încheie. Notă: Când camera este pornită, nu se va încărca atunci când este conectată...
- Page 12 1. Pornire: țineți apăsat butonul circa 3 secunde, LCD-ul afișează „ON” și se poate auzi un bip de la sonerie. 2. Oprire: țineți apăsat butonul circa 3 secunde, LCD-ul afișează „OFF” și se poate auzi un bip de la sonerie.
- Page 13 Notă: Camera se va opri automat dacă este inactivă timp de 5 minute. Începerea utilizării Setare implicită: După pornirea camerei, setarea implicită este cea de mai jos:...
- Page 14 Camera este în Icoana mod modul înregistrare video înregistrare video. Rezoluție video FHD: 1080p@30fps Durată de 0 ore și 00 minute. înregistrare Afișată când este introdus cardul TF. Nu este afișată când Icoană card TF nu este introdus.
- Page 15 Bateria este încărcată complet. Nivelul bateriei Camera este în modul Mut, nu se va auzi niciun bip la apăsarea butoanelor. Este afișată doar când modul Mut Icoana mut este activat. Afișată când modul este activat. Icoana Wi-Fi Moduri de fotografiere/filmare. Camera oferă diverse moduri de fotografiere/filmare. Apăsați în mod repetat;...
- Page 16 HI pentru video FHD (1920x1080, 30 fps) Video LO pentru video 720P (1280x720, 30 fps) HILO pentru video 720P (1280x720, 60 fps) HI pentru rezoluție 8M (3264 x 2448) Foto LO pentru rezoluție 5M (2592 x 1920) Camera suportă efectuarea a 3 fotografii în mod continuu Fotografiere continuă...
- Page 17 Video Pentru a efectua o înregistrare video, vă rugăm să verificați dacă aparatul este în modul Video. Dacă icoana nu este afișată pe ecran, apăsați butonul în mod repetat până când apare. Începerea înregistrării: Apăsați și eliberați și [:] afișate pe LCD vor pâlpâi. , icoana În același timp va pâlpâi și indicatorul roșu, însemnând că...
- Page 18 Când cardul TF este plin, sau când bateria este descărcată, înregistrarea se va opri automat, iar înregistrarea video va fi salvată înainte ca aparatul să se oprească. Foto Pentru a face o fotografie, vă rugăm să verificați dacă aparatul este în modul Cameră foto. Dacă...
- Page 19 3. Activare/dezactivare Wi-Fi Wi-Fi-ul este dezactivat implicit. Apăsați butonul Wi-Fi de pe partea laterală a camerei pentru a-l activa. Când începeți conectarea la o rețea Wi-Fi indicatorul va pâlpâi, când rețeaua este conectată, indicatorul va rămâne aprins, iar icoana Wi-Fi va fi afișată pe ecranul LCD. (Pentru a economisi energie, Wi-Fi-ul va fi dezactivat automat dacă...
- Page 20 4. Activarea/dezactivarea modului Mut Soneria este activată implicit. În modul Video sau Foto, țineți apăsat butonul diafragmei pentru a dezactiva soneria și indicatorul pentru a intra în modul Mut. În modul Mut, icoana va fi afișată pe ecran; țineți apăsat din nou butonul diafragmei pentru a ieși din modul Mut. Soneria este activată...
- Page 21 5. Conectarea la HDTV 5.1 Conectarea camerei la HDTV prin cablu HDMI (opțional) Dacă trebuie să transferați imaginea și sunetul la un HDTV pentru redare, introduceți capătul Com al cablului HDTV în cameră, iar celălalt capăt (ieșirea) la intrarea HD a HDTV-ului, conform figurii următoare:...
- Page 22 Notă: Înainte de a conecta sau a îndepărta cablul HDMI, vă rugăm să opriți înregistrarea, redarea și să deconectați mai întâi Wi-Fi-ul. 5.2 Când HDTV-ul este conectat, intră în modul Redare, iar LCD-ul afișează ca mai jos:...
- Page 23 Numele icoanei Descriere Mod Redare Acum în modul Redare. Număr fișier Sunt 31 de fișiere și îl vizionați pe al 19-lea. Fișierul este video. Icoana video În modul Redare, apăsați butonul pornire pentru a schimba între fotografii și clipuri. Când sunt mai multe fotografi și clipuri, apăsați butonul Wi-Fi pentru a selecta fotografia sau clipul.
- Page 24 În modul Redare, țineți apăsat butonul diafragmei . Va apărea un mesaj de ștergere a fișierului sau de formatare. Apăsați butonul Wi-Fi pentru a comuta între ștergere și formatare, apoi apăsați butonul pornire pentru a selecta Yes sau No și apăsați butonul pentru a confirma și ieși.
- Page 25 6. Conectarea la PC 6.1 Porniți camera și conectați-o la port-ul USB al PC-ului prin cablul USB atașat. Camera va intra în modul U-disk și LCD-ul va afișa următoarele după conectare: Acum puteți vizualiza fotografiile sau clipurile făcute cu camera, pe PC.
- Page 26 Notă: După ce camera se conectează la PC pentru intra în modul U-disk, veți vedea două unități de disc portabile afișate în My Computer în Windows. Una este cardul TF, care stochează toate fotografiile făcute și toate clipurile înregistrate de către utilizatori. Cealaltă stochează...
- Page 27 Acum puteți porni web cam-ul prin aplicație. Pentru a reveni la modul U-disk mode (modul PCU), apăsați din nou butonul din nou. Notă: Nu este necesar driver-ul pentru modul web cam (modul PCC) pe Windows XP (SP3) sau pe versiuni mai noi.
- Page 28 Aplicația telecomandă Buton oprire Butoane Port emitere semnal Buton video Buton foto...
- Page 29 Instrucțiuni Puteți folosi telecomanda pentru a înregistra clipuri, a face poze și a opri camera. Când folosiți telecomanda, îndreptați portul de emitere a semnalului către receptorul de semnal infraroșu al camerei și apăsați butonul video, butonul foto sau butonul de oprire. Receptor semnal infraroșu...
- Page 30 APP (suport Android și iOS) 1. Cum să instalați un APP 1.1 Căutați ”SYMAGIX” în Google Play (pentru Android OS), sau scanați codul QR tipărit pe cutie pentru a găsi APP-ul și instalați-l conform instrucțiunilor. 1.2 Căutați ”SYMAGIX” în APP Store (pentru iOS), sau scanați codul QR tipărit pe cutie pentru a găsi APP-ul și instalați-l conform instrucțiunilor.
- Page 31 2. APP Android 2.1 Instalați SYMAGIX APP (de la furnizor sau de pe internet) pe smartphone sau tabletă Android. Când instalarea este finalizată, LCD-ul va afișa icoana 2.2 Introduceți cardul TF și porniți camera, apoi apăsați butonul Wi-Fi pentru a-l activa. Acum puteți vedea icoana Wi-Fi pe LCD.
- Page 32 2.4. Dați click pe icoana în lista de app-uri a smartphone-ului sau tabletei Android pentru a o deschide. Puteți să previzualizați imaginea trimisă de cameră pe telefon sau tabletă și să începeți operarea. Interfața de operare pe terminal este redată în următoarea figură.
- Page 33 1. Rezoluție video 6. Mod foto 2. Balans alb 7. Mod video 8. Icoană semnal Wi-Fi 3. Setare (intrare în meniul de setare) 9. Icoană baterie cameră 4. Intrare în modul Redare 5. Butonul diafragmei 3. APP iOS 3.1 Instalați SYMAGIX APP (de la furnizor sau prin internet) pe telefonul sau tableta iOS. Când instalarea este finalizată, LCD-ul va afișa icoana...
- Page 34 3.2 Introduceți cardul TF și porniți camera, apoi apăsați butonul Wi-Fi pentru a-l activa. Puteți vedea icoana Wi-Fi pe LCD. 3.3 Activați Wi-Fi pe telefonul sau tableta iOS și căutați semnalul AP wireless SY5000_WIFI, apoi conectați-l la cameră până când sistemul arată ”Conectare reușită”. Notă: Prima dată...
- Page 35 1. Icoană baterie cameră 2. Rezoluție video 3. Balans alb 4. Setare (intrare în meniul de setare) 5. Intrare în modul Redare 6. Butonul diafragmei 7. Mod foto 8. Mod video...
- Page 36 Notă: 1. Trebuie introdus un card TF dacă doriți să faceți o fotografie, să înregistrați un film, sau să descărcați fișiere pe terminal; 2. Indicatorul Wi-Fi va rămâne pornit când terminalul este conectat la cameră. Aruncarea echipamentelor electrice şi electronice în reşedinţele private Acest simbol marcat pe produs, in manual sau pe certificatul de garantie si/sau pe ambalaj indica faptul ca acest produs nu trebuie tratat ca deseu menajer.
-
Page 37: Declaraţie De Conformitate
DECLARAŢIE DE CONFORMITATE Noi, SC. AROBS Transilvania Software SA, cu sediul social în Cluj-Napoca, Str. Donath nr. 11, Bl.M4/28, cu nr. de înmatriculare la Registrul Comerţului J12/1845/1998, CUI RO11291045 telefon 0264/406700, fax 0264/598426 asigurăm, declarăm, garantăm pe propria răspundere conform prevederilor art. 5 din HG nr. 1022/2002 privind regimul produselor şi serviciilor care pot pune în pericol viaţa, sănătatea, securitatea muncii şi protecţia mediului că... - Page 38 • Directiva 1999/5/CE amendată (Directiva privind armonizarea legislaţiei Statelor Membre referitoare la echipamentele radio şi echipamentele terminale de telecomunicaţii) • Directiva 2011/65/UE (Directiva privind restricţiile de utilizare a anumitor substanţe periculoase în echipamentele electrice şi electronice) • Directiva 2004/108/CE (Directiva EMC privind ajustarea legislaţiei Statelor Membre referitoare la compatibilitatea electromagnetică) •...
- Page 39 Conformitatea produsului cu cerinţele directivelor UE este atestată prin conformarea deplină cu următoarele standarde: EN 55022:2010+AC: 2011 EN 55024:2010 EN 61000-3-2:2006+A2:2009 EN 61000-3-3:2013 IEC 62321: 2008 IEC 62321-4:2013 IEC 62321-5:2013...
- Page 40 Raport de încercări nr. CTL1406181388 din 10.01.2014, emis de laboratorul Shenzen CTL Electromagnetic Technology Co., Ltd., Shenzen, China. Certificat de conformitate/certificat de examinare CE din 10.01.2014, emis de Shenzen CTL Electromagnetic Technology Co., Ltd., Shenzen, China. Locul şi data emiterii declaraţiei: Cluj-Napoca, 05.05.2015 Voicu Oprean Director General AROBS Transilvania Software...
-
Page 41: Conținutul Pachetului
CONȚINUTUL PACHETULUI Verificați conținutul pachetului cu această listă. Dacă ceva lipsește sau este defect, vă rugăm să nu utilizați dispozitivul și să informați furnizorul cât mai curând posibil. 1. Cameră video sport 2. Carcasă subacvatică 3. Suport auto cu ventuză 4. - Page 42 10. Certificat de garanţie Centru Service & Suport Smailo AROBS Transilvania Software, Str. Săpătorilor Nr 5, Cluj-Napoca Tel: 0364-730907 Email: service@arobs.ro...
- Page 44 Importer and distributor AROBS Transilvania Software Cluj-Napoca, Str. Săpătorilor Nr. 5, T: 0364 730 907, F: 0264 598 426 info@smailo.ro, service@arobs.ro, www.arobs.ro, www.smailo.ro...
- Page 45 Thank you for buying our Wi-Fi DVR. Before using this product, please read this manual carefully to maximize its performance and extend the life of the product. Appearance and Buttons...
- Page 46 Shutter button 8. Micro USB port Microphone 9. Mini HDMI port LCD display 10. Micro SD card slot Lens 11. External microphone Wi-Fi switch and status indicator (red) 12. Battery cover push switch Power / Mode button 13. LED light Infrared signal reception light...
- Page 47 LCD Display Illustration Turn on the Wi-Fi DV, the LCD will display the following status and settings: 1. Camera mode...
- Page 48 2. Video recording mode (default) 3. Wi-Fi icon (display when enabled) 4. TF card icon (display when loaded) 5. Resolution icon: In camera mode, HI stands for 8 Mega Pixels (3264x2448), and in video recording mode, it stands for FHD (1920x1080, 30fps); In camera mode, LO stands for 5 Mega Pixels (2592x1920), and in video recording mode, it stands for 720P (1280x720, 30fps);...
- Page 49 9. Battery icon: current battery level of the camera. Note: The above icons may vary according to the status of the DV. Working Mode Flow Chart After turn on the DV, you can press the Power/Mode button to switch the following modes in turn: Video mode (720P,30fps) Video preview mode (1080P default)
- Page 50 Camera mode (8MP) Camera mode (5MP) In video mode, press the Shutter button to start recording, LED flashes and press it again to stop; In camera mode, press the Shutter button to take photo. Use your Wi-Fi DVR When you use the DVR for the first time, please: 1.
- Page 51 High speed card at least Class 4 is recommended. When using time delay function or recording video in professional mode, a card of Class 10 is required. Turn off the DV before inserting or removing the card. 2. Use the battery 2.1 Install the battery.
- Page 52 Please install the lithium battery correctly as shown in the following graphic. Figure 1 Figure 2 Figure 3 Figure 4 Step 1. Push the battery cover switch to the lock position ( ), and remove the battery cover. As shown in figure 1. Step 2.
- Page 53 corresponding to the symbols of the DV shell ( ). As shown in figure 2 and figure 3. Step 3. Install the battery cover back in place, and lock the switch to the lock position ( fix the battery. As shown in figure 4. 2.2 Charging the battery.
- Page 54 button for about 3 seconds, LCD displays “ON” and a beep 1. Turn on: press and hold the can be heard from buzzer. button for about 3 seconds, LCD displays “OFF” and a beep 2. Turn off: press and hold the can be heard from buzzer.
- Page 55 Note: The DV will turn off automatically if it is idle for 5 minutes. Start to Use Default setting: After turn on the DV, the default setting is as below:...
- Page 56 The DV is Video recording in video mode icon recording mode.
- Page 57 Video resolution FHD: 1080p@30fps Recording time Stands for 0 hour and 00 minute. TF card icon Display when a TF card is inserted, otherwise no display. Battery level Battery is full...
- Page 58 The DV is in Mute mode, no Beep will be heard when Mute icon pressing the buttons. It displays only when Mute mode is activated. Wi-Fi icon Display when activated. Shooting modes The DV provides different shooting modes. Press the button repeatedly, the following first two modes will show on the DV screen, and other models display on the APP operation.
- Page 59 Lo stands for 720P (1280x720,30 fps) video HILO stands for 720P (1280x720,60 fps) video HI stands for 8M (3264 x 2448) resolution Photo Lo stands for 5M (2592 x 1920) resolution Continuous The DV supports taking 3 photos continuously (only via shot App) Self-timer...
- Page 60 Video To record a video, please check whether the DV is under Video mode. If the icon is not displayed on the screen, press the button repeatedly until it appears. Start recording: Press and release the button, the icon and [:] displayed in LCD will flash.
- Page 61 stopped. When the TF card is full, or the battery runs out, the recording will stop automatically, and the recorded video will be saved before the DV turns off. 2. Photo To take a photo, please check whether the DV is under Camera mode. If the icon is not displayed on the screen, press the button repeatedly until it appears.
- Page 62 3. Enable/disable Wi-Fi The Wi-Fi is disabled by default. Press the Wi-Fi button on the side of the DV to enable it. When starting connecting to Wi-Fi network, the indicator will flash, and when a Wi-Fi network is connected, the indicator will remain on, and the Wi-Fi icon will display on LCD screen.( In order to save power, Wi-Fi will be automatically disabled if no terminal is connected after 30 seconds) Wi-Fi is disabled by default.
- Page 63 4. Enable/disable Mute mode The buzzer is enabled by default. Under the Video or Photo mode, press and hold the Shutter button to disable the buzzer and indicator to enter Mute mode. Under Mute mode, the icon will display on the screen; press and hold the Shutter button again to exit Mute mode. Buzzer is enabled by default When Mute mode is enabled, the icon will display on LCD.
- Page 64 5. Connecting to HDTV 5.1 Connect the DV to HDTV via HDMI cable (optional) If you need to transfer the image and audio to an HDTV for playback, insert the Com end of the HDMI cable to the DV, and the other end (output) to the HD input of the HDTV, as shown in the following figure:...
- Page 65 Note: Before connecting or removing the HDMI cable, please stop video recording, playback and disconnect Wi-Fi first. 5.2 When HDTV is connected, it enters Playback mode, the LCD displays as below:...
- Page 66 Icon name Description Playback mode Under Playback mode currently. File number There are 31 files and you are viewing the 19 one. Video icon The file is a video. In Playback mode, press the Power button to switch between photos and videos. When there are several photos or videos, press the Wi-Fi button to select the photo or video.
- Page 67 In Playback mode, press and hold the Shutter button , a prompt of deleting the file or formatting will appear. Press the Wi-Fi button to switch between deleting or formatting,then Press the Power button to select Yes or No, and press the Shutter button to confirm and exit.
- Page 68 6. Connecting to PC 6.1 Turn on the DV and connect it to the USB port of the PC via the attached USB cable. The DV will enter U-disk mode and the LCD will display as below after connection:...
- Page 69 Now you can view the photos or videos taken by DV on PC. Note: After the DV connecting to PC to enter U-disk mode, you will see two removable disks displayed in My computer of Windows, one is the TF card, storing all the photos taken and video recorded by users;...
- Page 70 Now you can start the web cam through application. To return to U-disk mode (PCU mode), press button again. Note: Driver is not required for web cam mode (PCC mode) on Windows XP (SP3) version or above.
- Page 71 Remote Controller Application Buttons Power off button Signal emission port Video button Photo button...
- Page 72 Instruction You can use the remote controller to record videos, take photos and shut down the DV. When using the remote controller, aim the signal emission port to the infrared signal reception light of the DV, and press the video button, photo button or power off button. Infrared signal reception light...
- Page 73 APP (support Android and iOS) 1. How to install an APP 1.1 Search for ”SYMAGIX” in Google Play (for Android OS), or scan the QR code printed on the gift box to find the APP and install it according to the instruction. 1.2 Search for ”SYMAGIX”...
- Page 74 4. Android APP 2.1 Install SYMAGIX APP (provided by dealer or via internet) on Android smartphone or tablet. When installation completes, the LCD will display icon 2.2 Insert the TF card and turn on the DV, then press the Wi-Fi button to enable it. Now you can see the Wi-Fi icon on the LCD.
- Page 75 2.4 Click the icon in the App list of the Android smartphone or tablet to open it. Now you can preview the image sent by the DV on the phone or tablet and start some operating. The operation interface on terminal is shown in the following figure.
- Page 76 1. Video resolution 6. Photo mode 2. White balance 7. Video mode 3. Setup (enter setup menu) 8. Wi-Fi signal icon 4. Enter Playback mode 9. DV battery icon 5. Shutter button 3. iOS APP 3.1 Install SYMAGIX APP (provided by dealer or via internet) on iOS phone or tablet. When installation completes, the LCD will display icon...
- Page 77 3.2 Insert the TF card and turn on the DV, then press the Wi-Fi button to enable it. Now you can see the Wi-Fi icon on the LCD. 3.3 Enable Wi-Fi on iOS phone or tablet and search for wireless AP signal SY5000_WIFI, then connect it to DV, until the system displays “Connected successfully”.
- Page 78 1. DV battery icon 2. Video resolution 3. White balance 4. Setup (enter setup menu) 5. Enter Playback mode 6. Shutter button 7. Photo mode 8. Video mode...
- Page 79 Note: 1. A TF card must be inserted if you need to take a photo, record a video, or download files on the terminal. 2. The WiFi indicator will remain on when the terminal is connected to DV.
Need help?
Do you have a question about the Smailo Action Wi Fi Cam and is the answer not in the manual?
Questions and answers