Advertisement
Quick Links
Advertisement

Subscribe to Our Youtube Channel
Summary of Contents for gofanco Prophecy PRO-HDExtIP-CTRL
- Page 1 ® PRO-HDExtIP-CTRL Control box for PRO-HDExtIP User‘s Guide Made in Taiwan...
- Page 2 ® PRO-HDExtIP-CTRL Congratulations for owning a gofanco product. Our products aim to meet all your connectivity needs wherever you go. Have fun with our products! Please read this manual carefully before first use. If you need more information about our products, please visit www.gofanco.com.
- Page 3 ® PRO-HDExtIP-CTRL 1. Introduction The PRO-HDExtIP-CTRL Smart Controller for HDMI over IP series provides central management and real time monitoring over the IP based PRO-HDExtIP transmitters and receivers. With high expanda- bility, a single PRO-HDExtIP-CTRL can serve up to 1024 transmit- ters and unlimited receivers at once.
-
Page 4: Specifications
® PRO-HDExtIP-CTRL • Allows to create custom OSD • Watch-dog with self-recovery • Assigns the video sources for each display with account/pass- word submit • Supports video wall function 3. Specifications Item Description Technical Role of usage Smart Controller Input 1x RJ-45 1x HDMI Output... - Page 5 ® PRO-HDExtIP-CTRL 4. Package Contents • 1x PRO-HDExtIP-CTRL • 1x Rack-mounting ear set • 1x DC 5V power supply • 1x User Manual 5. Connection Diagram...
-
Page 6: Panel Description
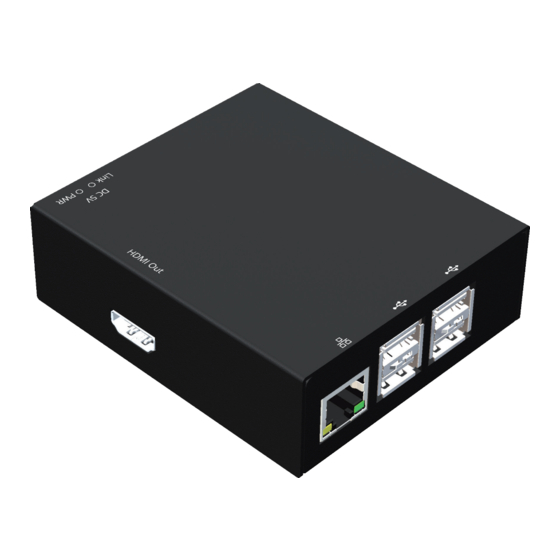
® PRO-HDExtIP-CTRL 6. Panel Description Front Panel Rear Panel 1. Output: HDMI output, it displays the information of controller 2. RJ-45: Ethernet control port 3. USB: Reserved 4. Activity LED indicator: When the storage device is being used, the light will blink 5. - Page 7 ® PRO-HDExtIP-CTRL 7. Operation Approach Installation Setup...
-
Page 8: Video Wall
® PRO-HDExtIP-CTRL Mapping On this Page, you can see runtime status of all TX/RX device in controller. The way to do input/output mapping is to drag TX icon to RX icon. It also provides 10 profile spaces to save the frequently used scenarios into the device. - Page 9 ® PRO-HDExtIP-CTRL Please note that, the TX /RXs selected into preview display much be rectangle layout. When you enable the video wall function, the corresponding TX and RX will be locked in the Matrix page until disable it in video wall page.
- Page 10 ® PRO-HDExtIP-CTRL Controller provides 8 custom OSD windows for users to input the texts or images to be shown with the video. User can click the button to adjust the image, message text, transparency, posi- tion, color and size. After setting, please drag the OSD window to RX window which you want to show the desired text or image.
- Page 11 ® PRO-HDExtIP-CTRL Schedule User can schedule the operation for video and power. Just click button to setup the time, type and action. Event User can set up the condition of trigger point in advance. Event happens, then controller will take action for self-recovery, real-time notification and alert.
- Page 12 ® PRO-HDExtIP-CTRL Setup After connecting the HDMI over IP transmitter and receiver units to the Router/Ethernet Hub, the controller will automatically add the device into the control system. You can click the blink LED button to search corresponding transmitter/receiver device.
- Page 13 ® PRO-HDExtIP-CTRL For more information and advanced setting, please go into here.
- Page 14 ® PRO-HDExtIP-CTRL This page contain a text log of your system operation history.
- Page 15 ® PRO-HDExtIP-CTRL Disclaimer The product name and brand name may be registered trademarks of related manufacturers. TM and ® may be omitted on the user‘s guide. The pictures on the user‘s guide are just for reference, and there may be some slight differences with the actual products. We reserve the rights to make changes without prior notice to a product or system described herein to improve reliability, function, or design.
- Page 16 ® Thank you for choosing gofanco www.gofanco.com Jun, 2019 Ver. A Copyright © by gofanco, LLC. All rights reserved.
Need help?
Do you have a question about the Prophecy PRO-HDExtIP-CTRL and is the answer not in the manual?
Questions and answers