Table of Contents
Advertisement
Quick Links
Advertisement
Table of Contents

Related Manuals for Vizualogic Omni 8 RSE

Summary of Contents for Vizualogic Omni 8 RSE
- Page 1 Rear Seat Entertainment System Owner’s Manual Pg 1...
-
Page 2: Table Of Contents
Table of Contents Chapter 1 Welcome Pg 5 Chapter 2 Rear Seat Entertainment System Description Pg 6 ◦ HDMI Input ◦ USB 2.0 ◦ Headphone Jack ◦ Eject Button ◦ DVD Slot ◦ Tablet Release Button Chapter 3 Pg 7 RSE Overview ◦... - Page 3 Table of Contents Chapter 10 RSE - How to Use the FM Transmitter Pg 19 ◦ FM Transmitter Chapter 11 RSE - How to Connect to Wi-Fi ◦ Wi-Fi Pg 20-21 Chapter 12 RSE - How to Connect to Bluetooth Devices ◦...
- Page 4 Table of Contents Chapter 19 Tablet - Downloading apps to your Device ◦ Pg 33 Download Apps from the Google Play Store Chapter 20 Tablet - How to Connect to Wi-Fi Pg 34-35 ◦ Wi-Fi Chapter 21 Tablet - How to Connect to a Hotspot Pg 36 ◦...
-
Page 5: Welcome
Chapter 1 Welcome Congratulations on your purchase of the Vizualogic Omni 8 RSE Tablet. In just a few minutes, you’ll be ready to watch your favorite movies, games, and streaming content. Tablet Accessories Your Rear Seat Entertainment Tablet package should include these items:... -
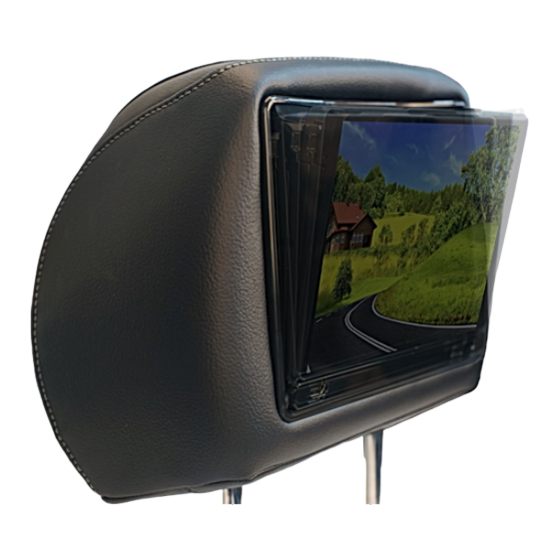
Page 6: Rear Seat Entertainment System Description
Chapter 2 Rear Seat Entertainment System Description Vizualogic Headrest 1. HDMI Input 4. Eject Button Plug in any standard Type A HDMI peripheral. Press to eject the DVD. Note: Tablet must be powered and docked for eject 2. USB 2.0 button to work. -
Page 7: Tablet Release Button
Chapter 3 RSE - Overview 1. Power Button 6. DVD Eject Button 2. Tablet Release Button 7. HDMI Input 3. Volume Control 8. USB 2.0 4. Tablet Pull Tab 9. Headphone Jack 5. Front Facing Camera Pg 7... -
Page 8: Rse Knowing Your System
Chapter 4 RSE - Knowing your System DOCK AND UNDOCK THE TABLET. 1. To open the dock, use the pull tab, with 2 fingers to pull the tray forward. (Fig. 1) 2. Slide the tablet into the tray, insuring the tablet dock connectors are on the bottom. 3. - Page 9 Chapter 4 RSE - Knowing your System 4. To open the dock, use the pull tab, with 2 fingers, pull the tray forward. (Fig. 3) 5. Push the tablet release button until the lock disengages. (Fig. 3) 6. Pull the tablet straight up from the dock tray. (Fig. 4) Tablet Release Button Pull Tab Fig.
-
Page 10: Rse - How To Navigate The Home Screen
Chapter 5 RSE - How to Navigate the Home Screen Tablet Docked Mode. 1. Navigation bar: Volume Down Adjust volume down Back: Return to previous screen Home: Return to the main Home screen Recent apps: Open/Close recent apps Volume Up: Adjust volume up 2. -
Page 11: Games Folder
Chapter 5 RSE - How to Navigate the Home Screen Games Folder. 1. Press the app icon on the home screen. (Fig.5) All the available apps should now be visible. 2. Find the app you wish to move. 3. Press and hold the app icon. (Fig.6) Fig.6 All Apps Fig.5... - Page 12 Chapter 5 RSE - How to Navigate the Home Screen 4. While your finger is holding down the icon, the home screen will appear. (Fig.7) 5. Move your finger over the Games icon and release your finger. (Fig.8) The app will now be located in the Games folder. Note: The folder can be filled with as many APPS until the screen is full.
-
Page 13: Rse - How To Play A Dvd Movie
Chapter: 6 RSE - How to Play a DVD Movie DVD PLAYER. 1. Insert the DVD with label facing the rear of the vehicle into the DVD slot located behind the tablet. See page 6 for DVD slot. 2. Once the DVD is inserted, open the DVD app located on the main home screen. (Fig.9) 3. - Page 14 Chapter 6 RSE - How to Play a DVD Movie 5. Press the exit DVD menu located at the top right corner, to show the DVD menu. (Fig.11) 6. Press the play icon on the DVD menu to play the DVD. (Fig.12) Fig.11 Home Screen Fig.12...
- Page 15 Chapter 6 RSE - How to Play a DVD Movie 7. While the DVD is playing, the following functions can be controlled using the touch screen: Slide bar: touch anywhere on the bar to advance the movie. (Fig.13) Note: This function may not work on all DVD’s. Forward Arrow: this allows to forward to the next DVD track.
-
Page 16: Rse - How To Setup Dvd
Chapter: 7 RSE - How to Setup DVD DVD PREFERENCES MENU. To access the menu, press the small 3 square dots located in the upper right corner. (Fig.15) Note: Preferences menu can only be activated when the DVD is stopped. Loudness Boost: increases the audio for SmartDVD. -
Page 17: Rse - How To Use The Wireless Headphones
Chapter: 8 RSE - How to Use the Wireless Headphones WIRELESS HEADPHONES 1. When the tablet is removed from the dock the IR channel indicator is located in the bottom right corner. a. Locate the A/B OFF switch on the wireless headphones. b. -
Page 18: Rse - How To Use The Screen Share
Chapter: 9 RSE - How to Use the Screen Share SCREEN SHARING. 1. Each tablet has the ability to view its own source and the opposite tablet’s source simply by pressing the Share Screen app located on the bottom right of the tablet’s screen. (Fig.17) Note: Only one tablet Share Screen app can be used at one time. -
Page 19: Fm Transmitter
Chapter: 10 RSE - How to Use the FM Transmitter FM TRANSMITTER. 1. To access the FM Transmitter, open the apps menu from the home screen. (Fig.18) 2. Press the FM Transmitter icon. (Fig.19) 3. To power on the FM Transmitter, press the Power icon, the icon should highlight green.(Fig.20) 4. -
Page 20: Rse - How To Connect To Wi-Fi
Chapter 11 RSE - How to Connect to Wi-Fi WI-FI. Each tablet scans automatically for available Wi-Fi networks and connects to known networks when within range. Android provides several options for connecting to Wi-Fi where this section describes the most common. 1. - Page 21 Chapter 11 How to Connect to Wi-Fi 4. In the Wi-Fi control panel, select the network to connect to. (Fig.25) 5. Enter the password and tap Connect. (Fig.26) Note: The Wi-Fi control panel displays the wireless networks within range, their signal strength, and any wireless networks the tablet has connected previously.
-
Page 22: Rse - How To Connect To Bluetooth Devices
Chapter: 12 RSE - How to Connect to Bluetooth Devices BLUETOOTH CONNECTION 1. To turn on the bluetooth, go to the home page. 2. Press the Settings icon. (Fig 27) 3. Press the Bluetooth icon. (Fig 28) 4. Press the ON/OFF icon to switch the bluetooth to on. (Fig 29) 5. -
Page 23: Tablet - Overview
Chapter 13 Tablet - Overview FRONT VIEW 1. Front Facing Camera Back 2. Notifications Bar Home 3. Touch Screen View Open APPS 4. APPS (applications) Volume Down (swipe up) Volume Up 5. Navigation Bar Pg 23... -
Page 24: Back View
Chapter 13 Tablet - Overview BACK VIEW 1. Power / Sleep Button 5. Micro SD Card Slot 2. Volume 6. Speaker 3. Rear Facing Camera 7. USB C Charge/Data Port 4. Headphone Jack(3.5mm) 8. USB C Charge/HDMI Port Pg 24... -
Page 25: Power / Volume Button
Chapter 13 Tablet - Overview POWER BUTTON The power button will power the tablet on, off, or put the tablet into sleep mode. Sleep mode is a power saving mode that disables certain functions; namely, the screen. Your tablet will still play music, and remain ready to use with a simple press of the power button. Power Your Tablet ON •... -
Page 26: Micro Sd Card Slot
Chapter 13 Tablet - Overview MICRO SD CARD SLOT Your tablet will accept a micro SD card up to 256GB. Connecting a Micro SD Card • Insert a micro SD card into the Micro SD card slot located on the left bottom corner. •... -
Page 27: Tablet - Connecting Your Device
Chapter 14 Tablet - Connecting your Device USB CONNECTIONS Transferring files with a PC • Unlock your Android device. • Connect the USB-C data port of your tablet to the USB C cable, and the USB side to your computer. •... -
Page 28: Charging The Battery
Chapter 14 Tablet - Connecting your device CHARGING THE BATTERY Charge the Battery with the provided USB-C to USB cable. USB C USB C Bottom of tablet Back of tablet To USB charging port Pg 28 USB-C USB-C... -
Page 29: Tablet - Controlling Your Device
Chapter 15 Tablet - Controlling your device GESTURE CONTROL The screen on your Omni 8 tablet is capable of accepting up to five points of contact at once. By using these simple hand gestures, you can interact with the tablet and its various functions. Tap / Hold / Rotate Swipe Hold &... -
Page 30: Tablet - Screen Rotation
Chapter 16 Tablet - Screen Rotation SCREEN ORIENTATION Your tablet will automatically adjust from portrait to landscape mode as you rotate the tablet. You can disable this feature by dragging the Quick Settings tab down from the top right of the screen Auto-Rotate. -
Page 31: Tablet - Unlocking / Locking Your Device
Chapter 17 Tablet - Unlocking / Locking your Device LOCK SCREEN & SECURITY Disable the lock screen by dragging up anywhere on the screen. If you want to make your tablet more secure you can choose from several different options by going to Settings >... -
Page 32: Tablet - Updates / Adding Apps To Your Device
Chapter 18 Tablet - Updates / Adding apps to your Device ANDROID OS UPDATES Over the air updates (OTA) for the operating system contain improvements such as fixes, security enhancements, and other new features to improve your user experience. It is recommended to check for updates regularly and run the most current version of the software. -
Page 33: Tablet - Downloading Apps To Your Device
Chapter 19 Tablet - Downloading apps to your Device DOWNLOAD apps FROM GOOGLE PLAY STORE 1. Open Google Play. • On your tablet, use the Play Store app. • Applicable fees may apply. 2. Find an app you’re looking for. 3. -
Page 34: Tablet - How To Connect To Wi-Fi
Chapter: 20 Tablet - How to Connect to Wi-Fi Wi-Fi. Each tablet scans automatically for available Wi-Fi networks and connects to known networks when within range. Android provides several options for connecting to Wi-Fi where this section describes the most common. 1. - Page 35 Chapter 20 Tablet - How to Connect to Wi-Fi 5. In the Wi-Fi control panel, select the network to connect to. (Fig.4) 6. Enter the password and press Connect. (Fig.5) Note: The Wi-Fi control panel displays the wireless networks within range, their signal strength, and any wireless networks the tablet has connected previously.
-
Page 36: Tablet - How To Connect To A Hotspot
Chapter 21 Tablet - How to Connect to a Hotspot Connect to a Wi-Fi Hotspot Turn on your mobile hotspot 1. Open your phone’s settings app. 2. Press Network & Internet > Hotspot & tethering. 3. Press Wi-Fi hotspot. 4. Turn on Wi-Fi hotspot. 5. -
Page 37: Tablet - How To Connect To Bluetooth Devices
Chapter 22 Tablet - How to Connect to Bluetooth Devices Bluetooth Connection 1. Swipe up on the bottom right side of the Home screen to access the apps page. (Fig.34) 2. Press the Settings icon. (Fig 35) 3. Press the Bluetooth icon. (Fig 36) 4. -
Page 38: Tablet - Browsing The Internet
Chapter 23 Tablet - Browsing the Internet GOOGLE SEARCH • Use the Google Search Bar for web searches. Use the tablet’s keyboard to enter your search word and begin searching the web. Google Search Bar Google Search Screen Pg 38... -
Page 39: Tablet - Camera Functions
Chapter 24 Tablet - Camera Functions PICTURES, VIDEO & GALLERY Your tablet is equipped with front and rear facing cameras for capturing images and video. Taking Pictures • Press the icon from the apps menu or Home Screen. • When you are ready, press to capture the image. -
Page 40: Specifications
Specifications Hardware & Features • Android 9 Pie™ • Hexa core (Dual-core Cortex-A72 up to 1.8GHz, Quad-core Cortex A53 up to 1.4GHz) processor • Built-in 4GB RAM • 16GB minimum flash memory • 8” TFT LCD display: 1200 x 1920 resolution •... -
Page 41: Warnings & Precautions
Warnings & Precautions Important Safety Instructions • Read these instructions. • Keep these instructions. • Heed all warnings. • Follow all instructions. • Do not use this device near water. • Clean only with a dry soft cloth. • Do not block any ventilation openings. Install in accordance with the manufacturer’s instructions. •... - Page 42 Warnings & Precautions FCC Caution This device complies with part 15 of the FCC Rules. Operate is subject to the following two conditions: (1) This device may not cause harmful interference, and (2) this device must accept any interference received, including interference that may cause undesired operation.
- Page 43 Warnings & Precautions Additional Warnings • WARNING: To reduce the risk of fire or electric shock, do not expose this apparatus to rain, moisture, dripping, or splashing. • WARNING: Changes or modifications to this unit not expressly approved by the party responsible for compliance could void the user’s authority to operate the equipment.
-
Page 44: Customer Support
Customer Support Contact Information • Website: www.vizualogicdirect.com • Email Support: cs@vizualogicdirect.com • Phone Support: 1-800-595-7571 Warranty Information For Warranty Information and the most up-to-date version of this User’s Guide, go to: www.vizualogicdirect.com PN: 700-0009 Pg 44 QP: 09-384 Rev.1...
Need help?
Do you have a question about the Omni 8 RSE and is the answer not in the manual?
Questions and answers
Can you buy a replacement screen for omni8 RSE rear entertainment system? Is this a ford product that I could order from ford dealership?