
Related Manuals for Rockville ROCKFORCE W4

Summary of Contents for Rockville ROCKFORCE W4
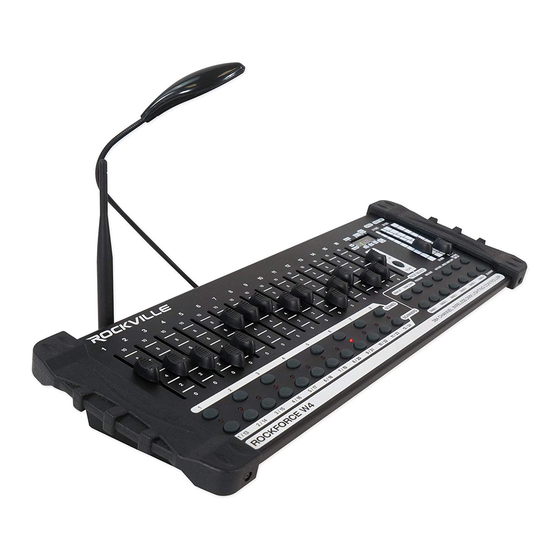
- Page 1 OWNER’S MANUAL ROCKFORCE W4 384 CHANNEL WIRELESS DMX LIGHTING CONTROLLER + MIDI CONTROL...
- Page 2 Thank you for purchasing this Rockville ROCKFORCE W4 384 Channel Wireless DMX Lighting Controller + MIDI Control. Please read this guide carefully for proper use of your Rockville ROCKFORCE W4. Should you need technical assistance, please call our technical help line at 1-646-758-0144, Monday through Friday, 9am to 5pm EST.
-
Page 3: Functions: Front Panel
Functions: Front Panel 3 4 5 384 CHANNEL WIRELESS DMX LIGHTING CONTROLLER 1. Channel Faders: For adjusting DMX values. Channels 1 – 6 can be adjusted immediately after pressing the respective scanner select button. 2. Scan Select Button: In manual mode, press to toggle between scan levels: 1 –... -
Page 4: Rear Panel
12. MIDI/ADD: MIDI: Turns MIDI mode on/off and selects the MIDI address. ADD: In program mode pushing the MIDI/ADD button will record a chase step or scene setting on the display showing when music trigger mode is active. 13. Program: Used to place the unit in programming mode to create /record scenes and chases. - Page 5 1. Power on the ROCKFORCE W4 and then power up your wireless reciever(s). 2. Now turn on the Wireless ID feature on the ROCKFORCE W4 (item 7 on the previous page). The LED will begin to ash red indicating that the unit is in par- ing mode.
-
Page 6: Dmx Connections
Fixture Channel Assignments The controller is programmed to control 32 channels of DMX per xture, there- fore the xtures you wish to control with the corresponding SCANNER buttons on the unit, must be spaced 16 channels apart. BINARY DIP SWITCH BINARY DIP SWITCH DEFAULT DMX DEFAULT DMX... -
Page 7: Xlr Connection
Channels should never overlap. If they do, this will result in erratic operation of the xtures whose starting address is set incorrectly. You can however, control- multiple xtures of the same type using the same starting address as long as the intended result is that of uniform movement or operation. - Page 8 DATA - and DATA + wires. The connections are illustrated below. If you are only connecting a few xtures which are close together and use a short run to the controller, you maybe able to operate without a terminator. DMX Termination Diagram 120 Ohm PIN 2 PIN 3...
-
Page 9: Pan And Tilt Channels
Pan and Tilt Channels Because not all intelligent lighting xtures are alike or share the same control attributes, the controller allows the user to assign the wheel the correct pan and tilt channel for every individual xture. All pan/tilt settings can be reassigned to output on a different DMX channel. -
Page 10: Recording A Scene
Recording a Scene 1. Position the SPEED and FADE TIME sliders all the way down. 2. Select the SCANNERS you wish to include in your scene. 3. Adjust the appropriate faders to set the desired output level for each channel. 4. -
Page 11: Programming Chases
Copy a Scene You can copy the contents of a scene to another scene in the same or different bank. 1. Use BANK UP or BANK DOWN to select the bank from which you wish to copy a scene. 2. Select desired scene within the bank by pushing it’s SCENES button, 1 – 8. 3. -
Page 12: Record A Chase
step can utilize any scene in any bank. Any scene can be used in multiple chase steps and multiple chases. Record a Chase 1. Select a chase, 1 – 6, by pressing the corresponding CHASE button. 2. Select the scene bank which contains the scene to be used for the chase step using BANK UP or BANK DOWN. -
Page 13: Delete A Complete Chase
3. Keep holding down the buttons until all LEDs ash indicating that the chases have been cleared. Operating Scenes When the ROCKFORCE W4 is turned on, it defaults to manual scene mode with bank 1, scene 1 active. Manual Mode The manual mode allows direct control of all scanners. - Page 14 Chase Review: 1. Select any one of the 6 CHASE buttons. 2. Press the TAPSYNC/DISPLAY button to view the step number on the display. 3. Press the BANK UP/BANK DOWN buttons to review all the scenes in a chase. Run a Bank of Scenes Automatically The scene Auto-Run function will continuously cycle through a bank of scenes.
- Page 15 The controller will only respond to MIDI commands on the MIDI channel which is set to full stop. The ROCKFORCE W4 uses MIDI “Note on” commands to execute scene and chase function. All other MIDI instructions are ignored. You may have to use a MIDI keyboard to send the correct notes.
-
Page 16: Dmx Dip Switch Quick Reference Chart
MIDI NOTE FUNCTION 64 – 71 Bank 9 Scenes 1 – 8 ON/OFF 72 – 79 Bank 10 Scenes 1 – 8 ON/OFF 80 – 87 Bank 11 Scenes 1 – 8 ON/OFF 88 – 95 Bank 12 Scenes 1 – 8 ON/OFF 96 –... -
Page 17: Features And Specifications
Features and Specifications • ROCKFORCE W4 384 Channel Wireless DMX Lighting Controller + MIDI Controls • Built in wireless DMX transmitter and antenna • Model DMX-WRE receiver is compatible with this unit (available at RockvilleAudio.com) • This is also compatible with all of our wireless DMX lights •... -
Page 18: Glossary Of Common Terms
• Makes it easy to set up all of your lights without a mess of wires! • Controls work without any delay. These are extremely reliable • The product uses the 2.4GHz frequency band • Ef cient GFSK modulation with 126 channel high-speed frequency hopping (FHSS). - Page 19 Entrance A, Inwood, NY 11096 Hereby declares that the product(s) Rockville ROCKFORCE W4 384 Channel Wireless DMX Lighting Controller + MIDI complies with FCC rules as mentioned in the following paragraph: This device complies with Part 15 of the FCC rules. Operation is subject to the following two conditions: (1) this device may not cause harmful interference, and (2) this device must accept any interference received, including interference that may cause undesired operation.
- Page 20 RockvilleAudio.com © 2019 ROCKVILLE // Features and specifications are subject to change and or improvement without notice.
Need help?
Do you have a question about the ROCKFORCE W4 and is the answer not in the manual?
Questions and answers