Table of Contents
Advertisement
Quick Links
Advertisement
Table of Contents

Subscribe to Our Youtube Channel
Related Manuals for Currys Essentials C1DVDB12

Summary of Contents for Currys Essentials C1DVDB12
- Page 1 INSTRUCTION MANUAL COMPACT DVD PLAYER C1DVDB12...
-
Page 3: Table Of Contents
Contents Safety Warnings ............................. 5 Unpacking .............................. 7 Product Overview ..........................8 Front Panel ...................................8 Rear Panel .....................................8 Remote Control ..................................9 Battery Installation for the Remote Control ......................11 Remote Control Operation Range ..........................11 Connections ............................12 Audio / Video Connections ............................12 Connecting to the Mains Socket ..........................13 Compatible Disc Types ........................14 Supported Formats ................................14... - Page 4 Image Rotation ................................20 Zoom ....................................20 Slide-show Effect ................................20 Customising the General Settings......................21 Customising the Audio Settings ......................22 Customising Dolby Settings .......................22 Customising the Video Settings ......................23 Customising Preference Settings .......................23 Maintenance ............................25 Cleaning the unit ................................25 Handling Discs .................................25 Cleaning Discs ..................................25 Storing Discs ..................................25 Hints and Tips ............................26 Specifications ............................27...
-
Page 5: Safety Warnings
Safety Warnings Ventilation • Read all the instructions carefully before using the unit and keep them for future • To prevent the risk of electric shock or reference. fire hazard due to overheating, ensure • Retain the manual. If you pass the unit that curtains and other materials do not onto a third party make sure to include this obstruct the ventilation vents. - Page 6 Service hours and can lead to death. • Keep new and used battery away from • To reduce the risk of electric shock, do not children. remove screws. The unit does not contain any user-serviceable parts. Please leave all • If the battery compartment does not close maintenance work to qualified personnel.
-
Page 7: Unpacking
Thank you for purchasing your new DVD Player. We recommend that you spend some time reading this instruction manual in order that you fully understand all the operational features it offers. You will also find some hints and tips to help you resolve any issues. -
Page 8: Product Overview
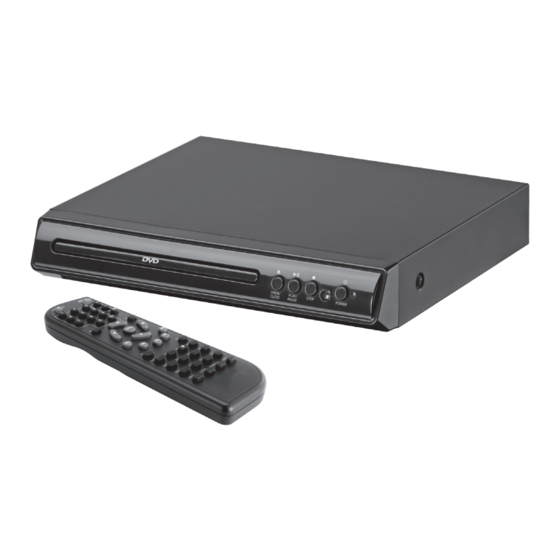
Product Overview Front Panel OPEN/ PLAY/ STOP POWER CLOSE PAUSE 1. Disc Tray 5. Remote Control Sensor Load a disc into the disc drive. 6. POWER button 2. OPEN/CLOSE button Switches the unit between the ON and STANDBY modes. Opens or closes the disc tray. 7. -
Page 9: Remote Control
Remote Control 1. OPEN/CLOSE Button Opens or closes the DVD disc tray. 2. 0–9, 10+ Button Selects the numeric items in a menu. 3. MENU Button Enters or exits the disc contents menu. 4. ENTER Button Confirms the selection on a menu screen. - Page 10 17. POWER Button Switches the unit between the ON and STANDBY modes. 18. VOLUME +/– Button Increases and decreases the volume. 19. MUTE Button Silences the unit or restores the sound. 20. SETUP Button Displays the Setup Menu of the DVD player.
-
Page 11: Battery Installation For The Remote Control
Battery Installation for the Remote Control 1. Press and lift the back cover up to open the battery compartment of the remote control. 2. Insert two AAA size batteries. Make sure the battery match those shown in the (+) and (–) ends of the battery compartment. -
Page 12: Connections
Connections Audio / Video Connections Television SCART Cable (not included) AV Cable (included) VIDEO SCART OUTPUT AUDIO OUT VIDEO OUT Audio Cable (not included) Stereo System 1. Connecting to a TV with a SCART Cable Use a SCART cable (not supplied) to connect the DVD player’s SCART OUTPUT to the TV’s SCART IN. -
Page 13: Connecting To The Mains Socket
If your DVD player will not be connected to a stereo system or an AV receiver, a SCART connection is sufficient for both audio and video connections between your DVD player and TV. 2. Connecting to a TV with an AV Cable Use audio/video cables (supplied) to connect between the DVD player’s AUDIO/VIDEO OUT and the TV’s AUDIO/VIDEO IN. -
Page 14: Compatible Disc Types
Compatible Disc Types Disc Types Disc Logo Recorded Content DVD-VIDEO (Digital Versatile Disc) AUDIO + VIDEO DVD±RW (Audio/Video format or JPEG files) AUDIO + VIDEO + JPEG DVD+ReWritable DVD±R (DVD Recordable - Audio/Video format or AUDIO + VIDEO + JPEG JPEG files) DVD+R CD-R (CD Recordable - Audio/Video format or... -
Page 15: Powering On/Off
Powering ON/OFF Connect the mains plug to the mains socket. The unit will start in STANDBY mode and the LED Indicator will be red. • Press the POWER button on the unit or the remote control to switch the unit on. The LED indicator will light up green. -
Page 16: Setup
Setup Press the SETUP button on the remote control to display the DVD player setup menu. Pause Playback Press the PLAY/PAUSE button to pause/resume playback. Stop Playback 1. Press the STOP button to go to pre-stop mode, the TV screen will display “Press Play Key To Continue”. -
Page 17: Slow
Slow 1. Press the SLOW button on the remote control when a DVD is playing to enter slow playback. Each time you press the SLOW button on the remote control, the playback speed changes in the following sequence: 1/2, 1/4, 1/8 and 1/16. -
Page 18: A-B Repeat
A-B Repeat Repeat a section between points A and B within a Title / Chapter / Track. 1. Press the A-B button to choose a starting point A. 2. Press the A-B button again to set an ending point B and complete the setting. The selected section A-B will be repeated. -
Page 19: Pal / Ntsc
PAL / NTSC Press the N/P button to switch among PAL, NTSC and AUTO. Aspect Ratio Press the WIDE button to switch the aspect ratio on TV screen size. Clear Press the CLEAR button during information input to cancel the previous input. Menu Press the MENU button to return to the DVD main menu. -
Page 20: Jpeg Disc Playback
JPEG Disc Playback When a JPEG disc is inserted into the DVD player, the slide show will be automatically start. Press the STOP button to enter the navigation menu. buttons to select a file, then press the PLAY/PAUSE • In the menu, use the button to start the slide show. -
Page 21: Customising The General Settings
Customising the General Settings 1. During Stop mode. Press the SETUP button General Audio Dolby Video Preference to display the setup menu. - - General Setup Page - - TV Display Wide buttons to select General 2. Press the Angle Mark OSD Lang Setup Page. -
Page 22: Customising The Audio Settings
Customising the Audio Settings 1. During Stop mode. Press the SETUP button General Audio Dolby Video Preference to display the setup menu. - - Speaker Setup Page - - Downmix buttons to select Speaker 2. Press the Setup Page. 3. Press the buttons to select the following options, then press the ENTER Go To Speaker Setup Page... -
Page 23: Customising The Video Settings
Customising the Video Settings 1. During Stop mode. Press the SETUP button General Audio Dolby Video Preference to display the setup menu. - - Video Setup Page - - Output Mode buttons to select Video 2. Press the Setup Page. 3. - Page 24 Parental This feature allows you to block disc playback with specific ratings. The rating levels are from 1 to 8 and are country dependent. You can prohibit the playing of certain discs that are not suitable for your children, or you can have certain discs played with alternative scenes.
-
Page 25: Maintenance
Maintenance Cleaning the unit Ensure the unit is fully unplugged from the mains socket before cleaning. • To clean the unit, wipe the case with a slightly moist, lint-free cloth. • Do not use any cleaning fluids containing alcohol, ammonia or abrasives. • Do not spray an aerosol at or near the unit Handling Discs • Do not touch the playback side of the disc. -
Page 26: Hints And Tips
Hints and Tips If a problem does occur, it may often be due to something very minor. The following table contains some tips. Problem Solution No power. • Make sure the mains socket has power. • Make sure that the unit is turned on. The remote control does • Use the remote near the unit. -
Page 27: Specifications
Picture freezes • Check the disc for fingerprint or scratches, and clean with momentarily during a soft cloth wiping from centre to edge. playback. Specifications Model C1DVDB12 Power Main Unit AC 110-240 V~ 50/60 Hz Power Consumption 10 W Feature... - Page 28 For more information about where you can drop off your waste for recycling, please contact your local authority, or where you purchased your product. All trademarks are the property of their respective owners and all rights are acknowledged. DSG Retail Ltd. (co. no. 504877) 1 Portal Way, London, W3 6RS, UK IB-C1DVDB12-160127V4...
Need help?
Do you have a question about the C1DVDB12 and is the answer not in the manual?
Questions and answers