Table of Contents
Advertisement
Quick Links
Advertisement
Table of Contents

Summary of Contents for Suhr microMIDI Control
- Page 1 User Guide...
-
Page 2: Table Of Contents
Table of Contents Overview � � � � � � � � � � � � � � � � � � � � � � � � � � � � � � � � � � � � � � � � � � � � � � � � � � � � 3 Uses &... -
Page 3: Overview
Change commands and has the ability for momentary, latching, pulse switching, and predetermined combinations of the two switches� The microMIDI Control is the smallest of it's kind available today, making it easy to add to a pedalboard or hidden behind an amplifier. -
Page 4: Uses & Features
The Suhr microMIDI can be used in many ways. Here is a short list of possible uses and features. Uses & Features • Silent and reliable MIDI controllable footswitch replacement for Amps, pedals, and other devices� • Optically isolated, preventing ground loops in systems whose switch control jacks aren't isolated from the switcher�... -
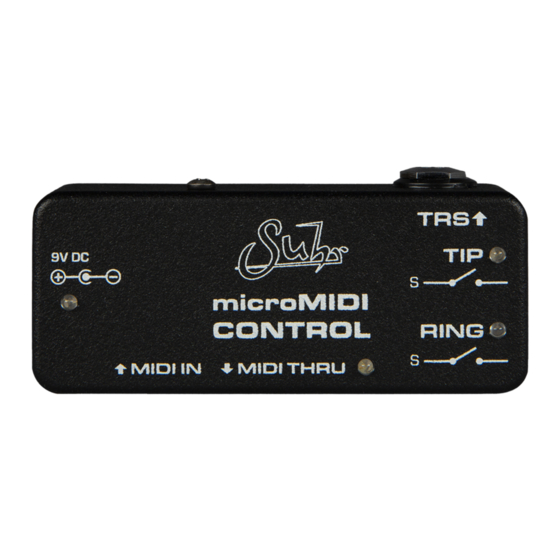
Page 5: Front Panel Overview
TRS Output 9VDC Power & LED Plug in TRS cable or Mono cable (See page 7) 9VDC Center negative, 2.1mm x 5.5mm to device that you wish to switch. (Standard connector for pedals). TIP LED Blue LED indicator for TIP switch (On when closed, Off when open). -
Page 6: Setting Midi Channel
Setting MIDI Channel This section will explain how to set the MIDI channel for the microMIDI� All microMIDIs will be set from the factory to receive messages on MIDI channel 1� Steps: 1� Remove the 4 screws on back of microMIDI� 2�... -
Page 7: How To Connect Micromidi To An Amp
TRS jack� 3� Connect a MIDI cable from the MIDI OUT of your master device to the MIDI IN of the microMIDI Control� 4� Be sure your MIDI interface or MIDI switching device is set to communicate on the same MIDI channel as your microMIDI (1-16)�... -
Page 8: How To Connect Micromidi To A Pedal
2� Connect your Suhr pedal's "FX Link" via 1/8" - 1/4" TRS cable to microMIDI's TRS jack� Effect Pedal with ‘FX link’ or TRS or MONO switching input ( e.g. Suhr Alexa Chorus Pedal) 3� Connect the MIDI IN to your MIDI interface or MIDI switching device with MIDI outs�... -
Page 9: How To Connect Micromidi To A Daw
1/8" - 1/4" TRS cable or mono (TS) cable to microMIDI's TRS jack� Effect Pedal with ‘FX link’ or TRS switching input ( e.g. Suhr Alexa Chorus Pedal) 3� Connect the MIDI IN to your recording interface with MIDI outs or to a computer using a USB to MIDI cable�... -
Page 10: Midi Programing Table
MIDI Programing Table PROGRAM CHANGE AND CONTINUOUS CONTROLLER TABLE TABLE KEY PROGRAM CHANGES RING (PC#) OPEN = SWITCH OPEN TO SLEEVE = OPEN OPEN LED will be OFF CLOSED OPEN CLOSED CLOSED OPEN CLOSED OPEN CLOSED OPEN CLOSED CLOSED = SWITCH CLOSED TO SLEEVE = TOGGLE LED will be ON TOGGLE... -
Page 11: Technical Specifications
Warranty Technical Specifications For warranty information on the Suhr microMIDI as well as all other Power Connector: 9Vdc, center negative, 2.1mm x 5.5mm Suhr products, please visit, www.Suhr.com/Warranty Operating Voltage: 9Vdc Maximum Voltage: 12Vdc Current Consumption: <12mA @ 9VDc Dimensions: 3.64" x 1.52" x 1.24"...
Need help?
Do you have a question about the microMIDI Control and is the answer not in the manual?
Questions and answers