
Summary of Contents for KegLand Mini 360
- Page 1 Mini 360 Core Actuator Regulator Instruction Manual Mini 360 Core Actuator Regulator Instruction Manual KL15868 KegLand Distribution PTY LTD www.KegLand.com.au www.KegLand.com.au Last Updated 4/08/2020 11:09 AM Page 1 of 14...
- Page 2 Mini 360 Core Actuator Regulator Instruction Manual WARNING WHEN ATTACHING AND DISCONNECTING THE REGULATOR TO/FROM A SODASTREAM CYLINDER ALWAYS HOLD THE NECK OF THE SODASTREAM CYLINDER WITH A SPANNER TO PREVENT THE NECK OF THE CYLINDER ROTATING WARNING DO NOT SUBMERGE THE REGULATOR IN LIQUID AT ANY TIME WARNING ALWAYS PERFORM A LEAK TEST PRIOR TO USE.
-
Page 3: Items Included
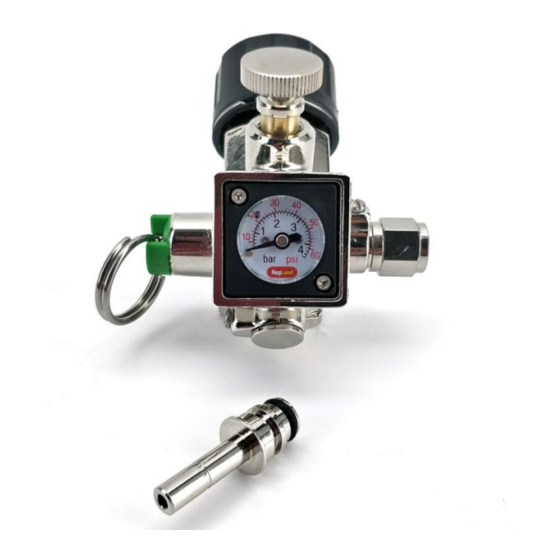
Mini 360 Core Actuator Regulator Instruction Manual Items Included 360° FFL fitting for MFL disconnects 65 PSI Green Pressure Relief Valve hose barb Output end cap 360°6.5mm duotight compatible hose barb Thumb Screw Output 2 Output 1 Sodastream to 16g thread bushing Note: The duotight compatible hose barb or FFL fitting can be placed on either output 1 or output 2 depending upon which orientation you require the regulator to be. - Page 4 Connecting the mini regulator to a keg or keg system The Mini 360 Core Actuator Regulator is very versatile in regards to the ways that it can be connected to a keg system. It is suitable for both portable kegging systems and more permanently situated kegging systems.
- Page 5 Mini 360 Core Actuator Regulator Instruction Manual No nylon flare washer is required between a premium ball lock disconnect and the regulator. Connecting to a keg via a stainless ball lock disconnect MFL (KL09539, KL03001 or KL09041) It is best to use the output adjacent to the gauge (output 2) when connecting the regulator to a stainless ball lock disconnect.
-
Page 6: Setting The Pressure
Mini 360 Core Actuator Regulator Instruction Manual Connecting a 16g CO Cartridge/Bulb 16g CO cartridges are a suitable portable option for dispensing on go with smaller volume kegs. They are not suggested for use for both carbonating and dispensing as this will require a large... -
Page 7: Performing A Leak Test
Mini 360 Core Actuator Regulator Instruction Manual are unaware of a pressure drop in the regulator. If liquid flows back into the regulator it may result in the regulator becoming damaged, hence, this should be avoided. Performing a leak test It is essential that a leak test is performed every time a gas bulb or Sodastream cylinder is connected to the mini regulator. - Page 8 Mini 360 Core Actuator Regulator Instruction Manual Swapping the mini gauge If you wanted to install a mini gauge with a different pressure range to the default 0-60 psi mini gauge then follow these steps: Step 1. Unscrew the two socket head cap screws which hold the mini gauge cover in position and remove the mini gauge cover.
- Page 9 Mini 360 Core Actuator Regulator Instruction Manual Lubricating Thumb Screw If the regulator is new and has not been lubricated or alternatively if the thumb screw is a bit too tight then application of some food grade lubricant may be necessary.
- Page 10 Mini 360 Core Actuator Regulator Instruction Manual Replacing Seat and Seat Cap Assembly All regulators contain parts that are susceptible to ingress of contamination. Although the Mini 360 Core Actuator Regulator is made from high quality components and assembled in a clean environment it’s possible that throughout its life that some contamination can get into the regulator...
- Page 11 Mini 360 Core Actuator Regulator Instruction Manual Step 2. Once these grub screws have been removed the regulator black knob can be completely undone and removed as shown below: www.KegLand.com.au Last Updated 4/08/2020 11:09 AM Page 11 of 14...
- Page 12 Mini 360 Core Actuator Regulator Instruction Manual Step 3. Using a set of needle nose pliers remove the piston diaphragm: www.KegLand.com.au Last Updated 4/08/2020 11:09 AM Page 12 of 14...
- Page 13 NOTE: The seat and seat cap assembly is the same part used inside the KegLand MK4 Regulator and is interchangeable. So the replacement MK4 diaphragm and seat assembly (KL15646) can be purchased as the spare part for this regulator model.
- Page 14 Mini 360 Core Actuator Regulator Instruction Manual Replacing Thumb Screw O-Ring If for some reason you get gas leaking from the base of the thumb screw it’s possible that you have blown the o-ring on the thumb screw shaft. To replace this o-ring follow the steps below: 1.
Need help?
Do you have a question about the Mini 360 and is the answer not in the manual?
Questions and answers