
Summary of Contents for Scandium SCEO08
- Page 1 I N S T A L L A T I O N · O P E R A T I O N · M A I N T E N A N C E G U I D E BUILT-IN ELECTRIC OVEN SCEO08...
-
Page 2: Table Of Contents
Index Welcome ............................3 Your Safety — General Warnings .....................5 Saving Energy ..............................5 Unpacking ................................5 Appliance Description ........................6 Cooker Fittings ..............................7 Installation ............................8 Features of the Cabinet .............................8 Inserting the Oven in the Cabinet ........................8 Electrical connection ............................9 Operation ............................11 Before First Use ..............................11 Cleaning ................................11 Electronic Programmer ............................12 Current Time Set-up ............................12... -
Page 3: Welcome
1. Welcome Welcome Thank you for purchasing this Scandium appliance. To achieve the optimal performance from your appliance, and to avoid the risk of accident or damage, it is essential to read this manual before installation and first time use. - Page 4 2. Your Safety — General Warnings WARNING: It is important that this instruction book be retained with the appliance for future reference. Should the appliance be sold or transferred, always ensure that the book is left with the appliance in order that the new owner can get to know the functions of the appliance and the relevant warnings.
-
Page 5: Your Safety - General Warnings
2. Your Safety — General Warnings Saving Energy Using energy responsibly not only saves money but also helps the environment. • Make sure the oven door is properly closed. Heat can leak through spillages on the door seals. Clean up any spillages immediately. •... -
Page 6: Appliance Description
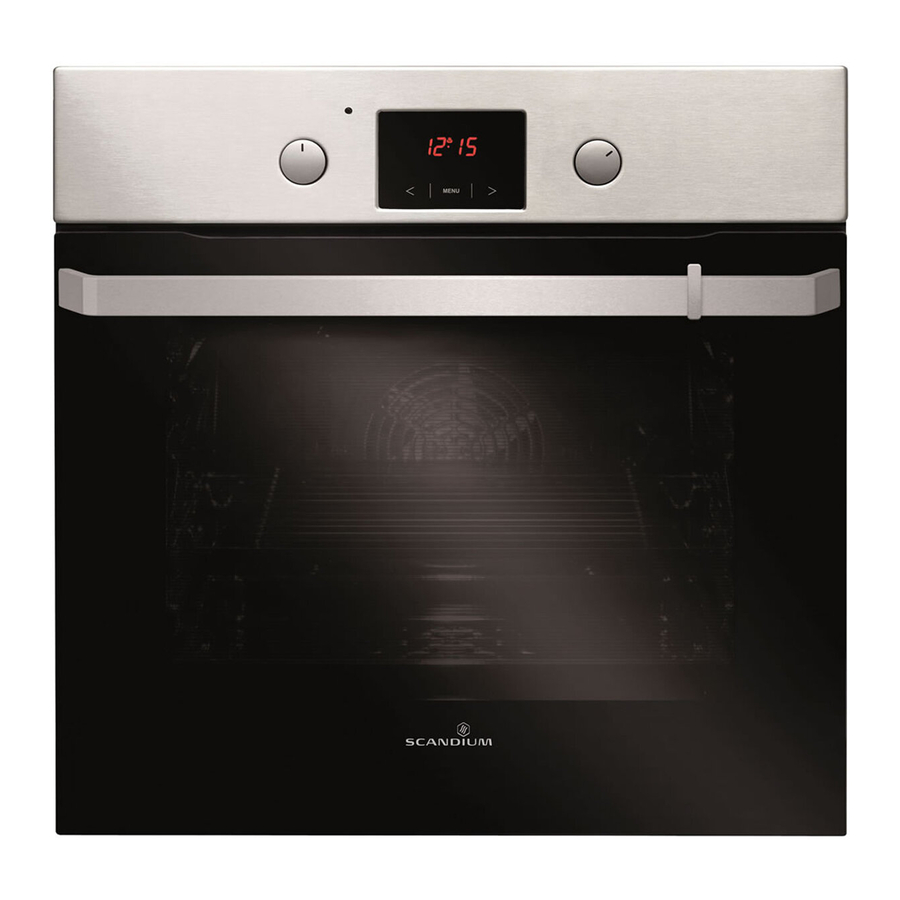
3. Appliance Description Electronic programmer Temperature light Oven operation light MENU MENU Function selection knob Temperature control Oven door handle Electronic Programmer 88 88 8 8 88 Control button “-” Control button “+” Menu button Page 6... -
Page 7: Cooker Fittings
3. Appliance Description Oven Fittings Baking tray Grill rack Roasting tray Moulded shelf supports Page 7... -
Page 8: Installation
4. Installation • The installation and technical assistance must only be performed by qualified staff. Carefully read the safety instructions in this manual before using the oven. Incorrect installation, maintenance, assistance and use can cause serious damage/injury to persons or objects. •... -
Page 9: Electrical Connection
4. Installation Electrical Connection The supply cable should be positioned so that it does WARNING not reach a temperature of more than 75°C along its entire length. This appliance must be earthed. For fixed wiring installation, the means for disconnection with at least 3mm distance between contacts must be incorporated in the fixed wiring in accordance with the wiring rules. - Page 10 4. Installation Terminal connection box 230V 1N~ Neutral (Black or Blue) Live (Red or Brown) Earth (Green/Yellow or sleeving) Cable clamp WARNING Disconnect the electric power supply before performing technical assistance or maintenance on the product. In case of replacement of the electric cable, ensure the use of an electric cable certified according to the Standards in force and suitable to the technical features of the product.
-
Page 11: Operation
5. Operation Before First Use • Remove packaging, clean the interior of the oven with warm water and a little washing-up liquid. • Take out and wash the oven fittings with warm water and a little washing-up liquid. • Ensure there is sufficient ventilation in the room, or open a window. •... -
Page 12: Electronic Programmer
5. Operation Electronic Programmer Symbol Definition 1200 8888 Work time 1 200 88 8 8 1 20 0 8 88 8 1 20 0 8 88 8 12 0 0 88 8 8 Turn off time Timer Programmer work function selection button Current time Button “-”... -
Page 13: Semi-Automatic Operation
1200 5. Operation Semi-automatic Operation To turn the oven off at specified time, do the following: • Set the oven function knob and temperature control knob in positions where the oven should work, • Press button 1 until the starts to flash, and the display shows “... -
Page 14: Automatic Operation
1200 8888 5. Operation Automatic Operation To turn the oven on for specified cooking time and turn off at a specified time, set up the work time and the work end time: 1830 • Press button 1 until the starts to flash, and the display shows “... -
Page 15: Oven And Fan With Automatic Air Circulation
5. Operation Oven and Fan with Automatic Air Circulation The oven can be heated up using the bottom and top elements, the grill and the fan function. Operation of the oven is controlled by the function selection knob. Turn the knob to the selected position, and the temperature regulator knob –... - Page 16 5. Operation Combined grill and upper element In this setting both grill and top heater are on. This increases temperature in the top part of the oven’s interior, which is suitable for browning and roasting of larger portions of food. Grill For cooking small portions of meat: steaks, schnitzel, fish, toasts and sausages, (thickness of grilled dish should not exceed 2-3 cm and should be turned over during grilling).
-
Page 17: Use Of The Grill
5. Operation Using the Grill To switch on the grill you need to: • Set the oven knob to the position marked grill • Heat the oven for approximately 5 minutes (with the oven door shut). • Insert a tray with a dish onto the appropriate cooking level, if you are grilling on the rack insert a tray for dripping on the level immediately below (under the rack). -
Page 18: Baking In The Oven - Practical Hints
6. Baking in the Oven — Practical Hints Baking • We recommend using the baking trays which were provided with your cooker. • Cake tins and trays bought elsewhere can be used. Black trays and tins conduct heat better and shorten baking time. -
Page 19: Practical Cooking Hints (Also Indicated On The Inside Of The Oven Door)
6. Baking in the Oven Practical Cooking Hints (Also indicated on the inside of the oven door) Oven Functions Temperature Rack Level Time in Minutes Type of Dish 160 - 200 2 - 3 30 - 50 25 - 35 160 - 180 20 - 40 65 - 70... -
Page 20: Cleaning And Maintenance
7. Cleaning and Maintenance By ensuring proper cleaning and maintenance of your oven you can have a significant influence on the continuing fault-free operation of your appliance. Before you start cleaning, the oven must be switched off and you should ensure that all knobs are set to the position “off ”. -
Page 21: Replacement Of The Oven Light Bulb
7. Cleaning and Maintenance Replacement of the Oven Light Bulb To avoid the risk of electric shock ensure that the appliance is switched off before replacing the bulb. • Set all control knobs to the position “ ”/“0” and disconnect the mains plug, •... -
Page 22: Door Removal
7. Cleaning and Maintenance Tilting the hinge safety catches Tilting the hinge safety catches Door Removal To obtain easy access for cleaning inside the oven, the oven door can be removed. First, open the oven door completely. At the hinge location, identify the safety catch that sits over the hinge. Removal of the internal glass panel Removal of the internal glass panel (Fig 1) Gently pull the safety catch upwards and towards you until it stops. - Page 23 7. Cleaning and Maintenance Tilting the hinge safety catches Removal of the internal glass panel Tilting the hinge safety catches Inner Glass Middle Glass Front Glass Removal of the internal glass panel Page 23...
-
Page 24: Regular Inspections
7. Cleaning and Maintenance Regular Inspections Besides keeping the oven clean, you should: • Carry out periodic inspections of the control elements and cooking units. After the guarantee has expired you should have a technical inspection of the cooker carried out by the service centre at least once every two years. -
Page 25: Troubleshooting
It is not the responsibility of Scandium to rectify any incorrect installations. A service call out fee will be charged for any Scandium technician that attends a call, whereby it is established that the fault is due to an incorrect installation or non-manufacturing fault. Should the appliance be installed in such a way that the service agent is unable to gain access to the appliance, the person/s who own the premises or the property where the appliance resides —... -
Page 26: Operation In Case Of Emergency
9. Operation In Case of Emergency In the event of an emergency, you should: • Switch off all working units of the oven • Disconnect the mains plug • Call the customer service centre • Some minor faults can be fixed by referring to the instructions given in the table below. Before calling the customer service centre, check the following points in the table. -
Page 27: Technical Data
All information supplied is to be used for general reference purposes only and is on the understanding that Scandium will not be liable for any loss, liability or damage of whatever kind arising as a result of any reliance upon such information. All pictures used in the guide are for illustrative purposes only. - Page 28 Australia 8/3-4 Anzed Court, Mulgrave 3170 Victoria. Phone 1300 881 693 Email info@scandiumappliances.com.au Web www.scandiumappliances.com.au New Zealand 5 Tolich Place, Henderson, Auckland 0610. Phone 0800 200 510 Email info.parex@emerson.com Web www.parex.co.nz Distributed by Axis Group International Pty Ltd. ACN 124 141 322 V1090817...
Need help?
Do you have a question about the SCEO08 and is the answer not in the manual?
Questions and answers