Advertisement
Quick Links
Advertisement

Summary of Contents for BinaryBots Dimm
- Page 1 Dimm Inventors Manual...
- Page 2 Other components can be disposed of in domestic refuse If any items are missing, please contact the BinaryBots team. Contact details are on our website. Copyright © 2016 CB Information Systems Ltd. All rights reserved.
- Page 3 In his space lab on planet Hex, Alien Inventor Binary has been busy creating exciting programmable objects that help young inventors learn coding and learn about the Internet of Things and STEM. Follow these instructions to build Dimm, your very own Robot. Step 1...
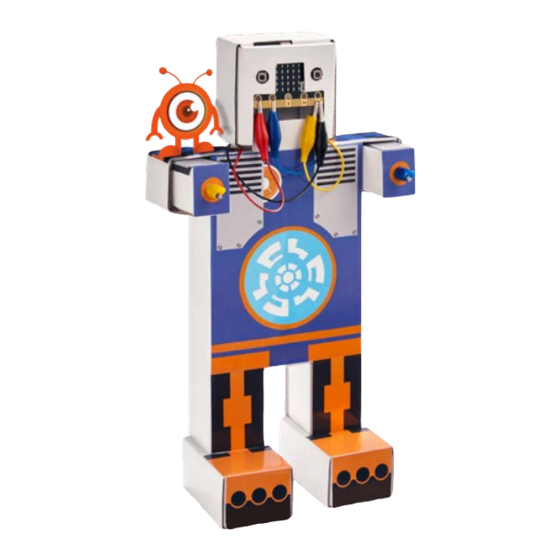
- Page 4 Step 1 - Check you have everything you need Main Body (1) Legs (2) Arms (3) Feet (4) Head (5) Stickers (6) * You may need to push out any remaining pieces of card using the images above as a guide...
- Page 5 Temperature Sensor (7) Light Sensor (8) Motion Sensor (9) Crocodile Clip Hands (10) Buzzer (11) Micro USB to USB Cable AAA Battery Pack (14) BBC micro:bit (12) (Requires 2xAAA Batteries) (13) *Wire colours may vary...
- Page 6 Step 2 - Assemble Dimm - Dimm’s Body Take Dimm’s main body (1) out of the box & unfold it. Fold in one side of the main body, lining the edge of the cardboard with the middle of the body.
- Page 7 Fold the other side of the main body using the previous step as a guide. Fold up the ‘tab’ located between the legs and secure in place.
- Page 8 Step 2 - Assemble Dimm - Dimm’s Legs and Feet Find Dimm’s legs (2) and partially fold along all the creases. Fold the strips of cardboard over and secure in place with the fold lock. Repeat for the second leg.
- Page 9 Locate Dimm’s feet (4), fold right in the sides, starting with the right section and then left the top section. bottom Fold the left flap so it meets the other side and then fold the bottom section over both flaps to hold the whole foot in place.
- Page 10 Step 2 - Assemble Dimm - Put the Feet on the Legs Get one of the assembled feet and turn it over. Slide the foot Push the two flaps of cardboard down from down into the foot and hold in...
- Page 11 Line the legs up with the body, making sure that the top of the body looks like the picture on the left. Once the legs are lined up with the body, slot the legs into place. Make sure that the tabs on the bottom of the body are pushed inwards to fully secure the feet.
- Page 12 Step 2 - Assemble Dimm - Installing Components Locate the blue & yellow crocodile clip hands (10) and thread the blue crocodile clip through the hole on the right and the yellow crocodile clip through the hole on the Yellow croc clip through Blue croc clip through the left.
- Page 13 Step 2 - Assemble Dimm - Dimm’s Arms Locate Dimm’s Arms (3). Partially fold along all the fold lines. Next thread the yellow crocodile clip wire from Dimm’s body, through the shiny outside of the larger hole on the arm.
- Page 14 Making sure the crocodile clip is secure in the small hole, first fold the sides of the arm in and then the front of the arm up to make the box complete. Finally, fold the flap of cardboard to lock the arm together.
- Page 15 Step 2 - Assemble Dimm - Making the Head Locate the main part for the BBC micro:bit head (5) Fold the side flaps inwards and then up to join each other. Fold the long strips of card up small tab and fold them in to the head to lock everything together.
- Page 16 Finally, making sure that you have the blue & red wires on one side and the yellow & black wires on the other side, slot the whole head on top of Dimm’s body.
- Page 17 Step 2 - Assemble Dimm - Wiring up the head To get started with Dimm, we want to wire up his hands and the Speaker. Attach the red crocodile clip from the speaker to pin 0. Attach the blue crocodile clip from Dimm’s hands to pin 1.
- Page 18 Get the sticker sheet out of the kit (6) & stick the different sections on to your finished Dimm. Lay Dimm down for ease and make sure that the wires are out of the way. You can also colour in Dimm using pens or create your own design online to be...
- Page 19 Step 4 - Connecting the BBC micro:bit to a computer or Mobile Device To connect to a PC or Mac - You will need to use the USB cable provided (13) Now you need to plug the BBC micro:bit on Dimm, into your computer - using the USB cable provided (13).
- Page 20 Step 5 - Start coding Dimm to do amazing things When you are coding using the BBC micro:bit, you need to do it through their online editor. If using a computer, open the web If you are using your mobile device, browser and go to http://microbit.org/...
- Page 21 P0 pressed’ block, this pin will listen out to see when a pin is pressed. Its called registering an ‘event handler’ that will do something when you hold Dimm’s hands. What is actually happening, is you are completing a circuit from the hand that is connected...
- Page 22 Step 5 - Start coding Dimm to do amazing things Click on the ‘Basic’ tab and select the ‘show leds’ block. This block will allow you to light up Dimm’s face however you want. Drag the block over the ‘on pin P1 pressed’ block and...
- Page 23 Now you’re officially a robot inventor, it’s time to enjoy learning how you can use Dimm to learn lots more about robots and coding. For lots of exciting projects & activities you can do with Dimm using the sensors in the pack visit:...
- Page 24 v171030...
Need help?
Do you have a question about the Dimm and is the answer not in the manual?
Questions and answers