Table of Contents
Advertisement
Quick Links
Advertisement
Chapters
Table of Contents

Summary of Contents for Millennion TX01S
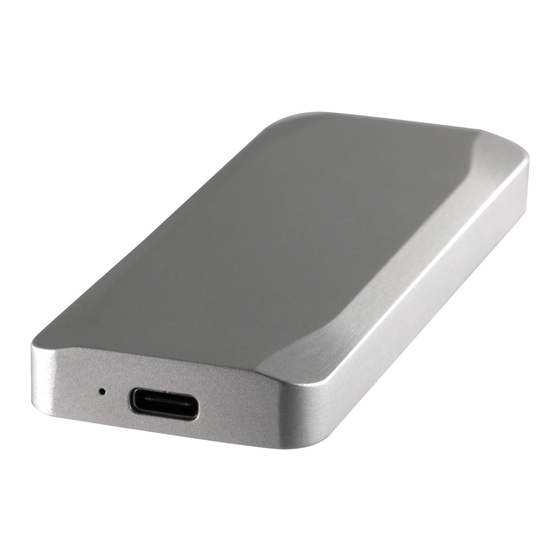
- Page 1 M.2 NVMe SSD Enclosure (Silver) User Manual Version 1.1 English...
-
Page 2: Safety Precaution
Safety Precaution Before using this product, please carefully read through the following pre- cautionary notice and follow its guidelines. Improper use may cause harm to the user and its surrounding environment. WARNING If the user ignores or mishandles the safety notice, then there is risk of serious injury. The guideline indicates clearly of what to be aware. - Page 3 Safety Precaution WARNING • Be sure to turn off the power and unplug the connection cord before mov- ing this product. Failure to do so may result in damaging the joint of this device, or possibly getting the cord caught causing the product to fall or injuring the user.
-
Page 4: Before Use
Before Use • Please carefully read through the safety guidelines to handle the product cor- rectly and safely. • Double check the device is functioning properly before use. • Avoid heat and humidity when using this device. Make sure it is in a dry and clean environment. -
Page 5: Table Of Contents
Table of Contents • Safety Precaution ・ ・ ・ ・ ・ ・ ・ ・ ・ ・ ・ ・ ・ ・ ・ ・ ・ ・ ・ ・ ・ ・ ・ ・ ・ ・ ・ ・ ・ ・ ・ ・ ・ ・ ・ ・ ・ ・ ・ ・ ・ ・ ・ ・ ・ ・ ・ ・ ・ ・ ・ ・ ・ ・ ・ ・ P.2 •... -
Page 6: Product Specification, Content, Supported Ssd
Product Specification ・ Content ・ Supported SSD ■ Product Specification • Product Model : TX01S • USB Spec : USB3.1 Gen2 • Interface: Type-C • Support OS (Windows): Windows 7/8/10 • Support OS(Mac): MacOS 10.10.5 or later • Dimension: 103mm x 40mm x 11mm •... -
Page 7: Ssd Installation Guide
SSD Installation Guide ■ Attachable M.2 SSD This product is designed for NVMe M.2 SSD, thus it does not support SATA and AHCI M.2 (NGFF) SSD. Please refer to the diagram below to check if your SSD is compatible. In the case of AHCI M.2 SSD, it may be difficult to distinguish at a quick glance, as they both look extremely similar. - Page 8 SSD Installation Guide (Type 2280) This page explains how to properly install NVMe M.2 SSD type 2280. For how to attach Type 2260/2242 size M.2 SSD, please refer to page 10. ■ Remove the Bottom Cover Turn over the device and remove the bottom four screws with the included screwdriver, then remove the bottom cover.
- Page 9 SSD Installation Guide (Type 2280) ■ Screw the SSD Screw the SSD with the included screws and screwdriver. ■ Attach the bottom cover Attach the bottom cover and screw in the four screws with the provided screwdriver. Complete with the attached rubber pad as required.
- Page 10 SSD Installation Guide (Type2260/2242) This page explains how to install M.2 SSD type 2260/2242. The figure be- low demonstrates how to install 2260 size; however, the same method can be applied to 2242 as well. ■ Removing the Board Remove the two screws holding the board with included screwdriver. ■...
- Page 11 SSD Installation Guide (Type2260/2242) ■ Secure the SSD Use the supplied nut and screw to secure the SSD as shown. Make sure to install the nut with the correct orientation. Please note that the SSD will not be level if the orientation is incorrect. ■...
-
Page 12: How To Connect A Pc
How to Connect a PC After the SSD is securely locked inside, use the included USB cable to connect it to a PC as shown. Type-C connector Type-A connector • When connecting to a Type-C USB port, please use a Type-C to C cable or Type-A to Type-C converter connector. -
Page 13: How To Safely Remove Ssd
How to Safely Remove SSD Before unplugging this product, please remove it using the safe removal pro- cess on the PC. Unplugging the product without safe removal may cause problems such as data loss. ■ For Windows Click the display USB Icon from the task bar, then click remove external. (As shown on left image) Message will appear as it is safe to remove now. -
Page 14: Troubleshoot
Troubleshoot If the device does not work properly, then please try the following: ■ SSD can’ t be attached • Please check if the SSD you are trying to connect is NVMe. Additionally, check the orientation when inserting the SSD into the connector. ■... - Page 15 Support Info f the device does not operate properly or breaks down, please contact the Digi- fast product support. E-MAIL : info@digifast-usa.com For additional contact info please visit: Digifast-usa.com DISCLAIMER Digifast is not accountable for any incidental or consequential damages, includ- ing, but not limited to property harm, loss of time or data from use of any Digifast product, or any other damages attributable to product malfunction or failure of including without limitation, those attributed to reliance of the materials provid-...
- Page 16 M.2 NVMe SSD Enclosure (Silver) ユーザーマニュアル Version 1.1 日本語...
- Page 17 安全上のご注意 ご使用いただく前に、 以下の注意項目をご確認の上、 正しく使用していただく様お願いい たします。 誤った使用を行った場合には、 使用者ご本人や周囲の方および環境へ損害を与える危険が ございますので、 くれぐれもご注意ください。 警告 この表示を無視して誤った取扱いをすると、 人が死亡または重傷を負う危険が想定されることを示していま す。 • 水が掛かる恐れがある場所や、 屋外には置かないでください。 感電や火災の原因となり ます。 • 接続コー ドが傷があったり、 断線していないかをご確認ください。 切断箇所が導体に触れ ることで感電や火災を引き起こすおそれがあります。 • 発煙や異音、 異臭がした場合には即座に使用を中断してください。 使用を続けると、 火災 や感電、 破裂等を引き起こすおそれがあります。 • 本製品の上に液体が入った容器を置かないでください。 万が一液体がこぼれた場合、 本 製品が破損したり、 感電したりするおそれがあります。 誤って液体が掛かってしまった場 合には使用を即座に中断し、 接続コー ドを抜き、 サポー トセンターまでご相談ください。 •...
- Page 18 安全上のご注意 注意 この表示を無視して誤った取扱いをすると、 人が傷害を負う危険または物的損害の発生が想定されることを示 しています。 • 本製品を移動する場合には、 必ず電源を切り、 接続コー ドを引き抜いてから行ってくださ い。 接続コードを引き抜かずに移動させようとすると、 本製品との接合部分を破損した り、 コー ドが引っ掛かって本製品の落下、 破損および、 けがを負ったりするおそれがありま す。 • 接続コー ドを引き抜く際は、 必ずプラグの根本付近をつかんで引き抜いてください。 コー ド部分を無理に引っ張るとケーブルやコネクタが破損するおそれがあります。 • 濡れた手で接続コードを差し込んだり引き抜いたりしないでください。 故障するおそれ があります。 • 本製品を直射日光の当たる場所や、 高温になる場所に設置しないでください。 製品が高 温となり、 火災や故障の原因となります。 • 湿度が高い場所やホコリが多い場所に設置しないでください。 火災を引き起こしたり、 感 電したりするおそれがあります。 •...
-
Page 19: ご使用の前に
ご使用の前に • ご使用になる前に本書をよくお読みのうえ、 本製品を正しく安全にお使いください。 • 接続する機器が予め正常に動作していることを確認してください。 • 高温多湿を避け、 清潔で乾燥した環境でご使用ください。 • 本製品の動作中、 製品本体が発熱するのは正常です。 • 機器に触れる際は、 静電気にご注意ください。 本製品は精密電子機器ですので、 静電気を与 えると誤動作や故障の原因となります。 • 製品を発送するなどの場合は、 破損を防ぐために緩衝材をご使用ください。 • 殺虫剤や揮発性のものを掛けたり、 ゴムやビニール製品を長時間接触させると、 変色したり 塗装が傷む場合があります。 • 長時間使用しないと機能に支障をきたす場合がありますので、 定期的に電源を入れることを お勧めします • 本体の汚れは、 柔らかい布で軽くふき取って下さい。 また、 汚れがひどい時は、 水で薄めた中 性洗剤を使い、 よくふき取って下さい。 ( ベンジンやシンナーは塗装を傷める原因となるため 使用しないで下さい)... - Page 20 目次 • 安全上のご注意 ・ ・ ・ ・ ・ ・ ・ ・ ・ ・ ・ ・ ・ ・ ・ ・ ・ ・ ・ ・ ・ ・ ・ ・ ・ ・ ・ ・ ・ ・ ・ ・ ・ ・ ・ ・ ・ ・ ・ ・ ・ ・ ・ ・ ・ ・ ・ ・ ・ ・ ・ ・ ・ P.17 •...
-
Page 21: 製品仕様 ・ 内容物 ・ 対応Ssd
本体寸法 : 103mm x 40mm x 11mm • 本体重量 : 約75g (付属品除く) ※ Windows7/8の場合、 USB3.0の転送速度で動作します。 ※ USB3.1 Gen2に対応したMac本体以外で接続した場合、 USB3.1 Gen1またはUSB3.0の転送速度にな ります。 ※ OSは可能な限り最新のバージョンをご使用ください。 ※ USB3.0/2.0インターフェイスに接続して使用することが可能ですが、 転送速度は低下します。 ■ 内容物 • TX01S本体 • ゴム足 x2 • SSD固定用ネジ x1 • Type2260/2242 SSD固定用ナッ ト x1 • プラス ドライバー •... -
Page 22: Ssdの取り付け方法
SSDの取り付け方法 ■ 取り付け可能なM.2 SSD 本製品はNVMe M.2 SSD専用のケースになっていますので、 SATA(NGFF)およびAHCI M.2 SSDには対応しません。 次の図をご参照の上、 お手持ちのSSDが取り付け可能かどう かをご確認ください。 特にAHCI M.2 SSDの場合、 NVMe M.2 SSDと同様に切り欠きが 1つのM-Keyの場合があるため、 NVMeとの見分けがつき難い場合がありますので十分に ご注意ください。 NVMe M.2 SSD SATA M.2 SSD ・ 端子部分の切り欠きが1つ(M-Key) ・ 端子部分の切り欠きが2つ(B&M-Key) ・ ラベルに 「PCIe」 や 「NVMe」 の表記がある ・ ラベルに 「SATA 6Gbps」 等の表記があ る... - Page 23 SSDの取り付け方法 (Type2280) 本稿ではType2280サイズのM.2SSDの取り付け方法を説明します。 Type2260/2 2 4 2サイズのM.2 SSDの取り付け方はP.1 0 「SSDの取り付け方法 (Type2260/2242) 」 をご参照ください。 ■ 底面カバーを取り外す 本体を裏返し、 付属の ドライバーで4つのネジを取り外し、 底面カバーを取り外します。 ■ SSDを取り付ける コネクタの切り欠きの位置を合わせ、 SSDをコネクタに斜めに差し込み、 コネクタが確実に 差し込まれたことを確認してSSDを倒します。...
- Page 24 SSDの取り付け方法 (Type2280) ■ SSDをネジ止めする 付属のネジと ドライバーでSSDをネジ止めします。 ■ 底面カバーを取り付ける 底面カバーを取り付け、 外した4つのネジを付属の ドライバーでネジ止めします。 必要に応じて付属のゴム足を取り付けて完成です。...
- Page 25 SSDの取り付け方法 (Type226 0/2 2 4 2) 本稿ではType2260/2242サイズのM.2SSDの取り付け方法を説明します。 図はType2260サイズのSSDで説明しますが、 Type2 2 4 2サイズの場合も同様の方法 で取り付けが可能です。 底面カバーの取り付け、 取り外しについてはP.8をご参照ください。 ■ ケースから基盤を取り外す 基盤を止めている2本のネジを ドライバーで取り外します。 ■ SSDを取り付ける コネクタの切り欠きの位置を合わせ、 SSDをコネクタに斜めに差し込みます。...
- Page 26 SSDの取り付け方法 (Type226 0/2 2 4 2) ■ SSDを止める 付属のナッ トとネジを使い、 図のようにSSDを止めます。 ナッ トには向きがあります。 向きを 間違うとSSDが水平になりませんのでご注意ください。 ■ 基盤をケースに取り付け、 底面カバーを取り付ける 基盤をケースに取り付け、 底面カバーを取り付けて、 必要に応じてゴム足を取り付ければ完 成です。...
-
Page 27: Pcとの接続方法
PCとの接続方法 SSDを組み込んだ状態で、 付属のUSBケーブルを使用して図のようにPCと接続します。 Type-Cコネクタ Type-Aコネクタ • Type-C搭載PCに接続する場合、 Type-C to CケーブルまたはType-A to Type-C変 換コネクタを使用して接続してください。 本製品には付属しませんので、 別途お買い求めい ただく様お願いいたします。 • USB3.1 Gen2対応のUSBポートに接続すると、 本製品のパフォーマンスが最大に 発 揮されます。 U S B 3 . 0またはU S B 2 . 0ポートに接 続した場 合 、 転 送 速 度 の 上 限は USB3.0(5Gp... - Page 28 SSDケースの安全な取り外し 本製品を取り外す際には、 PC上で安全な取り外し処理を行ってから取り外してください。 安全 な取り外しを行わずにSSDケースを取り外すと、 データ消失等のトラブルを招くおそれがあり ます。 ■ Windowsの場合 タスクバーからUSBアイコンの表示をクリックし 「Externalの取り外し」 をクリックしま す。 ■ Mac デスク トップに表示されているSSDをDockのごみ箱に ドラッグ& ドロップしてください。...
-
Page 29: トラブルシューティング
トラブルシューティング 機器が正常に動作しない場合、 次のことをお試しください。 ■ SSDが取り付けられない • 接続しようとしているSSDがNVMe規格かどうかご確認ください。 また、 SSDをコネクタに 挿入する際の向きもご確認ください。 ■ PCに接続しても認識しない • LEDが点灯していない場合 : 通電していないので、 USBケーブルの接続が正しいかご確認く ださい。 • LEDが点灯している場合 : 新品のSSDを組み込んだ場合はフォーマッ トが必要となりま す。 OSの操作マニュアル等をご確認の上、 フォーマッ トを行ってください。 ■ 転送速度が遅い • USB2.0ポー トに接続している場合、 転送速度は最大480MB/秒となります。 高速転送する ためにはUSB3.1またはUSB3.0ポー トに接続してください。 ■ ケース全体が発熱している • NVMe SSDは高速転送を実現するため、 高温になる場合があります。 本製品はSSDの放熱 のため、... -
Page 30: サポー トのご案内
サポー トのご案内 機器が正常に動作しない、 故障してしまった場合は Digifast サポー トセンターまでお問合せく ださい。 修理や送付先のご案内をいたします。 Digifast サポー トセンター お問い合わせ先 E-MAIL : info@digifast-usa.com お問い合わせはメールのみで承っております。 お電話でのご対応はできませんのであらかじめ ご了承ください。 また、 Digifast Webサイ トの 「サポー トのご案内」 からお問い合わせフォームへアクセスできま すので、 そちらからお問い合わせいただく事も可能です。 Digifast Webサイ ト https://www.digifast-usa.com/...
Need help?
Do you have a question about the TX01S and is the answer not in the manual?
Questions and answers