
Summary of Contents for HARVEY RC4
- Page 1 RC4: IP-based remote control for audio, lighting and media technology Operating Manual www.harvey.audio Version 1.0...
- Page 2 Operating Manual HARVEY RC4 Ó DSPECIALISTS GmbH, Berlin 2/20...
-
Page 3: Table Of Contents
Operating Manual HARVEY RC4 Table of Contents Introduction Overview HARVEY RC4-EU Overview HARVEY RC4-US Quick Installation Instructions for Mounting, Labelling and Wiring 3/20... -
Page 4: Introduction
1 Introduction HARVEY RC4 is a freely programmable end-user wall remote control for Ethernet networks. It is compatible to all members of the HARVEY family of audio and media control matrixes. The remote control is supplied exclusively via Ethernet (PoE). -
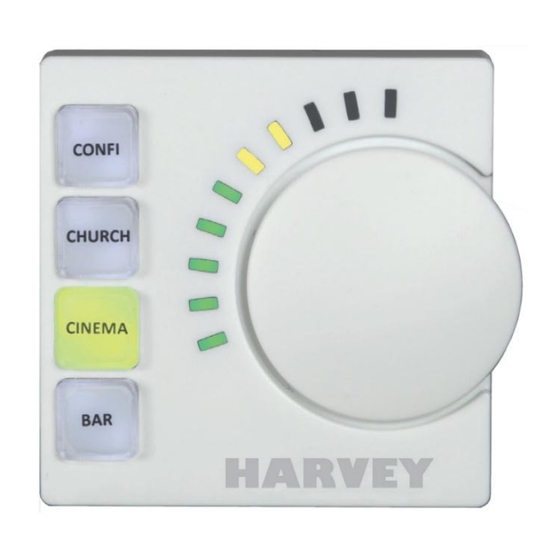
Page 5: Overview Harvey Rc4-Eu
Operating Manual HARVEY RC4 2 Overview HARVEY RC4-EU 5/20... - Page 6 Operating Manual HARVEY RC4 RC4-EU Specifications Push buttons 4x with integrated RGB LED; brightness and colour freely definable in HARVEY Composer; foil labels can be inserted for push button labelling; functions programmable in HARVEY Composer: preset call, logic control Rotary Knob Endless rotary encoder with integrated push button;...
-
Page 7: Overview Harvey Rc4-Us
Operating Manual HARVEY RC4 3 Overview HARVEY RC4-US 7/20... - Page 8 Operating Manual HARVEY RC4 RC4-US Specifications Push buttons 4x with integrated RGB LED; brightness and colour freely definable in HARVEY Composer; foil labels can be inserted for push button labelling; functions programmable in HARVEY Composer: preset call, logic control Rotary Knob Endless rotary encoder with integrated push button;...
-
Page 9: Quick Installation
PoE Injector attached to the RJ45 connector of the RC4. Option 3 – Stiff network cable with power provision from switch with PoE capability attached to the terminal block of the RC4.This option does not apply to the RC4-US model. 9/20... - Page 10 Among other things during initialization the RC4 waits for a physical network link. A physical link to the Ethernet network and data activity are indicated at the RJ45 interface on the rear side of the RC4, for both the RJ45 and terminal block wiring option.
-
Page 11: Instructions For Mounting, Labelling And Wiring
1: Follow these instructions forwards for disassembly in case you want to mount ROCEDURE a RC4 to a wall panel or you want to label the four push buttons. Assembly is done in the reverse order. For disassembly of the... - Page 12 For labelling the four push buttons proceed with P 2 on the next page. ROCEDURE For mounting the RC4 onto an EU flush-mounted box (UP60) and a flexible network cable with a RJ45 connector follow P ROCEDURE For attaching the RC4 to a stiff network cable coming from the wall follow P...
- Page 13 Operating Manual HARVEY RC4 2: Proceed with the following steps for labelling the four push buttons of the ROCEDURE RC4. Remove the screw joining the printed circuit board and the front shell of the housing. Remove the front shell from the printed circuit board.
- Page 14 Operating Manual HARVEY RC4 …continuation of P 2 (labelling push buttons): ROCEDURE Good results can be achieved by printing the labels on transparent foil sheets and cutting them with a knife or scissors. Put the label into the transparent cap and the cap onto the light guide body.
- Page 15 3: Mounting onto an EU flush-mounted box and connecting a flexible network ROCEDURE cable coming from the all to the RJ45 connector. The RC4 is designed for mounting into a standard 60 mm European flush-mounted box (UP60). A box’s depth of 60 mm is recommended.
- Page 16 Operating Manual HARVEY RC4 …continuation of P 3 (wall mounting with flexible network cable with RJ45): ROCEDURE Put the left side of the upper shell’s slots over the two keys of the lower shell. Proceed with the instructions of Procedure 1 in reverse order to re-assemble the housing.
- Page 17 Operating Manual HARVEY RC4 : Connecting a stiff network cable without RJ45 coming from the wall to the ROCEDURE terminal block connector. Strip off appr. 50 mm of the stiff network cable’s mantle. This is the result of de-mantling the cable.
- Page 18 Operating Manual HARVEY RC4 …continuation of P 4 (wall mounting with stiff network cable without RJ45): ROCEDURE Cut the foils – do not cut the shield-mesh! Turn back the shield-mesh and wind it around the end of the four wire pairs.
- Page 19 Operating Manual HARVEY RC4 …continuation of P 4 (wall mounting with stiff network cable without RJ45): ROCEDURE This is the result of the cable installation to the terminal block. On the rear side of the lower shell push the shield-mesh of the stiff network cable under the cable clamp and fasten the screw tightly.
- Page 20 Operating Manual HARVEY RC4 CONTACT DSPECIALISTS Digitale Audio- und Messsysteme GmbH Helmholtzstr. 2-9L 10587 Berlin Germany Phone +49 30 467 805-0 www.harvey.audio +49 30 567 805-99 sales@dspecialists.de www.dspecialists.de...
Need help?
Do you have a question about the RC4 and is the answer not in the manual?
Questions and answers