Table of Contents
Advertisement
Quick Links
Advertisement
Table of Contents

Summary of Contents for BYO Guitar JEM
- Page 1 JEM Guitar Kit Assembly www.byoguitar.com...
- Page 2 Do not underestimate the ability of these tools and machinery to cause injury. Never operate any tool without all guards in place and always wear approved safety glasses. For your own safety, please heed this warning. JEM Intro- 1 -...
-
Page 3: Table Of Contents
Sanding the Body and Neck ..................- 2 - 3.2.2 Appling Grain Filler ...................... - 3 - 3.2.3 Applying Sanding Sealer ....................- 3 - 3.2.4 Solid Color Primer ......................- 3 - 3.2.5 Burst and Translucent finishes .................. - 4 - JEM Intro- 2 -... - Page 4 …Other Hints ..........................- 5 - 1 Introduction Thank you for purchasing a BYOGuitar.com guitar kit. This kit includes everything you need to build a TIP: Get some finishing ideas by visiting BYOGuitar.com and BYO Guitar on Facebook (http://www.byoguitar.com/gallery/index.html) JEM Intro- 3 -...
-
Page 5: Introduction
These instructions assume you are familiar with the anatomy of a guitar. Refer to Figure 1 for many of the terms used in the assembly of your guitar. Fig 1 Major Components in Your JEM Guitar Kit JEM Intro- 4 -... -
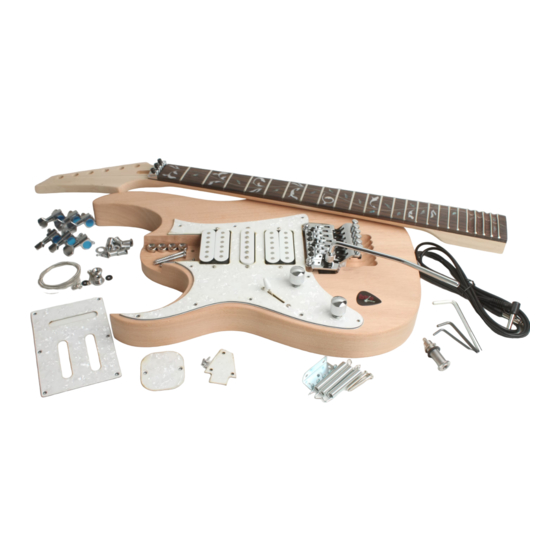
Page 6: Material Check List
BYO JEM Guitar below) TIP: use small interior packing box to inventory and organize piece parts JEM Pickguard with pickups Mounting screws for Pickguard, 3/8” 18 screws Audio Jack & + spare Back Plate Bridge/Tremblock 2 mounting inserts/screws JEM Intro- 5 -... - Page 7 6 Tuning Pegs Tuning Peg 6 Washers materials 6 Nuts 6 screws, 3/8” Output Jack Jack Back access cover 2 Holders Strap Holder 2 plastic materials washers 2 screws, 1” String retainer 1 retainer 2 screws, ½” materials JEM Intro- 6 -...
-
Page 8: Additional Tools/Materials Required
Additional tools/materials required: Drill & drill bits #1 & #2 Phillips Soldering iron/solder screwdriver Masking/painters tape Finishing/painting Sand paper 220 & material 320 grit Guitar strap Soap or candle Feeler gauge ruler Wood glue Wire cutter JEM Intro- 7 -... - Page 9 Section 5 – Setup: in this section, adjustments are made to your guitar such as the height of the pickups. Again, we thank you for your purchase of a BYO Guitar and we look forward to seeing pictures of your unique guitar! We also look forward to providing you with the guitar for your next project from our Custom Shop where you can select the wood for the body and neck as well as customizing all of the other components.
-
Page 10: Mockup And Fit Check
Figure 2.1 Body Cavity Locations a. Make sure the neck is aligned properly with the pickup pockets. b. Carefully clamp the neck in place – frets damage easily. JEM Section 2- 1 -... -
Page 11: Mount The Neck On The Body
#7 on material list), but do not over tighten them. The Bridge Mounting the Bridge assembly (item 4 on material list) on the JEM guitar utilizes two inserts in the Bridge Pocket (Fig 2.1) that will be installed in Section 4. When finishing the Body (Section 3), be careful not to allow finish material into the insert holes. -
Page 12: Check Tremolo Claw Alignment And Fit Check (Item #5 On Material List)
(item #14 on material list); 2. Mark the holes and drill starter holes with 1/16 drill bit. Check Strap Pins Figure 2.5.3 Truss Rod cover 1. Check for pre-drilled holes for the Strap Pins (item 10 on JEM Section 2- 3 -... -
Page 13: Check Tuner Alignment
Retainer bar (2), Figure 2.8, will be during the guitar final assembly. Mockup and Fit Check complete! Figure 2.8 String Retainer Bar Carefully disassemble the Mockup and move on to the next step: applying the finish to your guitar! JEM Section 2- 4 -... -
Page 14: Finish
Caution: if you remove the nut/string tie down from the headstock in preparation for finishing the neck, tape/cover the mounting area on the neck as to avoid material build-up that might influence the tuning of your guitar. JEM Section 3- 1 -... -
Page 15: Finish Application Steps
2. Before starting the finish on the neck mask off the surface of the fingerboard. 3. Use a flexible sanding block with #150 grit aluminum-oxide sanding paper to sand the guitar body until there is a consistent scratch pattern on the entire surface. Note: DO NOT round over JEM Section 3- 2 -... -
Page 16: Appling Grain Filler
Spray on two coats. When dry you may notice that the surface feels rough. Sand off the roughness with #320 dry and respray. Sand again. If the surface now appears smooth and all grain is opaqued you are ready for the color coat. JEM Section 3- 3 -... -
Page 17: Burst And Translucent Finishes
Buff the finish by hand or with a buffer, starting with a medium polish and working up to a high gloss polish. Note: If you use a buffing machine, be careful to avoid going through the finish, especially on the edges. JEM Section 3- 4 -... -
Page 18: Assembly
2. Slide a washer over the tuner shaft and secure the threaded bushing onto the tuner – do not tighten yet; 3. Secure the machine heads to the guitar headstock with the supplied screws - tighten the threaded bushings. Remove the protective film if necessary. Output Jack wiring & Installation JEM Section 4 - 1 -... -
Page 19: Installing The Strap Pins
(inside the jack pocket). 2. Solder the signal and ground wires to the jack (see Figure Figure 4.2 JEM Output Jack wiring 4.2) (Note: if the signal wire is shielded, solder the shield to the ground terminal on the jack). -
Page 20: Neck Installation
Using 3/8” screws (item 3 on Material list), attach the Pick Guard. Figure 4.4.1-2 Body Wiring 4.4.2 Neck Installation 1. Insert the neck into the neck pocket, aligning the mounting holes in the neck and body; JEM Section 4 - 3 -... -
Page 21: Installing The Floyd Rose Tremolo
4.4.3-3). Caution: if you lose grip of a spring it can fly and cause injury as well as damage to the Figure 4.4.3-3 Tremolo Claw Installation paint on the body. Tighten the screws on the JEM Section 4 - 4 -... -
Page 22: Install The Strings
8. Tighten the string down with the tuner; when the string is snug against the 1 slot in the nut, trim the excess string. 9. Repeat steps 4-8 using the next smaller diameter string & the tuner. JEM Section 4 - 5 -... -
Page 23: Tremolo Claw Adjustment
Guitar is now complete – let’s your 2. Carefully drill 1/16” starter holes. set it up!! 3. Attach restraint with supplied screws – do not tighten until the guitar is tuned to your satisfaction. JEM Section 4 - 6 -... -
Page 24: Initial Setup
In addition, check out this link for additional insights on setting up your guitar: “How to Set up a Floyd Rose Bridge -- AND keep it in Tune” http://www.guitarrepairbench.com/electric-guitar-repairs/floydrose_tremolo_setup.html JEM Section 5 - 1 -... -
Page 25: Adjust The Guitar Neck: Truss Rod
Lubricate the contact points of a string's travel to ensure tuning stability and reduce string breakage. Lubricate string/saddle contact points on the nut and bridge with a light machine oil (…such as 3-in-1 oil JEM Section 5 - 2 -... -
Page 26: Re-Check The Bridge Alignment
There should be a gradual increase in height from the first string to the sixth string. Adjusting saddle height is very easy on the JEM guitar. Since the bridge can only be adjusted at each end, there is no need to adjust each saddle individually. -
Page 27: Pickup Height (Figure 5.4)
2. Turn the volume & tone controls to Fig 5.6 Intonation Adjustment maximum. 3. Check tuning. Check each string at the 12th fret, harmonic to fretted note (make sure you are depressing the string evenly to the fret, not the fingerboard). JEM Section 5 - 4 -... -
Page 28: String Retainer Adjustment
Remember, guitars are tempered instruments! Re-tune, play and make further adjustments as needed. We hope you have enjoyed building your guitar! If you have any questions along the way please email us at sales@BYOGuitar.com. Custom Shop Products: Made in the U.S.A. JEM Section 5 - 5 -...