Table of Contents
Advertisement
Available languages
Available languages
Quick Links
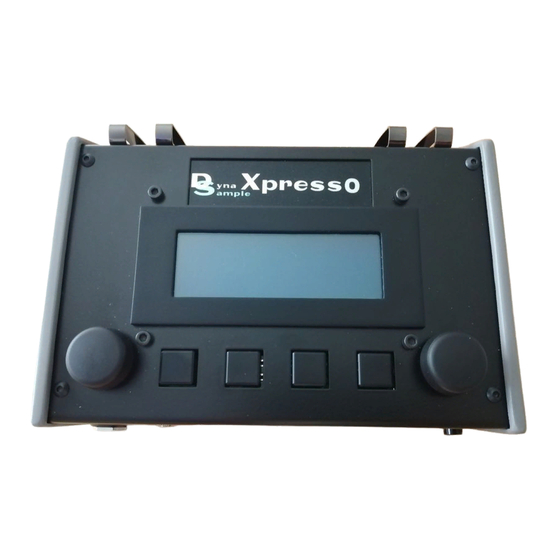
When you unpack your new XpressO you should find the following parts:
- XpressO (with soft case)
- AC adapter
- USB System Backup Drive (during the presale period NOT in the box! – You will receive it later separately.)
- Please download the operating manual from the XpressO website.
Placement
- Place the device on a dry surface and make sure that the air vents are never covered.
Power Supply
- Connect the included power supply to the Power In (DC 12V) jack on the rear side of the XpressO. Then
plug it into the wall outlet and move the Power Switch on the right hand to the upper position. You can turn
it off later by bringing it to the lower position.
The display shows a start-up message.
- The XpressO is now loading the software and the sound library. This will take a moment. When loading
has completed the display will show "READY" and change to the main display page showing the current
program name on the first line of the display. The next line will show the breath level and pitchbend by
default. The bottom line shows information about the MIDI program, transposition, octave and the current
edit channel.
This can be customized in the [Global] settings.
Audio Connections
- Connect the „Stereo Out" jack with a stereo 1/4 inch TRS cables to your (stereo) amplifier.
(If you use a mono TS cable you should set the stereo out to mono in [Utility] – see manual.)
- Alternatively you could connect stereo headphones with a 1/4 inch phone connector to the same output.
- If you have a digital SPDIF input on your sound system you can also use the rear SPDIF connector.
- Turn the volume all the way down before connecting the XpressO and then turn it back up slowly in order
to avoid damage to both your ears and your amplification system.
☺
hint:
To test the audio connection you could move with the left wheel twice counterclockwise and press onto the right wheel
to listen to the audio demos. Pressing once more will take you back to normal playing mode.
MIDI Connections
- Connect the MIDI Out of your MIDI controller with the MIDI In port of your XpressO.
- You can also use a USB keyboard or an Akai EWI-USB / EWI5000, etc. with any of the 2 USB ports.
The USB MIDI controller needs to support standard class compliant USB MIDI drivers in order to be
recognized. Make sure it is connected before starting up. A USB hub might work or not ...
- Set your controller to transmit on MIDI channel 1.
☺
hint:
For testing the MIDI communication you can activate the MIDI Monitor. Press the buttons 3+4 simultaneously to do so.
Pressing briefly onto any of the wheels will bring you back to normal playing mode.
DynaSample - XpressO
Quickstart
Advertisement
Table of Contents

Related Manuals for DynaSample XpressO


Summary of Contents for DynaSample XpressO
- Page 1 Power Supply - Connect the included power supply to the Power In (DC 12V) jack on the rear side of the XpressO. Then plug it into the wall outlet and move the Power Switch on the right hand to the upper position. You can turn it off later by bringing it to the lower position.
- Page 2 1-5. Done (!): Now you can select the different patches by using MIDI program changes or using the right wheel of the XpressO and play them. Different sound banks can be activated by moving to the left to „Bank Number“ or easier by pressing button 1+2.
- Page 3 - Stellen Sie das Gerät auf eine trockene Oberfläche und verdecken Sie nie die Belüftungslöcher. Stromversorgung - Verbinden Sie das Netzteil mit der Power In (DC 12V) Buchse auf der Rückseite des XpressO. Stecken Sie dann das Netzteil in die Steckdose und stellen Sie den Netzschalter auf der rechten Seite auf die obere Position (ON).
- Page 4 Benutzen Sie dazu die „Backup“ Funktion. Fertig (!): Wählen Sie verschiedene Instrumente mit MIDI Programmwechsel oder dem rechten Rad des XpressO und spielen Sie. Unterschiedliche Sound Bänke können Sie aktivieren, indem Sie nach links auf „Bank Number“ navigieren. Schneller geht’s indem man Taster 1+2 gleichzeitig kurz drückt.
- Page 5 - Placez L’appareil sur une surface sèche et assurez-vous les orifices d’aération ne soient jamais couvertes. Alimentation - Connectez la fiche de l’alimentation incluse à la prise Power In (DC 12V) à l’arrière de l’ XpressO. Ensuite, branchez la prise de courant murale et basculez l’interrupteur d’alimentation, placé à droite vers le haut.
- Page 6 Causes connues: La fonction remise à zéro (reset function) amène l’XpressO à jouer des doubles notes avec 2.0.00 RC2. Mettez à jour le logiciel vers RC3 ou supérieur. Les presets en couches (layered presets) qui ont été programmées pour l’XPression resteront silencieuses jusqu’à ce que la nouvelle fonction mulititâche (the new multi Handling) soit terminée.
Need help?
Do you have a question about the XpressO and is the answer not in the manual?
Questions and answers