Table of Contents
Advertisement
Quick Links
INSTALL ATION MANUAL
support@walielectric.com
CS201
IMPORTANT:
Ensure you have received all
parts against the component
checklist prior to installing. If
any parts are missing or faulty,
call the franchiser for a replacement.
wall plate(x1)
1a
WOOD STUD WALL MOUNTING:
●Use a stud finder to locate the edges of the studs. Use of an
edge-to-edge stud finder is highly recommended.
Based on their edges, draw a vertical line down each stud's center.
●Place wall plate on wall as a template. And mark the center
of the four mounting holes. Make sure that the mounting holes are
on the centerline of stud.
●Drill four 1/8"(3mm) dia. Holes 1.2"(30mm) deep. Secure it using
four screws(A), make sure that the wall
plate is level as shown in fig.1.1.
stud
B
S
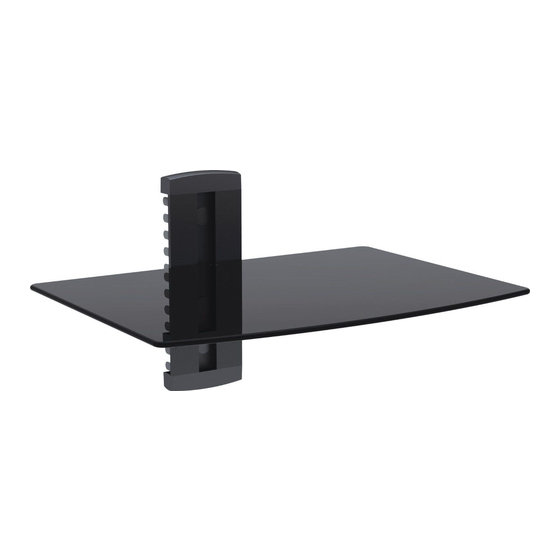
glass shelf(x1)
glass holder(x1)
①
②
decorative cover(x2)
④
③
1b
SOLID BRICK AND CONCRETE BLOCK
MOUNTING:
●Use the wall plate as a template to mark four holes locations on the wall as
shown in fig.1.2.
●Pre-drill these holes with a 8mm masonry bit and depth is at least 50mm.
Insert a Concrete Anchor(B) into each of these holes. Attach the wall plate
to the wall using four screws(A), make sure that the wall plate is level as
shown in fig.1.2.
A
fig.1.1
17.6 lbs.
(8 kg)
DVD WALL MOUNT
17.6 lbs.(8 kg) including
ST5.5x50(x2)
concrete anchor(x2) M5x14(x3)
A
B
plastic bush(x1)
3mm allen key(x1)
F
B
WARNING
!
●Do not begin the installation of the product before you have r
instructions and warnings contained in this installation sheet.
regarding any of the instruction or warning, please contact you
●Please refer to installation guide recommendation for required
avoid risk of property damage.
●This product should only be installed by someone of good mecha
experience and basic building, and fully understands.
●Make sure that the supporting surface will safely support the
the equipment and all attached hardware and components.
●If mounting to wood wall studs, make sure that mounting screws
into the center of the studs. Use of an "edge to edge" stud fin
●Never exceed the maximum load capacity.
●Always use an assistant or mechanical lifting equipment to saf
equipment.
●Tighten screws firml y, but do not over tingten. Over tightening can damage the
items, greatly reducing their holding powe
●This product intended for indoor use onl
lead to product failure and personal injur
connect piece(x1)
plastic cover(x2)
C
E
D
G
2
Assembling The Glass Holder
●Attach the connect piece to the glass holder using two screws and space reserved
3mm as shown in fig.2.1
●Use the same method to assemble the other glass holder
A
fig.1.2
ead amd understood the
if you have any question
r local distributor
distance from wall to
nical aptitude,with
combined load of
are anchored
der is highly recommended.
ely lift and position
r.
y. Using this product outdoors could
y.
Tools required
●Phillips Head Screw driver
(200mm length exclude the handle)
●Electric drill and 8mm masonry bit for
concrete wall installation
●Marking Pen
●Hammer
fig.2.1
Advertisement
Table of Contents

Summary of Contents for Wali CS201
- Page 1 DVD WALL MOUNT equipment. 17.6 lbs.(8 kg) including CS201 ●Tighten screws firml y, but do not over tingten. Over tightening can damage the items, greatly reducing their holding powe ●This product intended for indoor use onl y.
- Page 2 Installing The Glass Holder Installing The Glass Shelf Insert the glass holders into the wall plate along the wall plate rail at the desired height respectively, and Place the glass shelf gently on the glass holders respectively. Attach the glass shelves to the glass then tighten two screws with a 3mm Allen key as shown in fig.3.1.
Need help?
Do you have a question about the CS201 and is the answer not in the manual?
Questions and answers