Advertisement
Quick Links
Advertisement

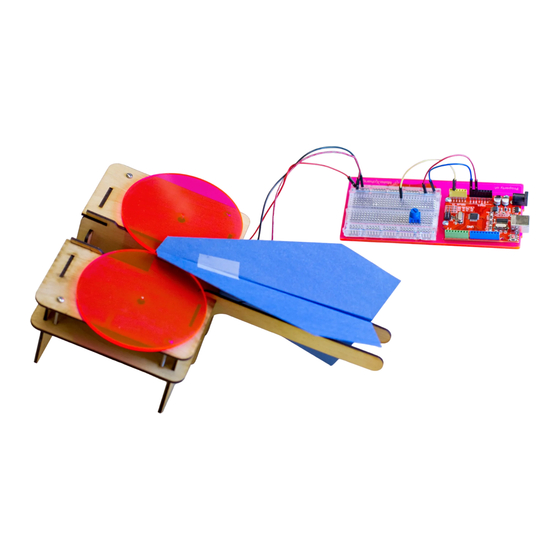
Summary of Contents for MakeXchange Paper Airplane Launcher Kit
- Page 1 Build Your Own Programmable Paper Airplane Launcher Assembly Instruction Manual www.makexchange.com ...
- Page 2 15 years of age. K eep fingers, loose clothing, and long hair away from the motors and wheel assemblies. Reach out to us with any questions or comments at: support@makexchange.com Copyright © 2017 Makexchange LLC...
-
Page 3: Parts List
Parts List: Parts From Your Paper Airplane Kit The following parts are included in your Paper Airplane Launcher Kit. NOTE: Life’s like a box of chocolates. The color of acrylic used for the wheels varys from kit to kit. ... - Page 4 1 x NPN Transistor This will control the launcher’s speed. 2 x Potentiometers You will use these to change the speed and pitch of the launcher. Copyright © 2017 Makexchange LLC...
- Page 5 1. Attach the servo motor through the opening in the Guide Panel. Use the servo and the two servo screws and matching nuts from your MakeXchange Invention Lab, Inventing With Electronics For Beginners Volume 1. Here is a close-up of the servo screws and nuts. These were included in the ...
- Page 6 Guide Panel. The notch on top of the Front Panel should slide flush into opening of the Top Panel. Copyright © 2017 Makexchange LLC...
- Page 7 If so, use your longer dupont cables to connect the motors to the breadboard. Male/Female dupont cables can be used as extension cords where needed. Copyright © 2017 Makexchange LLC...
- Page 8 Make sure the notch of the Middle Panel is seated flush with the Guide Panel. When the top of the motor is aligned it will click into place. Copyright © 2017 Makexchange LLC...
- Page 9 Attach the other Guide Panel and repeat steps 5 - 7 for the other side. 8. Run the motor wires through the appropriate holes so that all wires are coming out of the same side. Copyright © 2017 Makexchange LLC...
- Page 10 10. Remove the paper from each wheel. Copyright © 2017 Makexchange LLC...
- Page 11 This is MUCH easier to do AFTER the wheels have been placed on the motors. Videos are available showing how we did it on www.makexchange.com . Copyright © 2017 Makexchange LLC...
- Page 12 P lace the acrylic servo arm on the white tip of the servo and rotate the arm forward until it is completely horizontal and facing the front. You may have to remove the arm and place it back on again. Copyright © 2017 Makexchange LLC...
- Page 13 Microcontroller labeled G ND for 3. Insert the other end of the r ed wire into the p ositive (+) column o n the breadboard Copyright © 2017 Makexchange LLC...
- Page 14 o pposite d irection ! For the launcher to work, we need the motors to go in opposite directions. This will ensure both wheels grip the airplane and thrust it forward through the middle slot. Copyright © 2017 Makexchange LLC...
- Page 15 . To change the direction of spin, simply switch the motor’s r ed and b lack wires to the opposite column on the breadboard. Copyright © 2017 Makexchange LLC...
- Page 16 Page 16 Advanced Airplane Launcher Wiring Copyright © 2017 Makexchange LLC...
- Page 17 Page 17 Full Airplane Launcher Code Reach out to us with any questions or comments at: support@makexchange.com Copyright © 2017 Makexchange LLC...
- Page 18 CAUTION: Only place paper airplanes in the launcher. Do not launch airplanes in the direction of other people. Copyright © 2017 Makexchange LLC...
Need help?
Do you have a question about the Paper Airplane Launcher Kit and is the answer not in the manual?
Questions and answers