
Summary of Contents for AEROPOWER Powersky X6
- Page 1 A E R O P O W E R V E N T I L A T I O N C O . , L T D INSTALLATION GUIDE ○ Powersky WWW.AEROPOWER.COM.TW© 2019 ALL RIGHTS RESERVED.
- Page 2 Spacers are only used if the beam flange exceeds 3/8” (10 mm). Ensure you have the correct upper yoke for your mounting method. The upper yoke may differ from the illustration. Safety cable is attached to extension tube. WWW.AEROPOWER.COM.TW© 2019 ALL RIGHTS RESERVED.
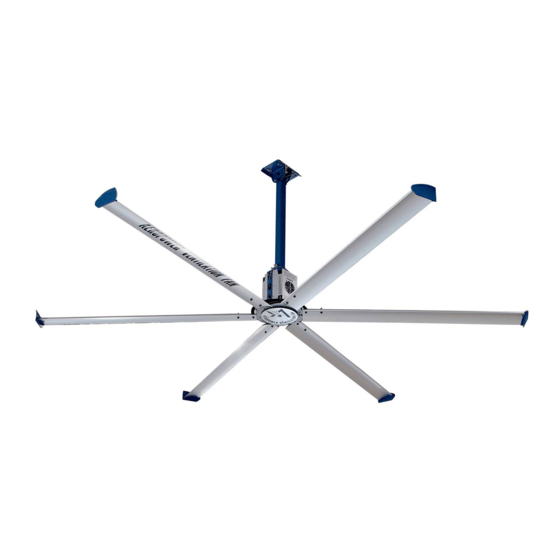
- Page 3 Safety Cable Upper Yoke Spacers Extension Tube Lower Yoke Main Fan Unit Hub Cover Winglets Used only if mounting fan to an I-beam. Spacers are used only when the I-beam flange exceeds 3/8” (10 mm). WWW.AEROPOWER.COM.TW© 2019 ALL RIGHTS RESERVED.
-
Page 4: Installation Location
® Powersky Fan diameter Distance from the ceiling 10 ft(3.0 meters) 4 ft(1.2 meters) 13 ft(4.0 meters) 5 ft(1.5 meters) 16 ft(4.9 meters) 6 ft(1.8 meters) WWW.AEROPOWER.COM.TW© 2019 ALL RIGHTS RESERVED. -
Page 5: Understanding Roof Pitch
If you are uncertain of your roof pitch or do not have the correct mount to properly hang your fan, consult a structural engineer or contact Aero Power Fans Customer Service. WWW.AEROPOWER.COM.TW© 2019 ALL RIGHTS RESERVED. -
Page 6: Pre-Installation
≥1x fan diameter if above diffuser. ≥2x fan diameter if below diffuser. Refer to the illustration below. HVAC equipment Fan spacing 2.5x fan diameter, center-to-center See the manufacturer’s requirements for the minimum clearance to combustibles. Radiant/IR heaters WWW.AEROPOWER.COM.TW© 2019 ALL RIGHTS RESERVED. -
Page 7: Installation
NOTICE:Before installation, make sure you have a upper yoke that fits the slope of the roof. WARNING:Make sure there are no people under the fan during installation! Overview PowerSky X6 can only be hung from I-beams or bar joists. For structural installation methods not covered in this manual, please consult a structural engineer. I-Beam Angle Iron •... -
Page 8: 1A. Prepare The I-Beam
5 inches to 9-7/8 inches (349 mm x 258 mm) (127 至 250 mm) Large upper yoke I-beam width 18-1/2 inches x10 inches 9-7/8 inches to 14-5/8 inches (470 mm x 258 mm) (250 至 371 mm) WWW.AEROPOWER.COM.TW© 2019 ALL RIGHTS RESERVED. -
Page 9: Select Proper Angle Irons
(7.6 cm x 7.6 cm x 0.6 cm) 8 ft to12 ft(2.4 m to 3.7 m) 3”x3”x0.25” (7.6 cm x 7.6 cm x 0.6 cm) Two pairs of angle irons. Pairs should be placed back to back and fastened in center WWW.AEROPOWER.COM.TW© 2019 ALL RIGHTS RESERVED. - Page 10 (4 or 8) M12 GR 8 Bolt b. (8 or 16) M12 GR 8 Washer c. (4 or 8) 2” x 3” (51 x 76 mm) Rectangular Washer (APF-supplied; see diagram) d. (4 or 8) M12 GR 8 Nylock Nut WWW.AEROPOWER.COM.TW© 2019 ALL RIGHTS RESERVED.
- Page 11 After fixing the main fan part to the angle iron, fix the angle iron to the roof structure. Proceed to 5.Secure Upper Safety Cable Main Fan Unit Hardware(APF-Supplied): a. (4) M12 GR 8 Bolt b. (8) M12 GR 8 Washer c. (4) M12 GR 8 Nylock Nut WWW.AEROPOWER.COM.TW© 2019 ALL RIGHTS RESERVED.
- Page 12 Secure the upper yoke to the I-beam using the upper yoke hardware kit. Proceed to 4.Installation Extension Tube Upper Yoke Hardware(APF-Supplied): a. (4) M12 X 55 MM GR 12 Bolt b. (8) M12 Flat Washer c. (4) M12 Nylock Nut d. (2) Beam Clip e. (2) Spacer WWW.AEROPOWER.COM.TW© 2019 ALL RIGHTS RESERVED.
- Page 13 (4) M12 X 50 MM GR 8 Bolt b. (8) M12 Flat Washer c. (4) M12 Nylock Nut The angle irons should be aligned with the outermost holes on the upper yoke. Do not use beam clips on angle irons! WWW.AEROPOWER.COM.TW© 2019 ALL RIGHTS RESERVED.
-
Page 14: Attach Extension Tube (To Upper Yoke)
The cable must be drawn tightly around the I-beam or angle iron, leaving as little slack as possible. The shackle should be on the topside of the I-beam or angle iron if possible. Securely tighten the shackle. I-Beam Mount Angle Iron Mount Direct Mount WWW.AEROPOWER.COM.TW© 2019 ALL RIGHTS RESERVED. -
Page 15: Attach Lower Yoke (To Extension Tube)
Make sure the lower cable is positioned between the lower yoke brackets as shown on the right. Main Fan Unit Hardware (APF-Supplied): a. (4) M12 x 30 MM GR 8 Bolt b. (8) M12 Flat Washer c. (4) M12 Nylock Nut WWW.AEROPOWER.COM.TW© 2019 ALL RIGHTS RESERVED. -
Page 16: Confirm Orientation
Guy Wire Hardware (APF-Supplied): a. (4) 8MM Beam Clamp b. (4) M10 X 15 MM Eyebolt c. (4) M10 x 35 MM Bolt d. (4) Locking Carabiner e. (4) Guy Wire f . (4) Wire Rope Clip WWW.AEROPOWER.COM.TW© 2019 ALL RIGHTS RESERVED. - Page 17 For best results, the guy wires should be installed at 45° in the X-Y, Y-Z, and X-Z planes as shown below. If the angle deviates by more than 15°, contact Customer Service for assistance. WWW.AEROPOWER.COM.TW© 2019 ALL RIGHTS RESERVED.
- Page 18 Gripples and the carabiners. Once all of the guy wires are taut and correctly positioned, secure their loose ends with the wire rope clips and tighten. Ensure all electrical cords/cables are unobstructed by the guy wire system. WWW.AEROPOWER.COM.TW© 2019 ALL RIGHTS RESERVED.
- Page 19 Slide the airfoils onto the tabs of the fan hub. The airfoils must be attached to the fan hub with the curved sides facing downward. Do not fasten the airfoils to the hub with hardware at this point. Proceed to step c. WWW.AEROPOWER.COM.TW© 2019 ALL RIGHTS RESERVED.
- Page 20 (12) M10 x 50 MM GR 8 Bolt b. (48) M10 Flat Washer c. (12) M10 Nylock Nut 11. Install Hub Cover Secure the hub cover to the fan hub with the Hub Cover Hardware. Hub Cover Hardware(APF-Supplied): a. (4) M4 Bolt WWW.AEROPOWER.COM.TW© 2019 ALL RIGHTS RESERVED.
- Page 21 2. Secure the mounting plate to the wall using the M5 X 20MM screw (a) shown below. 3. Secure the upper cover to the lower cover using the four (4) M3 X 5MM screws (b) shown below. WWW.AEROPOWER.COM.TW© 2019 ALL RIGHTS RESERVED.
-
Page 22: Electrical Installation
• 240V/120V Three-Phase (Delta Secondary). Provides 240V between phases for three-phase loads, 120V from phase “A” and “C” to Neutral/Ground, and 208V from phase “B” to Neutral/Ground as shown below. In this transformer arrangement, phase “B” is commonly referred to as a “Wild Leg” or “High Leg”. WWW.AEROPOWER.COM.TW© 2019 ALL RIGHTS RESERVED. - Page 23 12. AP Smart Controller (Optional) WWW.AEROPOWER.COM.TW© 2019 ALL RIGHTS RESERVED.
-
Page 24: Warranty
3. AP Smart controller and electric driver are high-precision electronic products, please do not install it in corrosive places. 4. When returning the product to Aeropower for recycling as described under the Waste Electrical and Electronic Equipment Directive, you are responsible for providing shipping and shipping costs. -
Page 25: Customer Service
CONTACT US Talk to the Aeropower experts. Call one of the phone numbers below or visit www.aeropower-fan.com.tw Customer Service TAIWAN THAILAND No. 171, Wufu W.Rd., Wufeng Dist., 662-8996052 Taichung City 413, Taiwan(R.O.C) 886-4-23320088 ® X6 INSTALLATION GUIDE-V1 10 / 09 / 2019 A E R O P O W E R V E N T I L A T I O N C O .
Need help?
Do you have a question about the Powersky X6 and is the answer not in the manual?
Questions and answers