Advertisement
Quick Links
The Empathy Belly®
Instructor Training Manual
"How to use and demonstrate
"The Empathy Belly"® Pregnancy Simulator
PLEASE NOTE:
To realize the maximum benefit from The Empathy Belly®, it is ESSENTIAL that you read this
manual, and learn to use the product correctly. You should also view the sample demonstration
video tape that was shipped with this product.
The effective presentation of this teaching resource depends on YOU!
* * *
* * *
Keep for future reference
Published by Birthways, Inc. © 2013
Advertisement

Summary of Contents for Birthways Empathy Belly
- Page 1 “The Empathy Belly”® Pregnancy Simulator PLEASE NOTE: To realize the maximum benefit from The Empathy Belly®, it is ESSENTIAL that you read this manual, and learn to use the product correctly. You should also view the sample demonstration video tape that was shipped with this product.
- Page 2 12 to 18. The large size is designed for men of average or above-average size, or older teenage boys who have the build of an adult male. The Empathy Belly should not be used on anyone weighing less than 100 lbs. (45 kg) or more than 300 lbs. (136 kg).
- Page 3 In a counseling setting or during a school Health or Family Life class, girls and boys can wear The Empathy Belly® and discover for themselves the many "price tags" or negative consequences that a pregnancy would impose on their lifestyles. This realism quickly shatters their romantic illusions and typical adolescent feelings of invincibility regarding teen pregnancy.
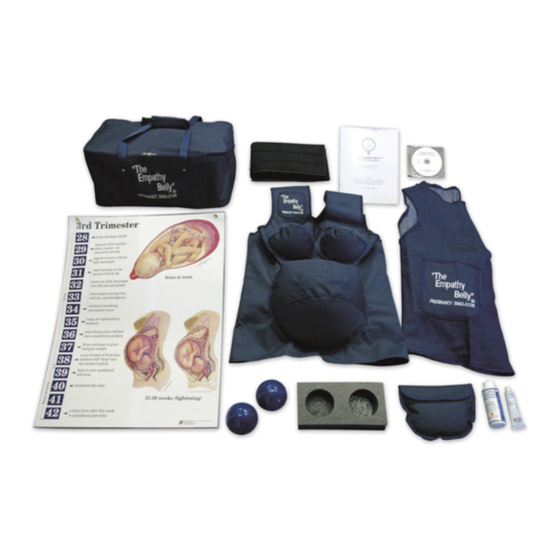
- Page 4 Introduction Components The Empathy Belly® consists of seven components, as illustrated in Figure 1. The Instructor Training Manual This manual is organized in three sections: • Assembly -assembling the water-filled belly; • Demonstration -procedure for a live demonstration; • Appendix -necessary forms, cleaning and repair information.
- Page 5 To realize the maximum benefit from The Empathy Belly®: It is ESSENTIAL that you practice both assembly and demonstration prior PLEASE NOTE: to introducing the Empathy Belly to clients or students. You should also view the sample demonstration video tape that was shipped with this product.
- Page 6 Assembly To assemble the torso garment: 1. Lay the torso garment inside out, as shown in Figure 3. 2. Open the zipper inside the circular "belly.” 3. Make sure the bladder is positioned with the water spout located closest to you, inside the canvas "belly"...
- Page 7 3. Measure and pour very warm water (less than 100°F or 38°C) into the vinyl bladder through the spout opening. • For the small size Empathy Belly®, measure 15 cups (3.5 liters). • For the large size Empathy Belly®, measure 20 cups (4.7 liters).
- Page 8 Assembly Assembly To complete the Empathy Belly® assembly: 1. Check again to make sure the two canvas pockets are laying flat on top of the water- filled vinyl bladder (Figure 4). 2. Close the zipper, to encase the vinyl bladder securely within the abdomen.
- Page 9 Empathy Belly®, and are able to quickly and easily move through the required steps. Empathy Belly® Sizes The Empathy Belly® comes in two sizes. Be sure to choose the appropriate size Empathy Belly® for the volunteer(s) you will have. •...
- Page 10 B. Select a volunteer • When demonstrating the Empathy Belly® on an adult, ask for a volunteer to wear it. Ask him or her to silently read and complete the lnformed Consent Release (see the Appendix). •...
- Page 11 Demonstration • Crowding of small intestines and stomach, combined with hormonal changes, causing: fullness and discomfort after eating small amounts of food heartburn constipation • Displacement of heart and upward pressure of the fetus on the diaphragm and lungs, causing: difficult and shallow breathing smothered feeling reduced oxygen intake with resulting fatigue, slowed pace, restriction of...
- Page 12 Review out loud the “DOs and DON’Ts” and on the warning label (Figure 9) which is sewn on the rib belt. E. "Install" the five Empathy Belly® components on the volunteer. NOTE: If the two lead balls have been left in the torso garment, remove them now.
- Page 13 Demonstration 3. Have the volunteer stand with knees bent and feet apart, to help keep his or her balance. 4. Tell the volunteer to drop his or her arms to their sides, and relax. Then instruct the volunteer to inhale deeply, and exhale as completely as possible, totally emptying his or her lungs.
- Page 14 Demonstration 2. Hold the shoulder straps over the volunteer's shoulders, while he or she carefully holds the "belly" from underneath. 3. Bring the two underarm straps (labeled B in Figure 11) ® around to the back and firmly secure the Velcro on them ®...
- Page 15 2. Pull the smock smoothly down over his or her chest and "belly". 3. Have them observe their new profile in a mirror (Figure 16). Congratulations! You have successfully installed the Empathy Belly®. Next you will show your volunteer how pregnancy could affect their daily activities.
- Page 16 Ask for the volunteer's conclusions and new insights about the pregnant condition. Thank him or her for participating. If the volunteer wishes, let him or her continue to wear the Empathy Belly® for the remainder of the class or prenatal appointment.
- Page 17 Release. C. Explain anatomical charts and pregnancy symptoms. D. Prepare the volunteer; check the release form, and review the warning label. E. "Install" the five Empathy Belly® components on the volunteer. 1. Rib belt 2. Torso garment 3. Bladder pouch 4.
-
Page 18: Table Of Contents
Appendix Appendix This appendix includes: Informed Consent Release form ......page 18 Copyright Release ..........page 19 Cleaning............... page 20 Troubleshooting........... page 21 Warranty .............. page 21 Please visit www.empathybelly.org for more information... -
Page 19: Informed Consent Release Form
NOT have ANY mechanical, electrical or electronic components. ® Handling or wearing of The Empathy Belly will be done on a strictly volunteer basis, and will be done only while under the careful supervision of a trained and authorized instructor. -
Page 20: Copyright Release
I assume all risk and liability for any injury or damage to me (or my child) that might arise out of my (or my child's) handling or wearing of The Empathy Belly® I hereby release and forever discharge the manufacturer of The Empathy Belly , the purchaser and the instructor, from all claims of injuries or suits of ®... -
Page 21: Cleaning
Appendix Cleaning IMPORTANT: Remove ALL vinyl, weights and foam components before cleaning! The fabric components of the Empathy Belly® can be cleaned according to the following instructions. To clean the torso garment (65% polyester, 35% cotton) and rib belt: ®... -
Page 22: Troubleshooting
463-9572 or birthways@empathybelly.org. Someone will discuss the repair options available to you. Replacement Parts If you are missing any component of the Empathy Belly®, or if a part has worn out, go to www.empathybelly.org/ordering call Birthways at 1-206-463-9572 to purchase replacement parts. - Page 23 ® The Empathy Belly Pregnancy Simulator Teaching Module (U.S. Patent 4,531,919) Made in the U.S.A. Manufactured by Birthways, Inc. Birthways, Inc. P.O. Box 2069 Vashon Island, WA 98070-2269 Phone: 800-882-3559 or 206-463-9572 Fax: 206-463-6837 www.empathybelly.org birthways@empathybelly.org...
Need help?
Do you have a question about the Empathy Belly and is the answer not in the manual?
Questions and answers