
Summary of Contents for Health Stream HS2.OEL
- Page 1 If you have any questions , please contact The Fitness Generation, +61 (03) 9765 9999. Free call number 1300 796 636 www. healthstreamfitness.com.au...
-
Page 2: Safety Hints
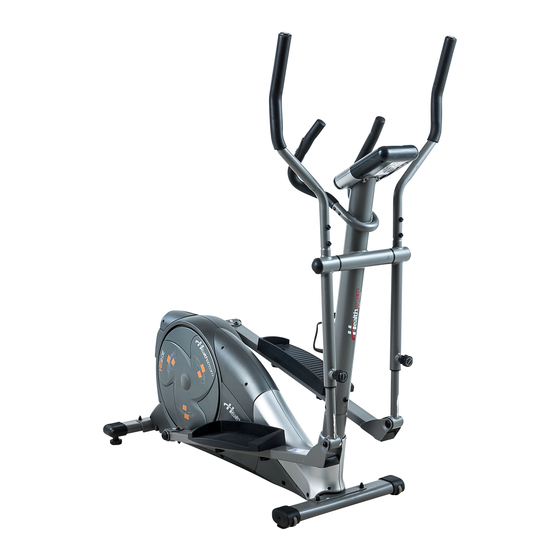
SAFETY HINTS WARNING - Read all instructions before using this appliance. Do not operate machine on deeply padded, plush or shag carpet. Damage to both carpet and machine may result. machine Keep children away from the machine. There are obvious pinch points and other machine caution areas that can cause harm. - Page 3 HANDLE BAR COMPUTER CENTRAL TUBE WATER BOTTLE REAR STABILIZER POP PIN PEDAL FRONT STABILIZER If you have any questions , please contact The Fitness Generation, +61 (03) 9765 9999. Free call number 1300 796 636 www. healthstreamfitness.com.au...
- Page 4 ASSEMBLY PACK CHECK LIST FIGURE 1 4 SCREW 7 NUT 5 WASHER 6 SPRING FIGURE 2 4 SCREW 7 NUT 5 WASHER 6 SPRING FIGURE 3 5 WASHER 6 SPRING 12 SCREW FIGURE 4 84 KNOB 16 WASHER 6 SPRING 23 SCREW 45 END CAP 61 END CAP...
-
Page 5: Assembly Pack Check List
ASSEMBLY PACK CHECK LIST FIGURE 6 5 WASHER 6 SPRING 105 SCREW FIGURE 8 109 SCREW If you have any questions , please contact The Fitness Generation, +61 (03) 9765 9999. Free call number 1300 796 636 www. healthstreamfitness.com.au... - Page 6 Identify the Front Foot [2], which has a Front Foot Cover [3] on the end. Attach the Front Foot with 2[4], 2[5], 2[6]and 2[7], by the wrench. Attach the Rear Foot [8] to the rear of the Base Frame [1] as the procedure (see above). If you have any questions , please contact The Fitness Generation, +61 (03) 9765 9999.
- Page 7 Hold the Handlebar Post against the main frame [1]. Connect the two ends of the computer cable [13] and [14] projecting from [1] and [15]. Push one spring washer [6] and one washer [5] on each of the bolts [12] through the holesin the main frame [1], screw into the threaded holes of the handlebar post [15] and tighten firmly.
- Page 8 Equip pedal(L) on pedal tube weldment(L) [21] and using washer [29],carriage bolt [30] , washer [31], spacer washer[32] and knob dawl [33] to tighten it. The proper pedal position is at middle hole. There are 3 holes can be changed when needed . The same assembly for right pedal.
- Page 9 Connect handle pulse wire [35] & [38], then equip small bar [36] onto handle bar post [15] and using screw [51] to tighten it. Connect wires of computer [43] and attach it on handle bar post [15] ,then using screw to tighten it. Attach water bottle housing [108] onto to handle bar post [15] and using screw [109] to fix it.
- Page 10 If you have any questions , please contact The Fitness Generation, +61 (03) 9765 9999. Free call number 1300 796 636 www. healthstreamfitness.com.au...
- Page 11 If you have any questions , please contact The Fitness Generation, +61 (03) 9765 9999. Free call number 1300 796 636 www. healthstreamfitness.com.au...
- Page 12 DESCRIPTION Q'TY DESCRIPTION Q'TY BASE FRAME ALLEN HEAD BOLT M8 * 50 mm FRONT FOOT PLASTIC PAD FRONT FOOT COVER (L&R) M8 NYLOCK NUT M8*52mm CARRIAGE BOLT CONNECT TUBE M8 WASHER (t=1.2) BEARING M8 SPRING WASHER ROUND SCREW FOR ADJHEIGH M8 CAP NUT WASHER REAR FOOT...
- Page 13 I. To operate the monitor A. To have power supply connected to the monitor. A-1. You may select different training mode of MANUAL, PROGRAM, USER or TARGET H.R. by pressing UP, DOWN buttons . Press MODE to confirm. Or, you may press ST/STOP button to start training directly. (In this case, the H training mode is in MANUAL automatically.
- Page 14 B-6 During all training period, you may press ST/STOP to stop monitor counting anytime. C. Training in PROGRAM mode - press UP button to select PROGRAM show up on the upper line, press MODE to confirm. Drawing D C-1 The initial set program profile is P1. There are 12 profiles for training. You may press UP/DOWN button to select training profile.(Drawing E) P 1 0 P 1 1...
- Page 15 D. Training in USER mode - press UP button to select USER show up on the upper line, press MODE to confirm. (Drawing F) Drawing F D-1 You may press ST/STOP button to start training directly, or you may press UP, DOWN buttons to adjust resistance level of profile unit.
- Page 16 UP, DOWN, and MODE buttons. The functions preset available are : Time, Distance, Calories in TARGET H.R. mode. E-2 After all setting is done, press ST/STOP button to start training. You will see each preset function data counts down from target as soon as training starts.
-
Page 17: Aerobic Exercise
AEROBIC EXERCISE Aerobic exercise is any sustained activity that sends oxygen to your muscles via your heart and lungs. Aerobic exercise improves the fitness of your lungs and heart - your body’s most important muscle. Aerobic exercise fitness is promoted by any activity that uses your large muscle -arms, legs, or buttock, for example. - Page 18 Quadriceps Stretch WARM UP With one hand against a wall for balance, reach behind you and pull your right foot up. Bring your heel as close to your buttocks as possible. Hold for 15 counts and repeat with left foot up. Inner Thigh Stretch Sit with the soles of your feet together with your knees pointing outward.
Need help?
Do you have a question about the HS2.OEL and is the answer not in the manual?
Questions and answers