
Summary of Contents for Eddyfi Technologies Inuktun 2-Function Manipulator
- Page 1 2569 Kenworth Road, Suite C Nanaimo, BC, V9T 3M4 CANADA +1.250.729.8080 info@eddyfitechnologies.com www.eddyfitechnologies.com INUKTUN 2-FUNCTION MANIPULATOR...
-
Page 2: Table Of Contents
2-Function Manipulator Table of Contents About This Manual ............................3 Description ..............................3 Specifications ............................3 Safety ................................4 System Setup ..............................5 Working Environment ..........................5 Connector Handling ..........................5 Changing Jaw Sets ........................... 7 Maintenance ..............................10 Cleaning ..............................10 Cutter Blades ............................ -
Page 3: About This Manual
This manual copyright © 2019 by Inuktun Services Ltd. All rights reserved. Description The Inuktun 2-Function Manipulator was designed as a deep-sea articulating gripper with an array of interchangeable jaw sets. The device is capable of high closing forces and provides an additional rotation feature to position the jaws in relation to the work piece. -
Page 4: Safety
2-Function Manipulator Maximum Peak Current 1.7A Maximum actuator force 90 kgf (200 lbf) Maximum Rotation Speed 14 RPM Maximum Depth (Sea Water) 5000 m (16,000 ft) Dry weight 0.9 kgf (2.0 lbf) Wet Weight (Sea Water) 0.6 kgf (1.4 lbf) Working Temperature 0 °-50 °C (32 °-122 °F) Closing Force... -
Page 5: System Setup
2-Function Manipulator • Mechanical Pinching Hazard. All the interchangeable jaw sets have enough force to seriously injure one’s fingers, and the cutter attachment could easily sever a human digit. Always power down the manipulator while someone is working on or near the jaws. •... - Page 6 2-Function Manipulator FIGURE 1: MANIPULATOR CONNECTOR Created by: Document: UMDK007857.docm Revision: A08 Date: 26 Sep 2019 IPN: 3044246-A08 CWS;PV Source Location: C:\ePDM\ISLEng\products\dk-manipulators\manuals\UMDK007857.docm Page 6 of 15...
-
Page 7: Changing Jaw Sets
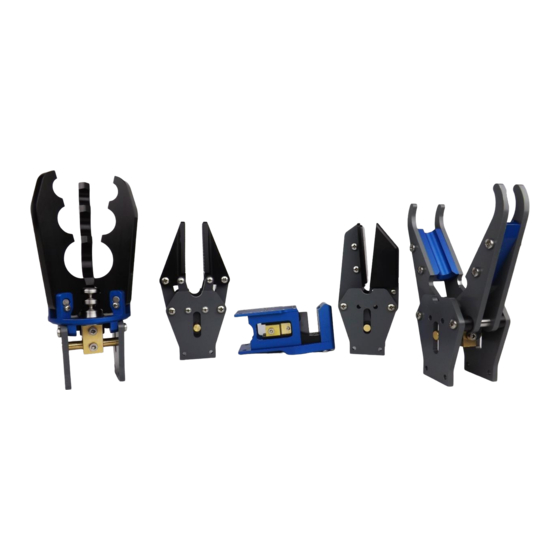
2-Function Manipulator Changing Jaw Sets The Manipulator has five (5) standard jaws from which to choose from. All offer unique characteristics and advantages for different operating requirements. The jaws are easily interchangeable. To uninstall the V Jaw, Parallel Jaw, and the Sampler, follow the steps listed below (installation is the opposite of removal): 1. - Page 8 2-Function Manipulator 4. Remove the M4x8 socket cap screws (x2) and end clips from the actuator end block. 5. Remove the jaw assembly from the drive unit by gently sliding it forward off the actuator shaft. Note on installation and adjustment for plastic jaw sets: Some adjustment may be required for smooth operation •...
- Page 9 Installation of the Trident is like above except for the actuator end clips. These also hold the centre engaging rack on and have 4x M4x8 socket cap screws which must be removed before the jaw can slide off the actuator shaft. Once the jaw is removed, always reinstall the rod end clips into the centre rack and end block to prevent loss of parts.
-
Page 10: Maintenance
2-Function Manipulator Maintenance Cleaning In order to ensure the Manipulator functions well, it should always be thoroughly cleaned after every use. Always use fresh water at standard line pressure (700kPa/100psi max). Always make sure to drain any water from the bellows port (small hole) on the front of the housing. Failure to clean properly could result in premature corrosion of components. -
Page 11: Dislodging The Centre Actuator
2-Function Manipulator 1. Insert an M3x25 socket cap screw into the bellows piston through the bellow port (see Figure 7 below) such that it gently seats on the front cap. Failure to do this will result in loss of oil. 2. - Page 12 2-Function Manipulator 4. While pulling the manipulator against the braced tool (as in trying to pull the actuator out), and applying full open force from the controller, gently tap on the tip of the actuator with a light hammer. Alternative - If a flat slotted tool cannot be found or made, one of three jaw-sets (Sampler, V- or Parallel Jaws) may be used instead by doing the following: 1.
-
Page 13: Parts And Repairs
2569 Kenworth Road, Suite C Nanaimo, BC, V9T 3M4 CANADA TF 1.877.468.5886 T +1.250.729.8080 info@eddyfi.com www.eddyfitechnologies.com Eddyfi Technologies – US (American Authorized Distributor and Service Centre) 812 W 13th Street Deer Park, TX, 77536 T +1.281.542.3292 info@eddyfi.com www.eddyfitechnologies.com Created by: Document: UMDK007857.docm... -
Page 14: Warranty Repairs
Warranty claims must return to the factory for evaluation. To return an item for evaluation or repair, first contact Eddyfi Technologies at our toll-free number or e- mail address. Eddyfi Technologies will supply a Return Merchandise Authorization (RMA) number with detailed shipping and customs instructions. -
Page 15: Limited Warranty Policy
The foregoing constitutes the sole and exclusive remedy of the purchaser and the exclusive liability of Eddyfi Technologies and is in lieu of any and all other warranties, express, implied or statutory as to merchantability, fitness for purpose sold, description, quality productiveness, or any other matter. Under no circumstances shall Eddyfi Technologies be liable for special, incidental or consequential damages, or for delay in performance of this warranty.
Need help?
Do you have a question about the Inuktun 2-Function Manipulator and is the answer not in the manual?
Questions and answers