Advertisement
Quick Links
8
4
x
x
Velcro
Spinning
Wheels x2
Strap
Fixed
Wheels x2
1
x
Reference Air Pad
Of Inflation
2
x
Rectangle Air Pad
4
x
Trapezoid Air Pad
Follow The Detailed Diagram Instructions
This product may be adjusted to fit different bicycle sizes.
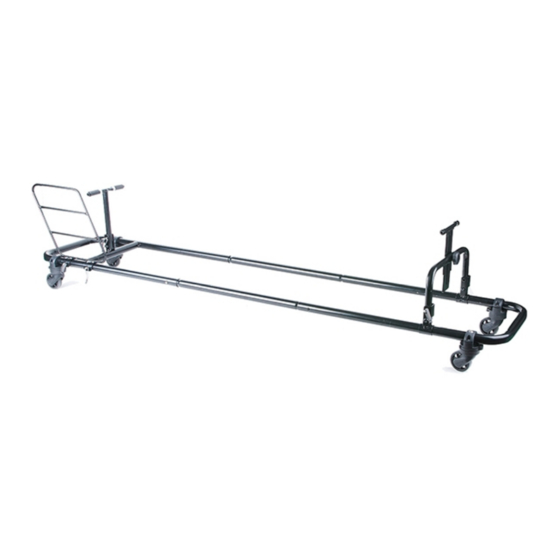
1
wheel
front supporting rack
attachment
6
8
3
frame holder
1)
Install front supporting rack through
3
the frame holder
as illustrated.
3
4
2)
Install tube
and frame
3
5
holder
by pressing
down on the spring button
until it clicks together.
3)
Open the wheel attachment, and then insert the wheels. Use
the spinning wheels at front side of frame holder
wheels at the rear side of frame holder
Install wheel this way
<Front side of frame holder>
Air pad installation
use the spinning wheels
Air pads, 3 pieces per side
valve stem/ air valve
Please do not inflate air into the air pads more than
1 psi or harder than reference air pads of inflation. It
may cause air pads broken. LOTUS do not take any
responsibility if users over inflate air to the air pads.
SH-53 3
x
Derailleur Protector
Detachable
1
x
frame holder
2
x
Disk
Protector
1
x
Freewheel
Protector
tube
4
4
tube
frame holder
1
1
6
, and fixed
7
as illustrated.
<Rear side of frame holder>
use the fixed wheels
Schrader valve(A/V)
*PLEASE READ AND SAVE THE INSTRUCTION*
1
Drawstring
Backpack
1
x
Shoulder
Strap
Max dimension of bag
9
rear supporting rack
5
7
wheel
attachment
4)Insert the bolt pin to secure the front and rear forks; place the
front/rear forks on the supporting rack.
<Front sdie>
5)
Before removing the rear wheel, select the gear that uses the
least amount of chain; To make sure your front and rear gear
are in the smallest chain.
6)
Open the brake if necessary.
Remove quick release units from wheel and then install them
7)
into frame holder as show on figure 1. (Do not tighten the
bicycle wheels yet, further adjustments will follow below)
1)Use schrader valve to pump the air until proper
pressure and secure with the cap.
※The cap with flat bottom is a
secured cap for the air valve.
※The cap with a pin in the
middle is for releasing air.
2)Open the bicycle carrying
bag, insert the inflated air
pads in the appropriate
pockets and secure with the
velcro straps.
Air may be adjusted
from the air valves.
1
x
5
x
Bolt Pin
110cm
25cm
80cm
139cm
1
9
1
x
Bike Carrying
Bag
4
x
(
)
Small
2
x
(
)
Large
Protection pads
34cm
<Rear side>
figure 1.
Advertisement

Summary of Contents for Go Easy SH-5313
- Page 1 SH-53 3 *PLEASE READ AND SAVE THE INSTRUCTION* Derailleur Protector Velcro Spinning Wheels x2 Bike Carrying Drawstring Strap Fixed Wheels x2 Detachable Backpack frame holder Reference Air Pad Disk Of Inflation Protector Small Shoulder Bolt Pin Rectangle Air Pad Large Strap Freewheel Protection pads...
- Page 2 2015/9/4 MADE IN TAIWAN •The GO EASY bike carrying bag can not be checked in as a carry on bag on the airplane. •Keep the bicycle carrying bag, storage bag, and other parts away for children. They are not toys.
Need help?
Do you have a question about the SH-5313 and is the answer not in the manual?
Questions and answers