Table of Contents
Advertisement
Quick Links
CONNECTOR ASSEMBLY TOOLING
Operation Instructions for Portable Hex Die Crimp
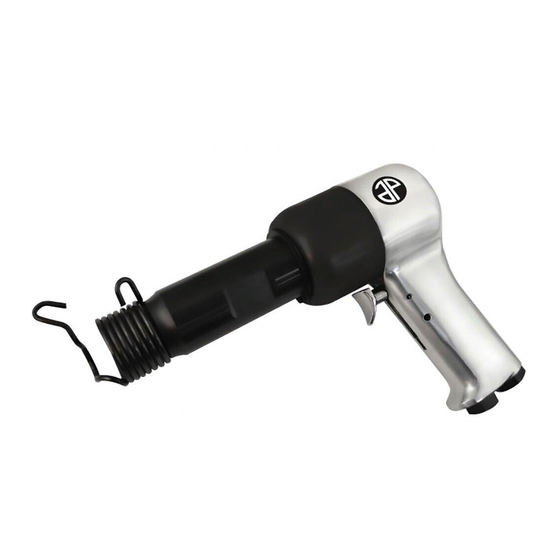
The Astro Tool Corp. Portable Pneumatic Hex Die Crimper has all the features of the EUS175 "C"
frame hand crimp tool. It accepts all standard Huber/Suhner or equivalent style die sets.
The EUSP175 requires a 80-120 P.S.I. regulated, filtered and lubricated air supply. Astro offers the
11413 air regulator for this purpose.
1. Observe all caution labels on the tool before assembling dies or connecting the air supply to the tool.
2. Select the appropriate die set for the connector or contact to be crimped.
3. Raise the safety shield by depressing the safety shield lever on the side of the crimp tool.
4. Insert the stationary die in the front of the tool, slide die along slot in the tool and into die nest until
die stops and tighten 6-32 set screw with wrench provided. See figure #1.
Actuating Button
Safety Shield
Lever
5. With the safety shield raised, insert the movable die into the drive shaft die nest located in the back
of the frame. Slide die along slot and into drive shaft die nest until die stops and tighten 6-32 set screw
with wrench provided. Release the safety shield after die installation.
6. Connect a regulated, filtered and lubricated air supply to the tool.
.
ASTRO TOOL CORP.
Tool No. EUSP175
BASIC DESCRIPTION
TOOL REQUIREMENTS
BASIC OPERATION
DIE INSTALLATION
Figure # 1
CRIMPING OPERATION
1
6-32 Set Screw
Stationary Die
5-22-15 TIUS75-99-1
Advertisement
Table of Contents

Related Manuals for Astro Tool EUSP175


Summary of Contents for Astro Tool EUSP175
- Page 1 Operation Instructions for Portable Hex Die Crimp Tool No. EUSP175 BASIC DESCRIPTION The Astro Tool Corp. Portable Pneumatic Hex Die Crimper has all the features of the EUS175 "C" frame hand crimp tool. It accepts all standard Huber/Suhner or equivalent style die sets. TOOL REQUIREMENTS The EUSP175 requires a 80-120 P.S.I.
- Page 2 7. Pre-assemble the connector or contact to the prepared wire or cable following the manufacturer's specifications. 8. Raise the safety shield by depressing the safety lever. 9. Insert and position the connector in the stationary die. 10. Release the safety shield lever. The dies will hold the connector in place. 11.
- Page 3 The Astro Tool Corp. EUSP175 portable pneumatic C-Frame crimping tool can be bench mounted for improved operating efficiency. The bench mount can be positioned at any angle to suit the operator. A foot pedal may be added to increase the versatility of the tool.
- Page 4 5. The tool is now ready for use. Follow the crimping instructions as described in the CRIMPING OPERATION section of this manual. ASTRO TOOL CORP. MANUFACTURERS OF INSERTION, REMOVAL, CRIMP TOOLS AND CONNECTOR SERVICE KITS ASTRO TOOL CORPORATION • 21615 S.W. T-V HWY. • BEAVERTON OREGON 97003 503-642-9853 • FAX 503-591-7766 5-22-15 TIUS75-99-1...
Need help?
Do you have a question about the EUSP175 and is the answer not in the manual?
Questions and answers