Table of Contents
Advertisement
Advertisement
Table of Contents

Subscribe to Our Youtube Channel
Summary of Contents for SLE 800 Series
- Page 1 SLE Hot Printers 800-Series User Guide...
-
Page 2: Table Of Contents
Contents Page Introduction Safety Notes Getting To Know Your SLE Hot Printer Preparing for Operation Setting up your hand-operated SLE Hot Printer Setting up your air-operated SLE Hot Printer Loading Foil Setting Foil Pull Unloading Used Foil Setting Temperature Preparing the Type, Emblem or Die... -
Page 3: Introduction
Your SLE Hot Printer is designed for simplicity and ease of operation. Anyone should be able to achieve excellent results in a very short time. To get full use of all the features of your SLE Hot Printer, we urge that you carefully study and thoroughly understand the instructions contained in this manual and the accompanying video, until you can execute each of the prescribed procedures with reasonable skill and confidence. -
Page 4: Safety Notes
Safety Notes Your SLE Hot Printer and accessories have been designed to assure years of profitable, trouble-free service, provided it is carefully maintained, handled with care and properly used. As with all mechanical and electrical devices, it is essential that certain safety precautions be fully understood and followed, to prevent injury to the operator and/or damage to the machine. - Page 5 • Bleed off air pressure in the system when not in use and before servicing or storage. To release the pressure, turn and press the valve underneath the Air Filter/Regulator. • Disconnect electrical power to machine and compressor when not in use. Unplug machine from the wall outlet before cleaning and servicing.
-
Page 6: Getting To Know Your Sle Hot Printer
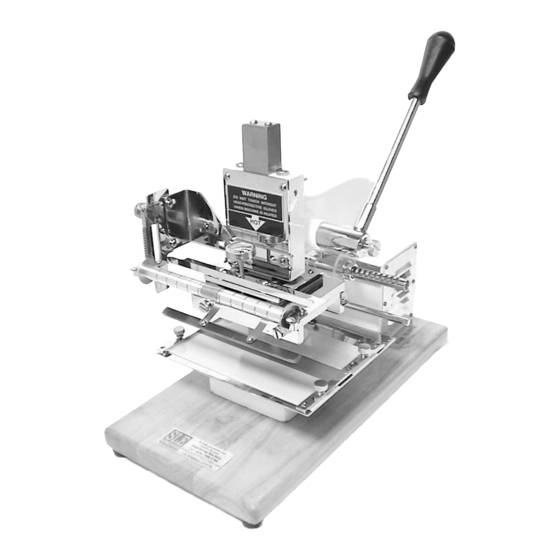
Getting to Know Your SLE Hot Printer Handle Temperature Handle Lock Screw Rear Foil Bracket Foil Spool Tension Foil Take-up Spool Foil Spool Clip Ram Bar Foil Rack Heating Temperature Power Heater Ribbon Printing... - Page 7 Model AM-800E Air Filter Power-on Switch Pressure Gauge Pressure Petcock Super-Quiet Compressor Pneumatic Control Power-on Reset Stop Button Cycle Cycle Mode Dwell Timer Electronic Activation Cycle Mode...
- Page 8 Open Chase Type Holder. Adapter Sleeves - fit into the Heater Platen of your SLE Hot Printer to keep Type Holders in place. To install an Adapter Sleeve, slide into the Heater Platen from either side and lock into place by flipping the Butterfly Clips on both sides.
- Page 9 Ribbon Guide - used to hold the ribbon in place to ensure a straight and uniform imprint. Depending on your specific model, the Ribbon Guide is either built into the Printing Table or attaches to the Printing Table similar to the Gauge Bar. Ribbon Spindle - for holding spools of ribbon to be imprinted.
-
Page 10: Preparing For Operation
Setting up your hand-operated SLE Hot Printer (Models M-800A, M-800B, M-800D, M-800E) As you unpack the SLE Hot Printer, familiarize yourself with its contents. Save the carton and packing materials. They should be used to re-pack the machine for transportation or service if necessary. -
Page 11: Loading Foil
8. Your air-operated SLE Hot Printer is now ready for operation. Loading Foil Depending on your specific model, the SLE Hot Printer is designed to accommodate foils from one to six-inch width. The foil is automatically advanced with each impression. -
Page 12: Setting Foil Pull
8. Snap the metal Foil Clip from the Foil Take-up Spool and wrap the end of the foil (dull side facing in) around the spool. 9. Replace the Foil Clip over the foil. Foil Clip Foil CAUTION: • During operation, the Heater Platen can become very hot. Take extreme caution when loading or unloading foils. -
Page 13: Unloading Used Foil
Regulator Knob on the controller, at the rear, left side of the machine. In general, SLE foils are formulated to perform best within a temperature range of from 200 to 250 degrees, depending on the type of material being printed. Smooth, coated papers perform well at the... -
Page 14: Preparing The Type, Emblem Or Die
Regulator Power-on 1. Plug in your SLE Hot Printer and turn on the power. (The Green and Red lights come on.) 2. Turn the Regulator Knob to the appropriate scale according to the above table. When the temperature has reached the set point the green light on the temperature control panel will begin to flash, on and off. - Page 15 After setting the temperature on your SLE Hot Printer, the next step is to prepare the type, emblem, or die. Setting type is a surprisingly simple procedure. With a little practice, it can be mastered by almost anyone. Do not rush; speed will come with practice.
-
Page 16: Printing With A 1-Line Or 2-Line Type Holder
• Do not leave type in a hot machine for an extended period of time. As soon as you have finished printing, remove the Type Holder from the machine and return the type back into the type box. The following instructions are intended to aid those who have little or no experience with typesetting. -
Page 17: Printing With The Open Chase Type Holder
5. Insert the Type Holder into the Adapter Sleeve. When imprinting at the top of a page, such as on stationery, insert the Type Holder from the left side of the Adapter Sleeve. When imprinting at the bottom of a page, such as on greeting cards, insert the Type Holder from the right side of the Adapter Sleeve. -
Page 18: Printing With Engravings
108 pt. Wafer WHOC The SLE Die catalog offers Engraving Dies for every occasion. You can also have custom dies made from your own design by simply sending us your black-and-white camera-ready artwork. When you prepare your artwork, try to use line drawings and avoid large areas of solids. Solid areas will not produce satisfactory results. -
Page 19: Doing Test Imprints
To combine an engraving with set type, simply slide the Wafer Die into the WHOC. Set the type using the Open Chase Type Holder and then drop the WHOC into the Type Holder. Complete the setup with spacers and lead rules and secure it with the Quoins. Insert the Type Holder into the Heater Platen as usual. - Page 20 2. Position the article on the Printing Table. Substitute a piece of scrap paper for the actual article if necessary. 3. For the correct imprinting pressure, always apply the pressure in two motions: • Bring handle down with light, easy motion, with arms and finger relaxed until the type is almost touching the article to be imprinted.
- Page 21 • Activate machine by pressing the two red Activation Buttons simultaneously. If You Need Help If you do not get perfect imprints, read this instruction book over again very carefully and look at the Training Video. If this does not help, write to us at 258 Fifth Avenue, City of Industry, CA 91746. Describe what seems to be the trouble.
-
Page 22: Common Problems & Solutions
Common Problems & Solutions The basic factors that contribute to creating quality imprints are: Temperature, Pressure and Dwell time. The following section offers solutions to most of the problems encountered in hot stamping. PROBLEMS SOLUTIONS No Impression at All • Machine is still cold Allow more time for the machine to heat up •... - Page 23 • Different height of type due to mixing Do not mix old type with new type. of type from different type sets. • Worn or damaged type Replace with a new type set. • Worn cushion board on Printing Table Replace cushion board.
- Page 24 5. Make another test imprint and examine the result. 6. Adjust table again by turning the appropriate Hexagonal Nut(s). 7. Repeat this process until you get an even impression on all four corners of the test imprint. 8. After adjustment, tighten Locking Screw underneath the wooden base. Foil Sticking To Item After Imprinting •...
-
Page 25: Special Imprinting Applications
Imprinted ribbons are used to decorate party favors, gift baskets and trophies to get a personalized message across. Your SLE Hot Printer is the most advanced of its type available for printing ribbons. It features a built-in ribbon guide that is very precise and easy to set up. The extra wide Type Holder allows you to print both sides of a favor ribbon in just one pass. - Page 26 Setup for Ribbon Printing 13. Make a few test prints, and make any necessary adjustment to the ribbon guide until the impression prints in the center of the ribbon. Adjust the temperature as necessary. 14.When printing ribbons, use strong and short dwell. 15.After each imprint, pull the ribbon through with your left hand.
- Page 27 How to Imprint on Ribbons using air-operated machines. Set up machine as above. 2.Set the air pressure to 80 psi at the compressor. 3.To do test imprints, activate machine using the two red Activation Buttons. 4.Check the quality of the test imprints. Adjust temperature, pressure or dwell time as necessary. 5.When you are satisfied with the quality of the test imprints, switch machine to Cycle Mode.
-
Page 28: How To Imprint On Napkins
How to Imprint on Napkins Napkins are available in beverage or luncheon styles. Beverage napkins are approximately 5 inch square; luncheon napkins are approximately 6 1/2 inch square. Gauge Bar Napkin 1.Set the temperature to about 230 degrees. Set the Type using the Open Chase Type Holder or the 2-Line Type Holder according to the instructions on typesetting. -
Page 29: How To Imprint On Matchbook Covers
How to Imprint on Matchbook Covers Matchbook covers can be imprinted straight on or at an angle. Select the proper Matchbook Guide as needed. Gauge Bar Rubber Matchbook Guide 1.Set the temperature to about 220 degrees. Set the 2-Line or 3-Line Type Holder according to the instructions on typesetting. The most common type sizes used for matchbook printing are 12 and 14 points. -
Page 30: How To Imprint On Pencils
How to Imprint on Pencils Hexagonal pencils can be imprinted by using the specially design Pencil Attachment. Pencil Set the temperature to about 210 degrees. Adjust temperature as necessary. Use Cheltenham 9-point Type and set the Type Holder according to the instructions above on typesetting. -
Page 31: How To Imprint On Stationery, Invitations Or Announcements
How to Imprint on Stationery, Invitations or Announcements. Stationery and writing papers can be imprinted using the Gauge Bar (for smaller stationery) or the Extended Printing Table (larger items.) Gauge bar 1.Set the temperature to between 220 and 250 degrees. 2. -
Page 32: How To Imprint On Emboss-A-Plates
How to imprint on Emboss-a-Plates SLE Emboss-a-Plates are vacuum plated in gold or silver with an adhesive backing. They are an excellent alternative for those who do not want to stamp directly onto photo albums leather bibles, as well as those hard to mark items such as centerpieces, desk sets or trophies. -
Page 33: How To Imprint On Larger Items
Because of its remarkable versatility, the Extended Printing Table is one of the most functional of all the SLE machine accessories. Properly used, the Extended Printing Table can dramatically increase production and enhance the print quality with significantly less effort. -
Page 34: How To Imprint On Mylar Balloons
How to Imprint on Mylar Balloons To imprint on Mylar balloons, use larger type (36-point) and the H-series foil. Use the Napkin Guide for positioning. 1. Set the temperature to about 200 degrees. 2. Center the Napkin Guide on the Printing Table and lock into position with the Gauge Bar. 3. - Page 35 • Make sure the handle of the Type Holder does not interfere with the article you are imprinting. It is good practice to remove Type Holder Handles when imprinting. Avoiding mistakes • Place a swatch or a piece of cardboard over the article and make a test impression to check for spelling and alignment and to see if all letters print evenly.
-
Page 36: How To Imprint On Favor Tags And Confetti Cards
How to Imprint on Favor Tags and Confetti Cards Ribbon Guide Favor Tags • Favor tags and confetti cards come in either of two forms: stacks of individual cut sheets or in a spool similar to a roll of postage stamps. •... - Page 37 How to Imprint on Glasses using Crysteramics Glass, ceramic or metal articles can be personalized by using the SLE product – Crysteramics. Crysteramics comes in many festive designs for all occasions. A name, a date or a short message is usually added to the design for personalization before applying to the article, such as a champagne glass.
-
Page 38: Foils
Supplies and Imprintables Foils Imprinting foils are available in a variety of colors and formulations. Your SLE Foil Color Chart gives you the wide selection of colors available. Some foil can be used adequately on a wide variety of material while others are specially formulated to print on designated substances. Foils for printing on paper stocks, however, are the most common. -
Page 39: Imprintables
Imprintables SLE offers a wide selection of imprintables to help you create elegant gifts and favors. The selection is constantly updated to reflect what is popular in the market. • Ribbons • Favor Boxes • Emboss-a-Plates • Magnetic Address Books •... -
Page 40: Caring For Your Hot Printer
Lubrication Your SLE Hot Printer should be oiled at least once a week. Use any good quality machine oil for this purpose. Apply a few drops of oil to all four sides of the ram bar. Work the handle up and down a few times to let the oil penetrate. -
Page 41: How To Promote Sales
How To Promote Sales You cannot expect your customers to ask for personalization service unless they can see some samples and know that you can do the work. By publicizing your foil imprinting capabilities and enthusiastically promote the "magic" of foil imprinting, you will attract many new customers. Arranging good-looking displays of imprinted samples is the best way to promote extra sales. - Page 42 List of Optional Accessories M-800A M-800B M-800E M-800D 1-Line 18-point Type Holder A8-LH1 B8-LH1 E8-LH1 D8-LH1 1-Line 24/36-point Type Holder A8-LHM B8-LHM E8-LHM D8-LHM 1-Line 72-point Type Holder A8-WH72 B8-WH72 E8-WH72 D8-WH72 2-Line 18-point Type Holder A8-LH2 B8-LH2 E8-LH2 D8-LH2 3-Line 18-point Type Holder B8-LH3 3-Line 12-point Type Holder...
-
Page 43: Specifications
SPECIFICATIONS Model M-800A M-800B M-800E M-800D Power Supply l10V AC 50 Hz Power Consumption 200 Watt Net Weight (Lb.) Overall Dimension 7.5 x 13.8 x 15.5 7.5 x 12.5 x 13 7.5 x 13.8 x 15.5 7.5 x 13.8 x 15.5 (in.
Need help?
Do you have a question about the 800 Series and is the answer not in the manual?
Questions and answers