
Summary of Contents for Burfam OL-BKY26-A011C2
- Page 1 Portable Air Conditioner Local air conditioners Owner’s Manual OL-BKY26-A011C2(Cooling Only) (With R290 refrigerant)
- Page 2 READ AND SAVE THESE INSTRUCTIONS...
- Page 3 CONTENTS 1. BEFORE YOU BEGIN ..........03 2. FOR YOUR SAFETY ..........06 3. PRODUCT OVERVIEW ..........12 4. INSTALLATION ............14 5. OPERATION ............19 6. CLEANING AND CARE ..........25 7. TROUBLESHOOTING ..........27 8. DECOMMISSIONING ........... 28...
- Page 4 1. BEFORE YOU BEGIN 1.1 PRODUCT DESCRIPTION Our powerful portable air conditioners are great cooling solutions for single rooms, creating a comfortable atmosphere in your space. It also has ventilation and dehumidifying function for circulating air and removal of moisture. They're self-contained systems that do not require any permanent installation allowing you to move to the space in which it is most needed.
- Page 5 warning Read the USER MANUAL carefully before operation. Further information is available in the USER MANUAL, SERVICE MANUAL, and the like. Service personnel are required to carefully read the USER MANUAL and SERVICE MANUAL before operation. THE FOLLOWING SHOULD ALWAYS BE OBSERVED FOR SAFETY ...
- Page 6 The unit is designed only for use with R-290(propane) gas as the designated refrigerant. The refrigerant loop is sealed. Only a qualified technician should attempt to service! Do not discharge the refrigerant into the atmosphere. R-290 (propane) is flammable and heavier than air. ...
- Page 7 EXPLOSION, DEATH, INJURY AND PROPERTY DAMAGE.
- Page 8 2. FOR YOUR SAFETY Your safety is the most important thing we concerned! Please read this manual carefully and fully understand before operating your appliance WARNING OPERATIONAL PRECAUTIONS WARNING- to reduce the risk of fire, electric shock or injury to persons or property: ...
- Page 9 the unit. Do not immerse or expose the unit to rain, moisture or any other liquid. Do not leave the unit running unattended. Do not tilt or turn over the unit. Do not unplug while the unit is operating. ...
- Page 10 regulations. Do not use means to accelerate the defrosting process or to clean, other than those recommended by the manufacture. The appliance shall be stored in a room without continuously operation sources (for example: open flames, an operating gas appliance or an operating electric heater).
- Page 11 Any person who is involved with working on or breaking into a refrigerant circuit should hold a current valid certificate from an industry-accredited assessment authority, which authorizes their competence to handle refrigerants safely in WARNING accordance with an industry, recognized assessment specification.
- Page 12 2.2 SAFETY PRECAUTIONS ON SERVICING Please follow these warnings when to undertake the following when servicing an appliance with R290. 2.2.1 Checks to the area Prior to beginning work on systems containing flammable refrigerants, safety checks are necessary to ensure that the risk of ignition is minimized.
- Page 13 If any hot work is to be conducted on the refrigeration equipment or any associated parts, appropriate fire extinguishing equipment shall be available to hand. Have a dry powder or CO2 fire extinguisher adjacent to the charging area. 2.2.6 No ignition sources No person carrying out work in relation to a refrigeration system which involves exposing any pipe work that contains or has contained flammable refrigerant shall use any sources of ignition in such a manner that it may...
- Page 14 – The charge size is in accordance with the room size within which the refrigerant containing parts are installed; – The ventilation machinery and outlets are operating adequately and are not obstructed; – If an indirect refrigerating circuit is being used, the secondary circuit shall be checked for the presence of refrigerant;...
- Page 15 WARNING! Install the unit in rooms which exceed 9 m². Do not install the unit in a place where inflammable gas may leak. NOTE! The manufacture may provide other suitable example or may provide additional information about the refrigerant odour.
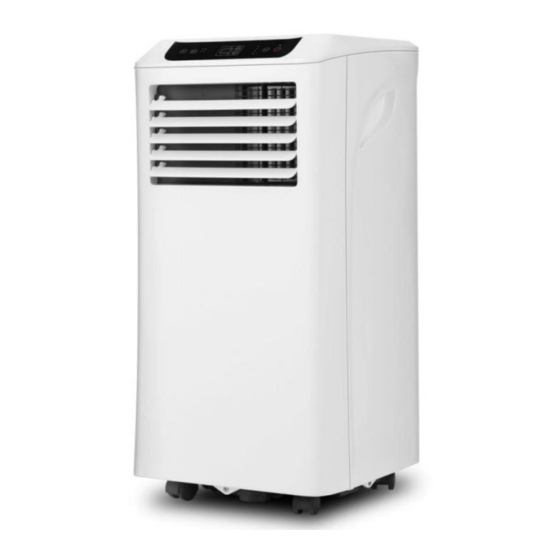
- Page 16 3. PRODUCT OVERVIEW 3.1 PRODUCT DIAGRAM ① ⑤ ⑥ ④ ⑦ Control panel Power cord Air Exhaust Air outlet with Recessed Drain opening adjustable handle with sealing plug louver Air inlet with air filter Note: The appearance is only for reference. Please see the real product for detailed information.
- Page 18 Self-evaporating system for better efficient Auto shut off when tank full Automatic restart in the event of power outage MODEL OL-BKY26-A011C2 Auto defrosting function at low ambient temperatures Remote control 2- speed fan Casters for easy mobility ...
- Page 19 Cooling Capacity 9,000 Btu/h Rated Voltage AC220-240V Rated Frequency 50Hz Cooling Rated Input Power 1,003 W Cooling Rated Input Current 4.5 A Refrigerant Charge R290/180g Sound power Level ≤65 dB(A) Maximum suction side working 0.7MPa pressure Maximum exhaust side working 3.2MPa pressure Minimum Room Size...
- Page 20 1. Exhaust hose 2. Hose connector 3. Window kit adapter 4. Remote control 5. Window kit ...
- Page 21 Choose your location If tipped more than 45°, allow the unit to set upright for at least 24 hours before start up. Place the unit on a firm, level surface in an area with at least 50cm of free space around it to allow for proper air circulation.
- Page 22 or may provide additional information about the refrigerant odour.
- Page 23 ATTACH THE EXHAUST HOSE The air conditioner requires being vented outside so that the exhaust air can escape the room which coming from the appliance contains waste heat and moisture. Do not replace or extend exhaust hose which will result in decreased efficiency, even worse shut down the unit due to low backpressure.
- Page 25 Step 4: Close your window to secure the kit in place. It needs to hold the It is windows kit firmly in place, secure the window kit with duct tape if required. recommended that t he gap between the adapter and the sides of the window should be sealed off for maximum efficiency.
- Page 27 Step 6: Adjusting the length of the flexible exhaust hose, and avoid bends in the hose. Then place AC near an electrical outlet. Step 7: Adjust the louver at the air outlet, and then switch on the unit.
- Page 28 OPERATION 5.1 CONTROL PANEL AND DISPLAY 5.2 FUNCTION KEYS AND INDICATORS POWER (LED) Press to turn on or turn off the machine Mode button , Press to switch the operation mode MODE between cool mode, fan mode, and dry mode. LED for three operation modes selecting by pressing Indicators mode button.
- Page 29 Press to switch the fan speed in HIGH fan speed (green) and LOW fan speed (green) Digital Display Displays timer setting and room temperature. MINUS Decreasing the desired temperature or timer setting. 5.3 REMOTE CONTROLLER...
- Page 31 5.4 SETTINGS 5.4.1. Start-up and Shutdown Press POWER button to turn the unit on the machine The unit runs in in FAN as default. Press MODE button to select the desired operation mode. Press POWER button again to turn off the machine 5.4.2.
- Page 32 B. Ventilating your room Press MODE button repeatedly until the LED of FAN operation lights up. In ventilation mode, the room air is circulated, but not cooled. Press SPEED button repeatedly to select the fan speed as desired.
- Page 33 C. Drying your room Press MODE button on the control panel or remote controller, the LED of DRY operation lights up. The fan speed is unable to select. User should connect the hose to the drain outlet at the bottom of the unit. Note: In this mode, the fan speed switches over to low speed and the temperature cannot be selected.
- Page 34 5.4.3. TIMER SETTING (1hour-24hours): The timer has two ways of operation: Press ADD/MINUS Press Timer key to To turn off turn on the timer repeatedly to set the function. delay OFF time. (When power on) Press ADD/MINUS Press Timer key to To turn on repeatedly to set the turn on the timer...
- Page 35 In the event of a power outage, to protect the compressor, there is a 3-minute delay until the compressor restarting.
- Page 36 5.5 DRAINAGE Self- evaporating system The self-evaporating system uses the collected water to cool the condenser coils for better efficient performance. It is no need to empty the drainage tank in cooling operation except in heating operation, drying operation and high humidity conditions. The condensate water evaporates at the condenser and evacuated through the exhaust hose.
- Page 37 drain hose downward toward the floor. It is appropriate that the degree of inclination should exceed 20 degrees. • Straighten the hose to avoid a trap existing in the hose. 6. CLEANING AND CARE 6.1. CLEANING THE AIR FILTER (every two weeks) Dust collects on the filter and restricts the airflow.
- Page 38 Pic2. Rinse the air filter under Pic1. Switch off the unit and remove running water. the two air filters. Warning! Do not touch the evaporator surface with bare-hand, or could cause injury of your fingers.
- Page 39 6.2. CLEANING UP OF REFRIGERANT General Measures: 1. Gas/vapor heavier than air. May accumulate in confined spaces, particularly at or below ground level. 2. Eliminate every possible source of ignition. 3. Use appropriate personal protection equipment (PPE). 4. Evacuate unnecessary personnel, isolate, and ventilate area. 5.
- Page 40 7. TROUBLE SHOOTING Symptom Inspection Solution Check the power Insert the power cord connection in securely. securely into the wall Outlet. The unit is Check if the water level Empty the drain pan by indicator lights up? remove the rubber plug.
- Page 41 The exhaust hose is Make sure the exhaust hose is detached. securely attached. Overflow while moving the Empty the water tank before unit. transport. Water Leakage Check if the drain hose is Straighten the hose to avoid a kinked or bends.
- Page 42 DECOMMISSIONING 8.1. STORAGE Long-Term Storage - If you will not be using the unit for an extended period of time (more than a few weeks) it is best to clean the unit and dry it out completely. Please store the unit per the following steps: Unplug the unit and remove exhaust hose and window kit store with the unit.
- Page 43 8.2. DISPOSAL Releasing refrigerant into atmosphere is strictly forbidden! WARNING!!! Do not dispose of electrical appliances as unsorted municipal waste, use separate collection facilities. Contact your local government for information regarding the collection systems available. If electrical appliances are disposed of in landfills or dumps, hazardous substances can leak into the groundwater and get into the food chain, damaging your health and well-being.
- Page 44 Importer: BURFAM PRODUCTS LTD Add: Unit 18 , Heron Business park , Tan House lane , Widnes WA8 0SW ,UK Website : www.burfamproducts.co.uk...
Need help?
Do you have a question about the OL-BKY26-A011C2 and is the answer not in the manual?
Questions and answers