
Related Manuals for Cytron Technologies Shield-PS2

Summary of Contents for Cytron Technologies Shield-PS2
- Page 1 ROBOT . HEAD to TOE P roduct User’s Manual – S hield-PS2 Shield-PS2 Cytron PS2 Shield User's Manual V1.0 September 2013 Created by Cytron Technologies Sdn. Bhd. – All Rights Reserved...
- Page 2 5 .1 C hoose PS2 Dual Shock Controller Protocol 6.1 PS2 Button and joystick status 6.2 O n Board vibrator motor control 6.3 All PS2 button and joystick status Warranty Created by Cytron Technologies Sdn. Bhd. – All Rights Reserved...
-
Page 3: Introduction And Overview
w ireless Shield-PS2 has stackable side headers which allows for more Arduino shields to be stacked on top of it. Besides, user has option to use either h ardware or software UART w ith Arduino’s main board to communication to get the PS2 controller status. Shield-PS2 reset is connected to arduino’s analog pin 1 (A1). -
Page 4: Packing List
P roduct User’s Manual – S hield-PS2 2.0 PACKING LIST 1. 1 x S hield-PS2 2. 3 x mini jumper 3. User’s manual, and sample source code can be downloaded from http://www.cytron.com.my Created by Cytron Technologies Sdn. Bhd. – All Rights Reserved... -
Page 5: Product Specification And Limitations
3.0 PRODUCT SPECIFICATION AND LIMITATIONS Dimensions Parameters Typical Unit Input Voltage (Logic Operation Voltage) Current Consumption V (Logic Input – High Level) IOH V (Logic Input – Low Level) IOL Created by Cytron Technologies Sdn. Bhd. – All Rights Reserved... -
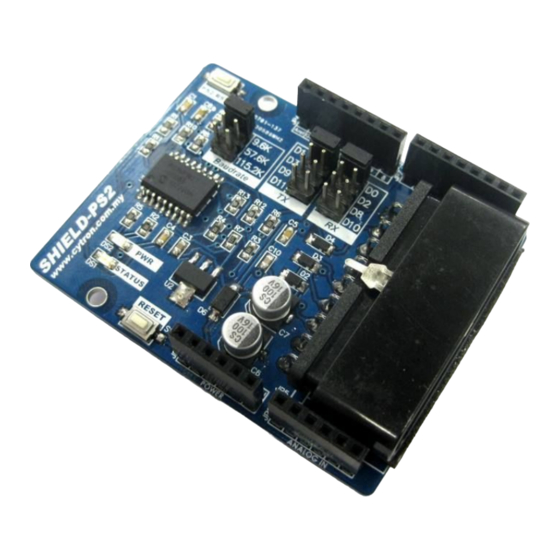
Page 6: Product Layout
This is the power port of the Arduino. The stackable header allows other stacked shield to utilize these pins. 3. Main Board reset button Arduino main board will require around 30ms to ready after reset. Created by Cytron Technologies Sdn. Bhd. – All Rights Reserved... - Page 7 6. Baud Rate selector To select the preferable UART baud rate For Cytron PS2 Shield to obtain latest baudrate from selector, Shield-PS2 need to be reset to update the board’s baud rate. 7. On board Cytron PS2 Shield reset button PS2 RST button will only reset the SHIELD-PS2 but not the Arduino Main board.
-
Page 8: Hardware Interface
If hardware serial pin (D0, D1) is selected, user needs to u nplug t he P S2 Connector from the Shield-PS2 before start to program the main board. Programming of main board may fail if the Shield-PS2 is stacked on mainboard and PS2 controller connector is connected. - Page 9 Cytron’s website. Connect the PS2 joystick to the PS2 connector socket on SHIELD-PS2 as shown. Don’t forget about the power source for the Arduino main board too. Power source for the Arduino main board is from DC adaptor plug.
- Page 10 ROBOT . HEAD to TOE P roduct User’s Manual – S hield-PS2 Created by Cytron Technologies Sdn. Bhd. – All Rights Reserved...
- Page 11 You can check the PS2 controller that are available in our store h ere No modification is needed to connect to PS2 shield. Wired PS2 Controller Wireless PS2 Controller Created by Cytron Technologies Sdn. Bhd. – All Rights Reserved...
- Page 12 Figure below shows the digital buttons and analog joystick on a typical PS2 controller. The analog value of Left Joystick and Right Joystick can be read from shield-PS2 too. Each joystick have 2 axes, and there are two formats of output. These formats will be explained later.
- Page 13 This is just an example, we notice a lot of PS2 joystick do not provide linear analog value across the range. There is a big dead zone near the middle position where analog value does not change. User is required to “play” around with the joystick. Created by Cytron Technologies Sdn. Bhd. – All Rights Reserved...
- Page 14 ROBOT . HEAD to TOE P roduct User’s Manual – S hield-PS2 Analog output format 2: In format 2, there are four variables for each joystick. The four variables are up, down, left and right. When user move the joystick in any direction, the value of these four variables change from 0 to 100.
- Page 15 ROBOT . HEAD to TOE P roduct User’s Manual – S hield-PS2 l - mean Left joystick x - mean X axis, format 1, range 0 to 255 r - mean Right joystick y - mean Y axis, format 1, range 0 to 255 u - mean Up axis, format 2, range 0 to 100 d - mean Down axis, format 2, range 0 to 100 l - mean Left axis, format 2, range 0 to 100...
- Page 16 S hield-PS2 6. PROTOCOL By default, Shield-PS2 is in passive condition, where it waits for command from UART. If Arduino main board sends a command, it will response based on the command and the status of PS2 button and joystick. The command is simple, it is in value. Each value will request Shield-PS2 to check the particular button or joystick status on PS2 and response.
- Page 17 Example : If main board sent 2 0 (decimal), Shield-PS2 right joystick up value will read and return the value of left joystick right joystick down value...
- Page 18 0 if the button is pressed 1 if button is not pressed Example: If microcontroller sent 3 1 (decimal), Shield-PS2 will check all the button and joystick status and return 6 bytes to microcontroller. Created by Cytron Technologies Sdn. Bhd. – All Rights Reserved...
- Page 19 S hield-PS2 Examples: Example of UART communication shows main board obtain the Circle button of PS2 Example of UART communication shows mainboard obtain the Left jostick, X axis value of Created by Cytron Technologies Sdn. Bhd. – All Rights Reserved...
-
Page 20: Warranty
No. 16, Jalan Industri Ringan Permatang Tinggi 2, Kawasan Industri Ringan Permatang Tinggi, 14100 Simpang Ampat, Penang, Malaysia. Tel: +604 - 504 1878 Fax: +604 - 504 0138 URL: www.cytron.com.my Email: s upport@cytron.com.my sales@cytron.com.my Created by Cytron Technologies Sdn. Bhd. – All Rights Reserved...
Need help?
Do you have a question about the Shield-PS2 and is the answer not in the manual?
Questions and answers