
Related Manuals for SWITCHEE Switchee


Summary of Contents for SWITCHEE Switchee
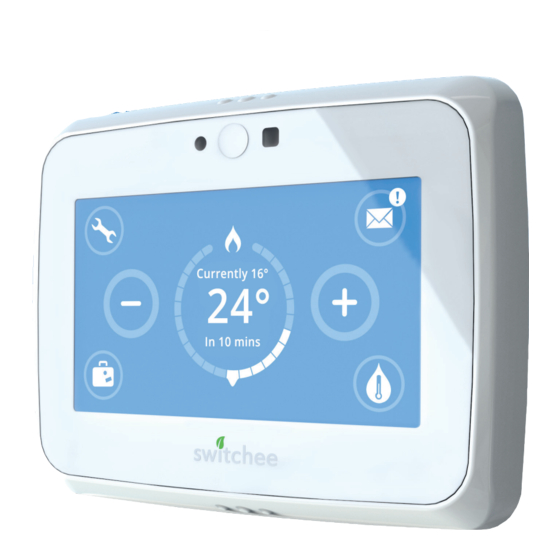
- Page 1 The Smart Thermosat for Affordable Housing Welcome to your new Switchee Switchee Installation Manual...
-
Page 2: Table Of Contents
Section 2: Installing the Boiler Receiver Unit helps landlords manage their property Section 3: Choosing a location for the Switchee Thermostat 7 portfolio. Switchee can save the resident up to 10% of their energy bills. -
Page 3: Section 1: What's In The Box
Mounting Bracket Switchee Thermostat Boiler Receiver Unit (BRU) – controls heating or heating & hot water. – to mount the Switchee Thermostat – controls valves for and be affixed to a wall. It replaces existing thermostat. heating or heating & hot water. -
Page 4: Section 2: Installing The Boiler Receiver Unit
Inners • • • Thermostat power and control terminal Override Danger – Main Terminals Electrician Only Isolate Mains before removing cover 240V Call for Heating/ Hot Water Terminal Outer casing – Front 240V AC Mains Terminal 4 Switchee Installation Manual... - Page 5 240V AC Mains Terminal then you will most likely power within the Boiler Receiver Unit. This the Switchee Thermostat with the will provide 240V power to the Boiler AC Adapter. If, however, you do see Receiver Unit.
- Page 6 NO NO NC 0V H2 W1 +12V Heat Water If the Switchee controls hot water (not the case for combi boilers) connect the NO (water) on the connector on the boiler using a spare cable on the multi-core cable.
-
Page 7: Section 3: Choosing A Location For The Switchee Thermostat
Switchee Installation Manual Section 3: Choosing a location for the Switchee Thermostat Switchee operates best when located in a room or corridor that is used frequently by the occupant(s), i.e. a living room or entrance corridor. If the existing thermostat isn’t in a good location, install Switchee Thermostat somewhere new. -
Page 8: Section 4: Switchee Thermostat - Wiring Scenarios
Switchee Installation Manual Section 4: Switchee Thermostat – Wiring scenarios There are three scenarios to consider when installing the Switchee Thermostat... Scenario 1: Fully wired in Scenario 2: Partly wired in Scenario 3: Powered by AC Adapter No existing cables between Thermostat... -
Page 9: Section 5: Switchee Thermostat - Installation
Switchee Installation Manual Section 5: Switchee Thermostat – Installation Scenario I: Fully wired in Locate the thermostatic control cable Remove the old thermostat from the 5.1.1 5.1.5 that was disconnected in Section wall. Disconnect the existing cable. 2.3. Feed the cable through the 12V... - Page 10 Replace the lid of the BRU and fasten of the unit using a 2hex screwdriver 5.2.4 Heat Water this with the Screws provided. (these can be provided by Switchee if Do not turn power on to the boiler needed). yet. Turn the power back ON. 5.2.9...
- Page 11 Section 5: Switchee Thermostat – Installation Scenario 3: Powered by AC Adapter If applicable, remove the old (these can be provided by Switchee if 5.3.1 thermostat from the wall and needed). disconnect the existing cable and blank it off. Turn the power ON at the wall 5.3.6...
-
Page 12: Section 6: Registering The Switchee
Once you’ve logged in to your web app hot water times set you can enter the must include uppercase letters and account, you’ll be able to register a Switchee. times here and we will set this remotely. numbers). 12 Switchee Installation Manual... - Page 13 Section 6: Registering the Switchee (continued from previous page) Once you have entered all necessary details Step 2: After you click on this, a browsing Downloading the WebApp icon it will take you to a summary page to confirm menu will pop up on your screen.
-
Page 14: Section 7: Final Checklist
5. Test hot water current time. If it does update, it If the Switchee also controls hot means the Unit has picked up the water, tap the Hot Water GSM signal. It can take a minute or button on the bottom right of two to update. -
Page 15: Section 8: Wiring Diagrams
If there are no cables to the existing the wall you will be able to wire in the thermostat, you can wire in 0V and 12V to thermostat, or you are installing Switchee 0V and 12V to power the Thermostat, provide power to the Thermostat. - Page 16 Section 8: Wiring diagrams 240V MAINS 240V WATER WATER HEAT 0V power output to Switchee Thermostat Call for Heat (H2) Call for Hot Water (W1) 12V power output to Switchee thermostat Call for Water - Satisfied (NC) Call for Hot Water (NO)
-
Page 17: 240V Combi Boiler
Section 8: Wiring Diagrams 240V Combi Boiler Wiring Diagram Switchee Thermostat Power supply HEAT WATER WATER 240V/50Hz mains Boiler Switchee Installation Manual... -
Page 18: Low Voltage Combi Boiler
Low Voltage Combi Boiler Wiring Diagram Switchee Thermostat 24 V Power supply HEAT WATER WATER 240V/50Hz mains Boiler Important: You must not wire in 240V supply into the common or the boiler. Boiler is low voltage and must be 24V only! 18 Switchee Installation Manual... -
Page 19: Y-Plan Boiler
Section 8: Wiring Diagrams Y-Plan Boiler Wiring Diagram Switchee Thermostat Power supply HEAT WATER WATER 240V/50Hz mains Boiler Zone Valve Hot Water Tank Switchee Installation Manual... -
Page 20: S-Plan Boiler
Section 8: Wiring diagrams S-Plan Boiler Wiring Diagram Switchee Thermostat Power supply HEAT WATER WATER 240V/50Hz mains Boiler Heating Valve Water Valve Hot Water Tank 20 Switchee Installation Manual... -
Page 21: District Heating Valve
Section 8: Wiring Diagrams District Heating Valve Wiring Diagram Switchee Thermostat Power supply HEAT WATER WATER 240V/50Hz mains Heating Valve Switchee Installation Manual... -
Page 22: Section 9: Technical Information
BRU: power output from receiver unit to provide disconnection. thermostat are 12V DC, 0.15A on all – The state of the control during SELV terminals (0V, H2, W1 and +12V). transportation is not critical. 22 Switchee Installation Manual... -
Page 23: Section 10: Frequently Asked Questions
(where applicable) Is it difficult to install? times on the Switchee. How long does it take to install a Switchee? It’s quite simple just like installing any It depends on the location, boiler and other thermostat, and very similar to the Can a resident change the heating and, wiring. -
Page 24: Section 11: Troubleshooting
Receiver Unit: make sure the Boiler Receiver Unit and – once for the heating to come ON, Switchee Thermostat are powered ON, – twice for the hot water to come ON, and press the Learn button on the Boiler – three times for both the heating and hot Receiver Unit for around two seconds. - Page 25 For any questions please call Switchee or ask the resident to call us on: 0800 133 7957 Alternatively you can email us at: install@switchee.co Switchee Installation Manual...
- Page 26 Switchee Ltd, Base KX 103c Camley Street, London N1C 4PF 0800 133 7957 – Option 2...
Need help?
Do you have a question about the Switchee and is the answer not in the manual?
Questions and answers