Table of Contents
Advertisement
Available languages
Available languages
Quick Links
Advertisement
Table of Contents

Related Manuals for Sylvania SP349


Summary of Contents for Sylvania SP349
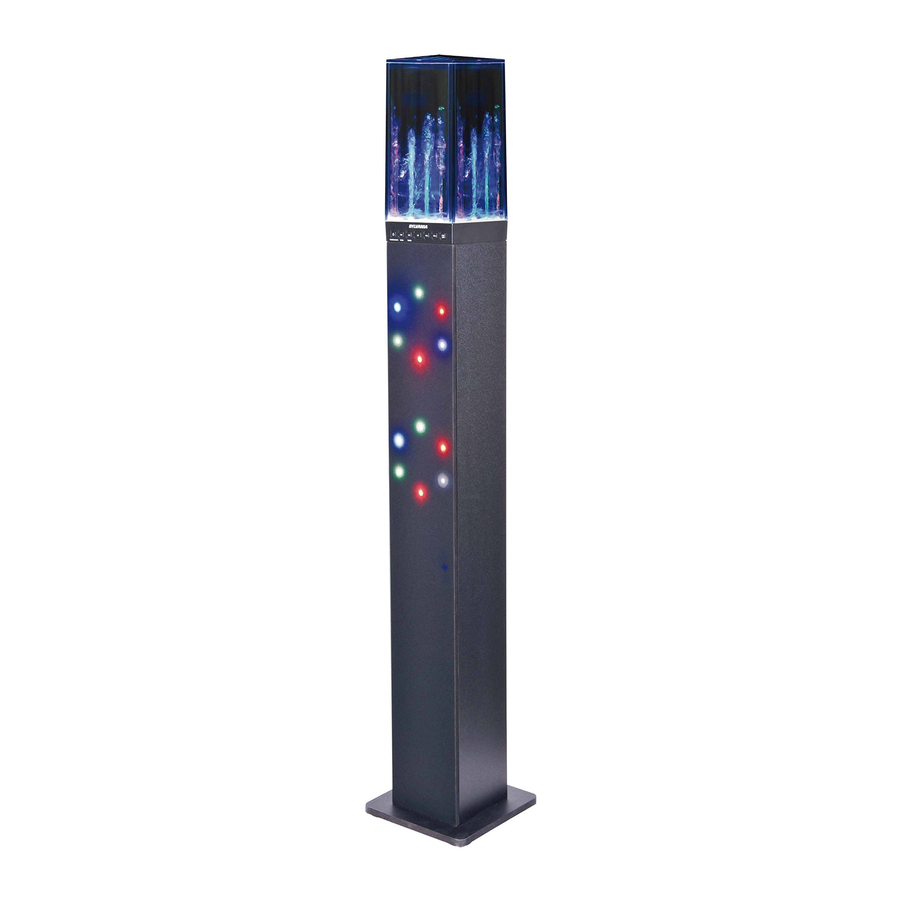
- Page 1 2016.0 2016.06. 6.14 17:22:2 +08'00' 08:13:59 +08'00' Water Dancing Bluetooth Tower Speaker MODEL:SP349 POWER SOURCE TUNE- TUNE+ 2016.06.15 08:50:27 +08'00' Instruction Manual Please read this instruction manual carefully before using and keep it for future reference...
-
Page 2: Important Safety Instructions
Important Safety Instructions CAUTION ! RISK OF ELECTRIC SHOCK DO NOT OPEN The lightning flash with arrowhead within an TO PREVENT The exclamation point within an equilateral equilateral triangle is intended to alter the RISK OF ELECTRIC SHOCK triangle is intended to alter the user to the user to the presence of uninsulated DO NOT REMOVE COVER (OR BACK) presence of important operating and... -
Page 3: Fcc Warning
FCC Warning: This device complies with Part 15 of the FCC Rules. Operation is subject to the following two conditions: (1) this device may not cause harmful interference, and (2) this device must accept any interference received, including interference that may cause undesired operation. -
Page 4: Front View
PRODUCT OVERVIEW Front View Rear View POWER SOURCE TUNE- TUNE+ FM ANT DC IN 9V, 2A AUX 2 AUX 1 FM ANT DC IN AUX 2 9V, 2A AUX 1 13 14 2016.06.15 08:50:48 +08'00' 1. Water Dancing Cover 9. VOL - (Volume Down) 10. - Page 5 REMOTE CONTROL POWER SOURCE TUNE- TUNE+ ON/OFF ON/OFF 2016.06.15 08:50:55 +08'00' 1.POWER Button 6.SOURCE Button (Previous) TUNE- Button (Play/Pause) Button 3.VOL- (Volume Down) Button (Next)/TUNE+ Button 4. LED ON/OFF Button 9.VOL+ (Volume Up) Button (Mute) Button 10.W.D ON/OFF (Water Dancing On/Off) Button...
-
Page 6: Battery Replacement
First Time Using: Remove and discard the insulation tab as shown. Battery Replacement Push and slide out the battery door (as shown in the figure below) on the rear of the remote control. Replace the battery with a new CR2025 button cell with the polarity "+" facing up. 2016.06.15 Battery Precautions 08:51:02 +08'00'... -
Page 7: Connecting Power
FM Radio Antenna Before using your unit fow FM reception, unwrap and fully extend the antenna wire. You may need to adjust the position of the antenna wire for maximum signal strength. Connecting Power Before connecting the power, check that the mains voltage on the rating plate of the back panel is the same as the voltage in your area. -
Page 8: Selecting Fm Mode
Selecting FM Mode Press the POWER/SOURCE button on the unit repeatedly or press the SOURCE button on the remote control repeatedly until the indicator turns GREEN, and there is a voice tone sounds "FM Mode". Station Search Press and hold / TUNE + or button on unit or on remote control to / TUNE -... - Page 9 Bluetooth devices. Select this option. ~ Your device will now scan for other Bluetooth device and should find the unit, identified as “SYLVANIA ”. Choose to pair with “ SYLVANIA ”. After successful pairing, there will be a voice tone sounds "Paired". 2016.06.15...
- Page 10 Connecting to AUX 1 Connect one end of the 3.5mm stereo mini jack cable to the line out or headphone jack of the source (smart phone, tablet, etc.). Connect the other end of the cable to the AUX 1 jack on the back panel of the unit. Playing an AUX Source Press the POWER/SOURCE button on the unit or press the SOURCE button on...
- Page 11 If you are having problems with your unit, please review the guide below before requesting. SYSTEM POSSIBLE CAUSE POSSIBLE SOLUTION Power plug is not plugged into a Plug into the wall outlet properly wall outlet No power Press and hold the POWER/SOURCE The unit is in standby mode button on the unit or press POWER button on the remote control to power on the unit...
- Page 12 Power Source................9V 2000mA Speaker........................2X5W Bluetooth Working Range................up to 32ft(10m) FM Coverage....................87.5-108.0MHz Accessories Instruction Manual 2016.06.15 AUX IN Cable 08:51:49 +08'00' Adapter Remote Control Wooden Base Plate 2XScrews 2XWashers is a trademark on a registered trademark of Bluetooth SIG Inc.
- Page 13 Enceinte-tour Bluetooth Reflets Dansants ® MODÈLE :SP349 2016.06.15 08:51:55 +08'00' POWER SOURCE TUNE- TUNE+ Mode d'emploi Lisez ce mode d'emploi avec attention avant d'utiliser l'unité, et conservez-le pour référence future.
- Page 14 Avant d'utiliser cette unité, veillez à lire toutes les instructions d'utilisation avec attention, et notez que ces précautions sont d'ordre général et peuvent ne pas être applicables à cette unité. Par exemple, cet appareil pourrait ne pas avoir la capacité d'être branché à une antenne extérieure.
- Page 15 9. N'essayez pas de contourner les caractéristiques de sécurité d'une prise polarisée ou d'une mise à la terre. Un prise avec mise à la terre possède deux lames et une troisième broche de mise à la terre. La large lame ou troisième broche est présente pour votre sécurité.
-
Page 16: Avertissement De La Fcc
Avertissement de la FCC : Cet appareil respecte la Partie 15 des règles de la FCC. Son utilisation est sujette aux deux conditions suivantes : (1)Cet équipement ne doit pas créer d'interférences dangereuses. (2)Cet équipement doit accepter toute interférence reçue, incluant celles pouvant entraîner un mauvais fonctionnement. -
Page 17: Installation
INSTALLATION ATTENTION : pour garantir la stabilité de l'unité, ne jamais l'utiliser sans le socle. Étalez un grand morceau de tissu sur une table ou une autre surface de travail. Allongez l'unité sur le tissu, sur le côté droit, la base orientée vers l'extrémité de la table. -
Page 18: Présentation Du Produit
PRÉSENTATION DU PRODUIT Vue avant Vue de côté POWER SOURCE TUNE- TUNE+ FM ANT DC IN 9V, 2A AUX 2 AUX 1 FM ANT DC IN AUX 2 9V, 2A AUX 1 13 14 2016.0 6.15 08:52:3 +08'00' 1. Couvercle à reflets dansants 9. - Page 19 TÉLÉCOMMANDE POWER SOURCE TUNE- TUNE+ ON/OFF ON/OFF 2016.06.15 08:52:41 +08'00' 6. Bouton SOURCE 1. Bouton ALIMENTATION Bouton (Lecture/Pause) Bouton (Précédent)/FRÉQUENCE - Bouton (Suivant)/FRÉQUENCE + 3. Bouton VOL- (réduction du volume) 9. Bouton VOL+ (augmentation du volume) 4. Bouton DEL activée/désactivée 10.
- Page 20 INSTALLATION DE LA PILE (TÉLÉCOMMANDE) CONFIGURATION INITIALE : Retirez puis jetez la languette d'isolation. Remplacement de pile 1. Poussez et faites glisser le compartiment à pile comme sur la figure ci-dessous et à l'arrière de la télécommande. 2. Remplacez les piles par une nouvelle de modèle CR2025, la borne « + » tournée vers le haut.
-
Page 21: Connecter L'alimentation
MISE EN GARDE ! Les piles-bouton peuvent entraîner de sérieuses blessures, et même la mort si ingérées. Jetez-les de manière appropriée ! Conservez les piles hors de portée des enfants. Distance de fonctionnement de la télécommande • Un obstacle entre l'appareil et le transmetteur peut en gêner le fonctionnement. •... -
Page 22: Écouter La Radio Fm
Reflets dansants • Appuyez sur le bouton DEL RD de l'unité ou sur le bouton RD activé/désactivé de la télécommande pour allumer la DEL et les effets d'eau sur le capot à eau. • Appuyez sur le bouton DEL RD de l'unité ou sur le bouton RD activé/désactivé de la télécommande pour éteindre la DEL et les effets d'eau sur le capot à... - Page 23 Sélectionnez cette option. ~ Votre appareil recherchera ensuite les autres dispositifs BT à portée. Il devrait identifier « SYLVANIA ». • Choisissez d'associer avec « SYLVANIA ». • Une fois l'association effectuée avec succès, une notification sonore annoncera « Paired ».
- Page 24 DIFFUSER L'AUDIO VIA SOURCE AUX 1 Branchement via AUX 1 • Raccordez une extrémité du mini jack stéréo de 3,5 mm à la prise sortie ligne ou écouteurs de la source (smartphone, tablette, etc.) • Raccordez-en l'autre extrémité à la prise AUX 1 présente sur le panneau arrière de la tour BT.
-
Page 25: Guide De Dépannage
GUIDE DE DÉPANNAGE En cas de problème avec votre unité, reportez-vous au guide ci-dessous avant de prendre contact avec notre service d'assistance. SYSTÈME CAUSE POSSIBLE SOLUTION POSSIBLE La prise secteur n'est Brancher correctement la prise dans la prise d'alimentation pas branchée dans la murale prise murale L'unité... -
Page 26: Caractéristiques Techniques
CARACTÉRISTIQUES TECHNIQUES: Alimentation 2000mA ………………………....……..………………………....……..Haut-parleur 2 X5W Portée Bluetooth………………………....……..jusqu'à 10 mètres Plage de fréquences FM…………………………… … 87,5-108,0MHz Accessoires Mode d'emploi 2016.06.15 Câble ENTRÉE AUX 08:53:34 +08'00' Adaptateur secteur • Télécommande • Socle de bois ...
Need help?
Do you have a question about the SP349 and is the answer not in the manual?
Questions and answers