Table of Contents
Advertisement
Quick Links
D3
eela-audio
D3
Digital Mixing Console
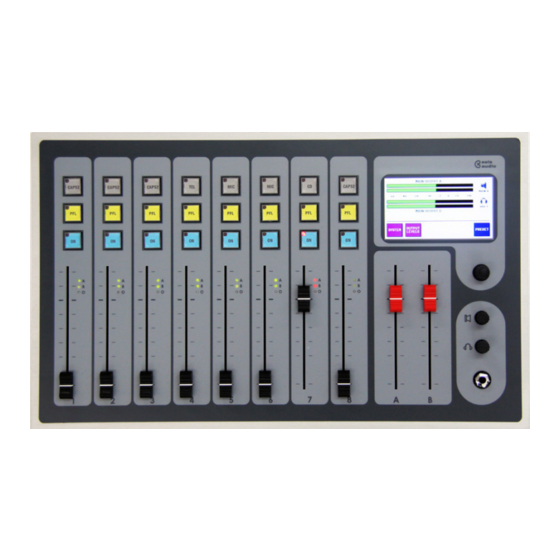
Eela Audio D3 table top / 19" digital mixing console
24 inputs, 2 main outputs, 4 configurable stereo outputs
8 input faders
2 main output faders
Color touch screen for settings, e.q., dynamics, configuration
Channel on "Start" button above each fader
Broadcast audio and logical functions
EA Broadcast / Eela Audio, Het Riet 8 A, 5431NM Cuijk, The Netherlands
http://www.eela-audio.com
e-mail: sales@eela-audio.com
Advertisement
Table of Contents

Related Manuals for Eela Audio D3

Summary of Contents for Eela Audio D3
- Page 1 2 main output faders Color touch screen for settings, e.q., dynamics, configuration Channel on “Start” button above each fader Broadcast audio and logical functions EA Broadcast / Eela Audio, Het Riet 8 A, 5431NM Cuijk, The Netherlands http://www.eela-audio.com e-mail: sales@eela-audio.com...
- Page 2 Please keep this manual so you can refer to it at a later stage. Functions and / or layout of the touch screen of the D3 can vary due to different software versions. More information is available on http://www.eela.nl/D3TI...
-
Page 3: Table Of Contents
GENERAL REMARKS: The D3 is designed in a way that most of the functionality is self-explaining and easy to understand by the experienced radio studio operator. As all software based equipment the functionality and screen layout can change with new versions. - Page 4 The unit is design for modern radio applications and suited for simultaneous dual use: APPLICATIONS: The Eela Audio D3 is designed for use in modern radio and television broadcast applications for On-Air and or production studios. Table top / 19" digital mixing console...
- Page 5 Eela Audio D3 manual, October 2009...
-
Page 6: Control Surface
You have to confirm the change by pushing on top of the rotary. The D3 features a color touch screen display. The display is mounted under a clear polycarbonate layer for a smooth surface and the best possible protection of the screen:... -
Page 7: Main Screen / Meters
Eela Audio D3 table top / 19" digital mixing console: MAIN SCREEN / METERS: Both meters, Loudspeaker and headphone icons hide a source selector. You can select the source for each item by touching the meters / icons and the source selector will open:... -
Page 8: System Settings
You can set the dim level for control room and studio loudspeakers. GPIO: The D3 has 8 opto isolated outputs and 8 opto isolated switching inputs on board. A further 16 GPI/O are available on the EA963 extender. The GPIO button takes you into the main screen GPIO menu. - Page 9 Example: If you switch off a master fader while the fader is in closed position the main level of this output will also be low. You can turn the volume up as described above. Eela Audio D3 manual, October 2009...
-
Page 10: Presets
PC’s for the same purpose. A qualified technician can change this (internal) battery. In the event of a firmware upgrade all settings will be lost including PRESET 1. It is recommended to write down your basic settings and keep these in a safe place. Eela Audio D3 manual, October 2009... -
Page 11: Channel Settings
The unit has a built-in DTMF generator. (No internal hybrid!) A normal hybrid is transparent for these DTMF tones. Pressing the CONFIG button opens the configuration menu for this channel. Settings are stored individually for each of the 3 inputs of a channel. Eela Audio D3 manual, October 2009... - Page 12 A red LED also indicates if a signal is routed to an output in the event a fader is externally overruled. The third LED next to each input fader marked “O” is input overload indication. Eela Audio D3 manual, October 2009...
- Page 13 Fader bypass switched the channel on to unity gain and ‘faderstart on’ independent of fader setting. Outputs can be: Faderstart, Pfl. Out and if activated as ‘hybrid’ also modem (hybrid) on. The type and shape of the I/O’s can be set in the main systems menu. Eela Audio D3 manual, October 2009...
-
Page 14: General Specifications
+10 PPM is 0 dBFS General specifications: The D3 comes with 19” rack mounts, unit can be rack mounted without the need for extra space above the unit to allow room for connectors. 6 microphone inputs, balanced on XLR, switchable 48 Volt phantom powering, 2 AES/EBU digital inputs, balanced XLR with sample frequency converters, range: 22kHz.>... -
Page 15: Connections
You can download the special update program and updates from: http://www.eela.nl/D3TI The Eela Audio CAPS2 radio automation program interfaces with the D3 via the USB port. For details see the CAPS2 manual. - Page 16 GPIO schematic overview: Pin no. Description GPI_1 GPO_1 GPI_2 GPO_2 GPI_3 GPO_3 GPI_4 GPO_4 GPI_5 GPO_5 GPI_6 GPO_6 GPI_7 GPO_7 GPI_8 GPO_8 25 pin D-type connector pin layout. Eela Audio D3 manual, October 2009...
-
Page 17: Gpio Pinout
TalkBack button is pushed. With the D3 an AUX bus is used for this purpose and you can even built a dedicated mix e.g. lower volume of the music contributions. It is not a cleanfeed signal as the presenter headphones need the... - Page 18 TB button. As the D3 mixing desk can be used in a true “split” mode e.g. an automated program is playing on air and at the same time making a recording you have to be able to select which signals must be present in the CLEANFEED, FOLDBACK or RETURN.
-
Page 19: Setup Examples, Control Room Microphone, Studio Microphone, Hybrid
TB microphone: Select the box “TB input ch” and with the help of the rotary select the channel on witch the CR microphone is connected. This will than be your TB microphone. Eela Audio D3 manual, October 2009... - Page 20 To setup a “cough” circuit see details in chapter “COUGH” on page 18. Briefly pushing the grey “select” button above the fader again to return to the main screen with meters. Eela Audio D3 manual, October 2009...
- Page 21 Please note all AUX levels depend on and are stored with the selected INPUT so if you switch inputs on a channel you have adjust that level also! Setup your Talkback microphone in the SYSTEMS menu ‘TB input ch:’ as described earlier. Eela Audio D3 manual, October 2009...
- Page 22 Select the purple GPIO button and set your ‘Ringtone detect’ GPI and ‘Modem on’ both to ‘8’. Standard for an Eela Audio hybrid the shape and type of the GPIO’s are continuous so do not select any checkboxes in the main GPIO settings menu (see page 7) An incoming call is indicated by a fast flashing LED in the grey “select”...
- Page 23 D3 / EA815/1 telephone hybrid cable diagram: EA815/1 hybrid remote is connected to GPIO 1 D3 Remote PC software: PC software to be used for firmware update and store settings in PRESET 1. PC remote software to safe settings in preset 1.
Need help?
Do you have a question about the D3 and is the answer not in the manual?
Questions and answers