Table of Contents
Advertisement
Quick Links
Advertisement
Table of Contents

Subscribe to Our Youtube Channel
Related Manuals for Lacunza Clasica 5T


Summary of Contents for Lacunza Clasica 5T
- Page 1 Clásica 5T Clásica 7T Clásica 8T Instruction Book...
-
Page 2: Table Of Contents
PRESENTATION OF THE APPLIANCE Lacunza congratulates you on your choice. Certified under ISO 9001, Lacunza guarantees the quality of its appliances and undertakes to meet the needs of its customers. Confident of the know-how afforded by more than 50 years’ experience, Lacunza uses advanced technologies in the design and manufacture of its entire range of appliances. - Page 3 PRESENTATION OF THE APPLIANCE 4.1.1. Visible enamelled parts ............................18 4.1.2. Top surface ................................18 4.1.3. Firebox ................................... 18 4.1.4. Inside the appliance ............................... 18 4.1.5. Flue socket ................................18 4.1.6. Chrome parts................................19 4.1.7. Brass parts ................................19 4.1.8. Enamelled-steel parts ............................. 20 4.1.9.
-
Page 4: Presentation Of The Appliance
PRESENTATION OF THE APPLIANCE PRESENTATION OF THE APPLIANCE For optimum operation of the appliance, we advise you to read this manual carefully before switching on the appliance for the first time. In case of problems or concerns, we urge you to contact your dealer, who will cooperate with you. - Page 5 Instruction Book. Failure to respect these conditions may lead to problems with the appliance (deterioration, shorter useful life, etc.) which are not covered by the Lacunza warranty. Figure No.1 - Dimensions of the Clásica 5T appliance in mm...
- Page 6 PRESENTATION OF THE APPLIANCE Figure No.2 - Dimensions of the Clásica 7T appliance in mm...
- Page 7 PRESENTATION OF THE APPLIANCE Clas ica Figure No.3 - Dimensions of the Clásica 8T appliance in mm...
-
Page 8: Instructions For The Installer
P ≤ 10kW fixtures, etc.). 10 < P ≤ 15 Lacunza’s liability is limited to the 15 < P ≤ 20 supply of the material and does not include 20 < P ≤ 25 installation of the appliance. -
Page 9: Location Of The Appliance In The Room
INSTRUCTIONS FOR THE INSTALLER • 2.2.2. Location of the appliance in the Make sure that the doors close room properly. • Make sure that all moving parts are Choose a location in the room which fitted in place. favours good hot-air distribution by convection and radiation. -
Page 10: Connection To The Flue
INSTRUCTIONS FOR THE INSTALLER 2.3.6. Connection to the flue The appliance must be connected to the chimney flue using special piping designed to resist the products of combustion (e.g. stainless steel, enamelled steel, etc.). To connect the flue to the socket flange, insert the piping inside the flange and seal the joint with fire sealant or fire cement to make it completely airtight. -
Page 11: Chimney Crown
INSTRUCTIONS FOR THE INSTALLER the appliance over its entire length in order 2.4.2. Chimney crown to ensure correct operation. The upper end of the chimney must The flue must prevent the entry of clear the roof, the roof ridge or any rainwater. - Page 12 INSTRUCTIONS FOR THE INSTALLER The chimney crown must clear the highest point of any neighbouring building or obstacle located within a 10m radius of the chimney outlet by more than 1m. Figure No.10 - Distances between the chimney crown and objects within a radius of between 10 and 20m Figure No.9 - Distances between the chimney crown and objects within a 10m...
-
Page 13: Instructions Of Use
INSTRUCTIONS OF USE • INSTRUCTIONS OF USE Resinous wood may mean that the appliance and the flue need to be cleaned more often. The manufacturer accepts no liability whatsoever for damage caused to parts as Non-permitted fuels: a result of the improper use of non- •... -
Page 14: Description Of The Parts Of The Appliance
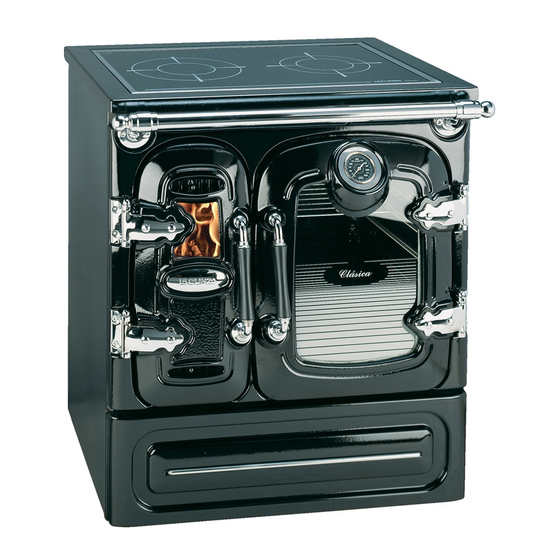
INSTRUCTIONS OF USE 3.2. Description of the parts of the appliance 3.2.1. Operating components Figure No.12 - Operating components on the appliance • A: Firebox door handle • B: Oven door handle • C: Direct draught rod o C1 open o C2 closed •... -
Page 15: Lighting
INSTRUCTIONS OF USE If the condensation comes into contact with the enamel, wipe it off and dry with a 3.3. Lighting cloth straight away to prevent any possible Use of the appliance in warm weather loss of shine. (warm days, early hours of the afternoon on sunny days) may lead to lighting and 3.4. -
Page 16: Removing Ash
INSTRUCTIONS OF USE and leave the Secondary Combustion IMPORTANT: Keeping the secondary-air Intakes open. intake open helps keep the door glass cleaner for longer. 3.6. Removing ash Double-combustion air intake Following sustained The Clasica 7T appliances provide appliance, it is necessary to remove the ash double combustion air intake., By opening from the firebox. -
Page 17: Cooking On The Top Surface
INSTRUCTIONS OF USE 3.7.2. Cooking on the top surface Follow the indications given in the following table: Min. Output Max. Output Direct draught Closed Closed Primary intake Closed Open Secondary intake Closed Open The best area of the top surface for cooking is the over the stove firebox. - Page 18 Move gently at all times. When you have finished using the protective supports, Lacunza recommends that you always return the glass-ceramic top surface to its original position (horizontal).
-
Page 19: Maintenance And Important Advice
MAINTENANCE AND IMPORTANT ADVICE Maintain according to the instructions MAINTENANCE AND given for Visible enamelled parts (front of IMPORTANT ADVICE the kitchen stove). Due to their position and function, however, these parts are subject to a great deal of wear and it is 4.1. -
Page 20: Chrome Parts
MAINTENANCE AND IMPORTANT ADVICE In order to gain access for cleaning purposes, it is necessary to unscrew the four screws from the back of the oven and remove the plate. When you finish cleaning, replace the cover by screwing the 4 screws tight. -
Page 21: Enamelled-Steel Parts
MAINTENANCE AND IMPORTANT ADVICE 4.1.8. Enamelled-steel parts Lacunza accepts no liability for any modification to the product which it has Use a damp cloth with neutral soap to not authorised. clean the enamelled-steel parts and dry immediately. abrasive, This appliance is a heat-producing corrosive, chlorine-based or acid-based appliance and contact may lead to burns. -
Page 22: Troubleshooting
TROUBLESHOOTING TROUBLESHOOTING This symbol means that a qualified professional should be called to perform the operation. Problem Probable causes Solution Use hard woods, cut at least 2 years ago and stored in a Green or damp wood sheltered, ventilated place Use crumpled paper or firelighters and dry wood chips to light The logs are too large the fire. -
Page 23: Basic Breakdowns
BASIC BREAKDOWNS BASIC BREAKDOWNS Figure No.19 - Basic breakdowns... - Page 24 BASIC BREAKDOWNS Clasica 5T Clasica 7T Clasica 8T Nº Denom. Ref. Ref. Ref. 1 Cristal Encimera Vitro 501000000126 501000000124 501000000219 Protección grande con arandelas 501000000322 "esmaltadas" Protección mediana con arandelas 501000000323 501000000323 "esmaltadas" Protección pequeña con arandelas 501000000324 "esmaltadas" 3 C.Cerrada Cajon Cenicero...
-
Page 25: Declaration Of Performance
DECLARATION OF PERFORMANCE DECLARATION OF PERFORMANCE... - Page 26 DECLARATION OF PERFORMANCE...
- Page 27 DECLARATION OF PERFORMANCE...
- Page 28 DECLARATION OF PERFORMANCE...
- Page 29 DECLARATION OF PERFORMANCE...
- Page 30 DECLARATION OF PERFORMANCE...
-
Page 31: Ce Mark
CE MARK CE MARK... - Page 32 CE MARK...
- Page 33 CE MARK...
- Page 34 CE MARK...
- Page 35 CE MARK...
- Page 36 CE MARK LACUNZA KALOR GROUP S.A.L Pol. Ind. Ibarrea s/n 31800 Alsasua (Navarra) Spain Tel.: (00 34) 948 56 35 11 Fax.: (00 34) 948 56 35 05 e-mail: comercial@lacunza.net Website: www.lacunza.net EDITION: 3...
Need help?
Do you have a question about the Clasica 5T and is the answer not in the manual?
Questions and answers