Advertisement
Table of Contents
- 1 Model X10
- 2 Operational Manual
- 3 Table of Contents
- 4 Preface Warning - Safety First
- 5 Components
- 6 Getting Started
- 7 Pressure Testing
- 8 Charging/Filling the Solvent Vessel
- 9 Preparing to Operate
- 10 Running the Extractor
- 11 Vent down and Pour off
- 12 Periodic Maintenance
- 13 Appendix A Facility Requirements
- Download this manual
Advertisement
Table of Contents

Related Manuals for Precision X10


Summary of Contents for Precision X10
- Page 1 Model X10 Extraction System 1 | P a g e Model X10 Operational Manual – For Hazardous Environments ® Precision Extraction Solutions ©2018 PX2 Holdings, LLC. All rights reserved. v02.21.18...
-
Page 2: Model X10
Congratulations on the purchase of your new Precision Extraction Solutions, Model X10 extraction system! You are well on your way to a better experience in professional extraction. Please read and understand this operational manual thoroughly prior to using your new extractor. Also visit our YouTube channel for video tutorials on the X10 system and other ® Precision Extraction Solutions products. Remember, safety first! ® If further assistance is needed please contact Precision Extraction Solutions technical support directly at 855-420-0020. -
Page 3: Table Of Contents
Charging/Filling the Solvent Vessel Preparing to Operate Running the Extractor Vent Down and Pour Off Periodic Maintenance Facility Requirements Appendix A Assembly Requirements Appendix B DOT compliance Appendix C Warranty May be found at https://precisionextraction.com/ client-portal/ Password: precision313 3 | P a g e Model X10 Operational Manual – For Hazardous Environments Precision® Extraction Solutions ©2018 PX2 Holdings, LLC. All rights reserved. v02.21.18... -
Page 4: Preface Warning - Safety First
Exposure may irritate eyes, nose, throat and skin. Please read manufacturer’s Material Safety Data Sheet for further safety information on LPG. WARNING Make certain all safety devices are functioning properly before operating equipment. 4 | P a g e Model X10 Operational Manual – For Hazardous Environments Precision® Extraction Solutions ©2018 PX2 Holdings, LLC. All rights reserved. v02.21.18... - Page 5 Lower Flammability Limit (“LFL”). WARNING LPG is heavier than air and can settle in low places. WARNING DO NOT allow children to tamper or play with the equipment. DO NOT use or store equipment or containers where they could be exposed to WARNING high temperatures. Relief valves can open allowing a large amount of flammable WARNING gas to escape. DO NOT artificially heat equipment or containers above 125°F. WARNING This equipment is NOT equipped with an overfill prevention device. WARNING All system containers must be depressurized prior to opening. IT IS THE USER’S SOLE RESPONSIBILITY TO USE, TRANSPORT AND STORE THE EQUIPMENT IN A SAFE MANNER. USER ASSUMES ALL RISK ASSOCIATED WITH THE USE OF THIS EQUIPMENT. USER AGREES THE EQUIPMENT IS ONLY TO BE UTILIZED FOR LAWFUL PURPOSES. 5 | P a g e Model X10 Operational Manual – For Hazardous Environments Precision® Extraction Solutions ©2018 PX2 Holdings, LLC. All rights reserved. v02.21.18...
-
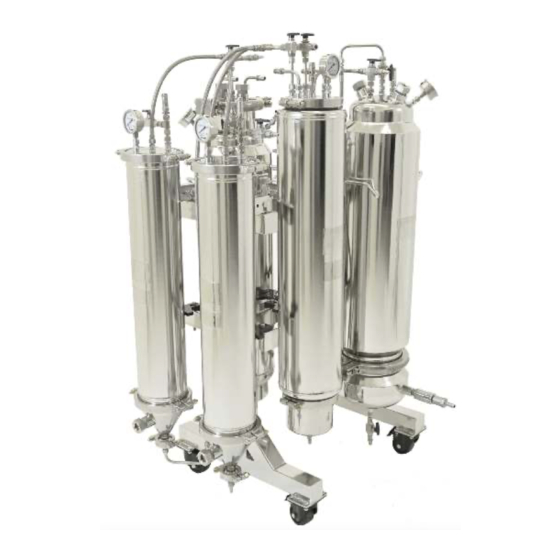
Page 6: Components
CHAPTER 1 Components Collection Tank De-Wax Tank Material Column Expansion Tank Solvent Tank Stand 6 | P a g e Model X10 Operational Manual – For Hazardous Environments Precision® Extraction Solutions ©2018 PX2 Holdings, LLC. All rights reserved. v02.21.18... -
Page 7: Getting Started
(e.g., Julabo temperature control devices), and placing them in an area determined to be fit by your local building department. If required, you may have to utilize UL listed equipment for this task and submit a building ® plan to your municipality. You should speak to your Precision Extraction Solutions technical representative to ensure that your cooling and heating options are adequate for seamless operation of the X10 system in a passive configuration. The X10 extraction system comes pre-configured with heating and... -
Page 8: Pressure Testing
CHAPTER 3 Pressure Testing Pressure Testing/Preparing the Equipment to Operate Your X10 unit comes factory tested and inspected for sustained pressure holding capabilities. However, shipping and moving of the unit may create pressure leaks, as well drastic change in temperature. It is the operator's responsibility to check for pressure for leaks prior to operation. To check the system for leaks, please attach all the components and hose assemblies per the drawing in this manual. If pressure testing the entire system new, the solvent vessel is to be included. If testing the system after the solvent tank has been filled, please keep all valves on the solvent vessel CLOSED. All other valves should remain OPEN. Attach a 3/8" compression hose to the collection vessel, and with all the valves open on the system, bring the system pressure to 150PSI using compressed air via an air compressor. Ensure the vent down nipples on the gauge are OPENED prior to performing a pressure test. - Page 9 THEM THE MORE EFFIECENT YOUR MACHINE AND CHILLER WILL FUNCTION. IT IS HIGHLY RECCOMENDED THAT YOU PURCHASE A STAINLESS STEEL INSULATED HOSE KIT ® FROM PRECISION EXTRACTION SOLUTIONS FOR YOUR HEATERS AND CHILLERS. 9 | P a g e Model X10 Operational Manual – For Hazardous Environments Precision® Extraction Solutions ©2018 PX2 Holdings, LLC. All rights reserved. v02.21.18...
-
Page 10: Charging/Filling The Solvent Vessel
Charging/Filling the Solvent Tank Attach your solvent source to the X10 solvent tank via a 1/4" compression line. Ensure that you have the proper fittings in order to properly and safely attach your source vessel to your X10 solvent vessel. These fittings will vary by supplier, please talk to your hydrocarbon solvent supplier to procure the proper fittings. To charge your X10 solvent vessel, begin by vacuuming the tank down to -30in/hg or until the vacuum pump bottoms out. Make sure to also put the line from for X10 solvent vessel to the solvent source tank under a vacuum also. Vacuum reading may be slightly different depending on atmospheric conditions. Once the tank has been vacuumed down, it will need to be cooled. If using a Precision Julabo, turn on the chiller and allow the tank to cool. Depending on your atmospheric conditions,... - Page 11 Your butane source is tainted, you will need a Oils contaminates are in the X10 tank better butane source and/or you will need to distill your butane before filling your X10 solvent vessel. 11 | P a g e Model X10 Operational Manual – For Hazardous Environments Precision® Extraction Solutions ©2018 PX2 Holdings, LLC. All rights reserved. v02.21.18...
-
Page 12: Preparing To Operate
Preparing to Operate Preparing to Operate - Passive You are now ready to prepare to operate your X10 system. Please select the appropriate sized material column to match the weight and volume of your input material. Ensure that there is a 6" screened gasket at the bottom of the material column above the reducer. Ensure that your material column is properly mounted to the mounting rack. Fill your... -
Page 13: Running The Extractor
13 | P a g e Model X10 Operational Manual – For Hazardous Environments Precision® Extraction Solutions ©2018 PX2 Holdings, LLC. All rights reserved. v02.21.18... - Page 14 NOTE FOR ACTIVE RECOVERY For active recovery, using either a Precision GC 5000 or Haskel brand recovery pump, the following procedure must be followed. The operator of such equipment must read and be familiar with the specific operational manual of the recovery equipment prior to use (e.g., pump/compressor operational manuals).
- Page 15 ON YOUR X10 HOSES. SET YOUR REGULATOR TO 30PSI ABOVE THE VESSEL PRESSURE YOU WISH TO INCREASE. INJECT THE NITROGEN UNTIL THE DESIRED PRESSURE INCREASE OF THE PRE-SET REGULATOR IS REACHED. OPEN THE NECESSARY VALVES TO MOVE YOUR SOLVENT TO THE TARGETED VESSEL IN THE PROCESS. WHEN THE SOLVENT HAS FULLY REACHED YOUR TARGETED VESSEL, YOU WILL NEED TO VENT OFF THE EXCESS NITROGEN. 15 | P a g e Model X10 Operational Manual – For Hazardous Environments Precision® Extraction Solutions ©2018 PX2 Holdings, LLC. All rights reserved. v02.21.18...
- Page 16 NITROGEN VENTING SHOULD HAVE A NITROGEN VENT DOWN LINE ATTACHED TO THE APPPOPRIATE VESSEL IN ORDER TO ROUTE THE NITROGEN DIRECTLY INTO YOUR CLASSIFIED VENTALATION SYSTEM. WARNING - NEVER VENT NITROGEN OR HYDROCARBON VAPOR DIRECTLY INTO THE ATMOSPHERE! 16 | P a g e Model X10 Operational Manual – For Hazardous Environments Precision® Extraction Solutions ©2018 PX2 Holdings, LLC. All rights reserved. v02.21.18...
-
Page 17: Vent Down And Pour Off
Your extract will slowly come out with a thick, cake batter consistency. You may now clean your components and vessels to prepare for your next run. 17 | P a g e Model X10 Operational Manual – For Hazardous Environments Precision® Extraction Solutions ©2018 PX2 Holdings, LLC. All rights reserved. v02.21.18... -
Page 18: Periodic Maintenance
Always replace worn components immediately. At a minimum, it is recommended that the following components be replaced according to the maintenance schedule below: Component Replacement Frequency Hoses Every 12 months Gaskets Every 10th use re-tightened or at first visible sign of wear Sanitary Clamp Bolts/Nuts Every 10 use or at first visible sign of wear Relief Valves Test once per month to ensure performance – replace as needed Ball Valves Every 12 months Quick Connects Every 12 months 18 | P a g e Model X10 Operational Manual – For Hazardous Environments Precision® Extraction Solutions ©2018 PX2 Holdings, LLC. All rights reserved. v02.21.18... - Page 19 If there is any question as to the integrity of any given component, replace it immediately. _______________________________________________________________________ If further assistance is needed please visit our YouTube channel for video tutorials ® or contact Precision Extraction Solutions technical support directly at 855-420-0020. 19 | P a g e Model X10 Operational Manual – For Hazardous Environments Precision® Extraction Solutions ©2018 PX2 Holdings, LLC. All rights reserved. v02.21.18...
-
Page 20: Appendix A Facility Requirements
• 40 CFR § 1910.144-145 – Specifications for marking physical hazards and accident prevention signs and tags • 40 CFR § 1910.147 – Control of hazardous energy (lockout/tag out) • 40 CFR § 1910.151 – Medical services and first aid • 40 CFR § 1910.157 - Portable fire extinguishers 20 | P a g e Model X10 Operational Manual – For Hazardous Environments Precision® Extraction Solutions ©2018 PX2 Holdings, LLC. All rights reserved. v02.21.18... - Page 21 1000 parts per million (ppm) as an 8-hour time-weighted average (TWA). Occupational exposures to propane must be controlled to a level less than 1000 ppm in accordance with the OSHA Permissible Exposure Limit (PEL). 21 | P a g e Model X10 Operational Manual – For Hazardous Environments Precision® Extraction Solutions ©2018 PX2 Holdings, LLC. All rights reserved. v02.21.18...
- Page 22 All sliding surfaces shall have a light coating of lubricant, this to reduce the friction between the two surfaces, prevent galling or seizure and increase clamping efficiency. The clamp can only fit correctly (segments forming a circular geometry) in one position and this ideally occurs in the fully tightened state. From the initial untightened assembly, the clamp compresses the two ferrules by about 0.9 to 1.3 mm at the fully tightened position. 22 | P a g e Model X10 Operational Manual – For Hazardous Environments Precision® Extraction Solutions ©2018 PX2 Holdings, LLC. All rights reserved. v02.21.18...
- Page 23 1. The two clamp segments have a gap between them and that metal to metal is not achieved. 2. The inside diameter of the clamp segments is not touching the outside diameter of the hub (ferrules) to which they are attached. 3. The hinge plate is not loaded (it should be loose to the touch with clearance between the two pins). 23 | P a g e Model X10 Operational Manual – For Hazardous Environments Precision® Extraction Solutions ©2018 PX2 Holdings, LLC. All rights reserved. v02.21.18...
- Page 24 Gasket Seal: The calculations for clamp stresses were based on using a flat-face self-energizing elastomer seal with hardness in the range 70 to 75 Shore A. Care must be taken to ensure that gasket seals of different composition or hardness are not used without due consideration of the effects on the working stresses of the clamp. Gasket Fit: Because of the extreme forces generated by this clamp, when used with a standard elastomer gasket there is excessive compression of the gasket (the gasket width can be reduced to a little as 0.7 mm, this against a normal typical compressed width of 1.5/1.6 mm). 24 | P a g e Model X10 Operational Manual – For Hazardous Environments Precision® Extraction Solutions ©2018 PX2 Holdings, LLC. All rights reserved. v02.21.18...
- Page 25 1.Using two of the M10 nuts and bolts, attach the base of the shroud to the X10 solvent vessel. This connection should be below any valves, hoses, or handles that are on the vessel.
Need help?
Do you have a question about the X10 and is the answer not in the manual?
Questions and answers