Advertisement
Quick Links
Advertisement

Summary of Contents for Egoe Nestbox
- Page 1 User Instructions Egoé Nestbox...
- Page 2 Please read these instructions carefully. They contain important information on how to operate and handle these devices. Always follow proper safety procedures. Before getting started, make sure that the voltage is correct and that all parts are properly assembled. If you have any questions, or are unsure about how to operate the devices, please contact your vendor.
-
Page 3: Intended Use
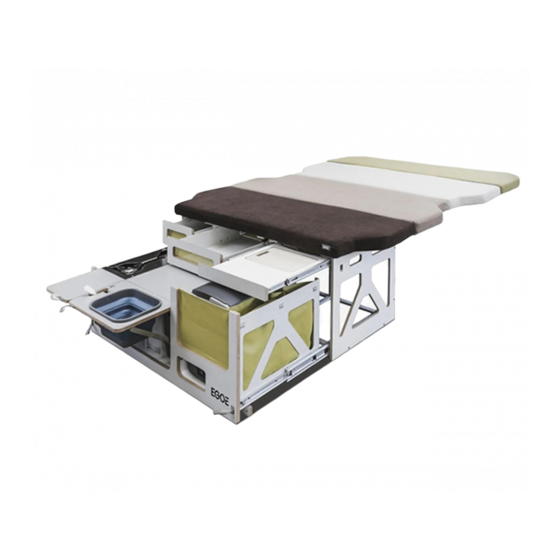
1.3 Nestbox Body - Installation 1.4 Technical Data 2. Nestbox Cooker Module 2.1 Cooker Module Description Nestbox is a camper car assembly designed for easy 2.2 Cooker Module - Package Contents insertion into the luggage compartment, transforming 2.3 Cooker Module - Instructions for Use your car into a camper car. - Page 4 1× knife and cutting board (all models except NST HI 300) Assembly The Nestbox camper car assembly consists of the 1× cutlery tray (only models NST HI 300, NST RO 710) main body with space for the modules - cooker, water, refrigerator, and removable drawers and textile pockets (except the NST HI 300 and NST CA 200 models).
- Page 5 Then use the four Yale straps to anchor the Nestbox body to the original anchor points. Various vehicles compatible with the Nestbox camper car assembly...
- Page 6 The side part of the Nestbox assembly: Is the anchor of your car located on the sides of the car? If it is, use the following procedure. For anchoring, use the anchor points C on the car The rear part of the Nestbox assembly: hook the...
- Page 7 Front of the Nestbox assembly: if your car‘s anchor points are below Nestbox, in the rear of the vehicle, then use the following procedure. Make sure that you have the assembly anchored properly in the rear; see anchoring the rear of the Nestbox.
- Page 8 The load must be secured during transport. 1.4 Technical Data The technical data is supplied together with the instructions depending on the vehicle type. If you have not found your car in the list, please contact us at nest@egoe.eu.
- Page 9 The cooker module is part of the kitchen set and serves to prepare food. It can be simply inserted into the main 3× stainless wind shields drawer of the anchored Nestbox body. The module is made of an aluminium frame with stainless steel parts and birch plywood with HPL surface.
-
Page 10: Maintenance
It is possible to remove the individual burners with Nestbox car assembly. The module consists of an cartridges and use them separately for cooking, e.g. aluminium frame and birch plywood with HPL. Water while hiking. - Page 11 3.3 Water Module - Instructions for Use — The module can be inserted into the main drawer of the locked Nestbox car assembly. — In the back of the water module contains a socket 3.2 Package Contents for the spiral power cable, which must be connected to the 12V electrical socket or external power supply at the rear of the car.
- Page 12 4. Nestbox – Sleeping Set 4.3 Package Contents 4.1 Sleeping Set Description 1× folding bed base The sleeping set is for sleeping and resting inside and outside the car. It consists of a folding bed base, supporting bed brackets or a universal bed base 1×...
- Page 13 First, insert the Nestbox assembly into the car. After anchoring it, place the folded bed base on the top plate and secure it from the rear into the Nestbox frame using two quick-release screws.
- Page 14 Using the universal bed base support; see separate instructions. After preparing the support, the bed base can be unfolded over it and the mattress put on the top. 4.5 Technical Data See the Nestbox technical data sheets shipped with your particular vehicle type.
- Page 15 Support First, insert the Nestbox assembly into the car. After anchoring it, place the folded bed base on the top plate and secure it from the rear into the Nestbox frame using two quick-release screws. 4.6.2 Package Contents 1× transverse bed bracket A 2×...
-
Page 16: Installation
Use the same procedure for the opposite part. Nestbox frame using two quick-release screws. Take the first transverse part A and slide the legs B onto Use the pin on the rope to secure these legs, preventing Tie the two longitudinal bed brackets C using the two transverse bed brackets D. -
Page 17: Warranty And Service
Warranty and Service A 2-year Warranty applies to all egoé products, provided that they have been operated and maintained in accordance with the manufacturer‘s instructions and The whole structure is then reinforced and tied by applicable regulations. The Warranty starts from the placing the bed base on the bed brackets. - Page 18 The Warranty shall not apply to: — defects caused by transport, handling and storage — defects caused by improper installation — defects caused by improper use or maintenance — mechanical or other damage to the product in an unexpected situation (e.g. fire) —...
- Page 19 Address of manufacturer Egoé nest s.r.o. Bílovice 519, 687 12 Bílovice Czech Republic nest@egoe.eu egoe.eu...
Need help?
Do you have a question about the Nestbox and is the answer not in the manual?
Questions and answers