Advertisement
Advertisement
Table of Contents

Summary of Contents for IdeaWorks JB8099
- Page 1 Extendable Extra Wide Scale Instructions...
- Page 2 CAUTION: • ALL BATTERIES MUST BE THE SAME TYPE. • DO NOT MIX OLD AND NEW BATTERIES. • REMOVE EXHAUSTED BATTERIES OR IF THE ITEM IS NOT GOING TO BE USED FOR AN EXTENDED TIME PERIOD. • MAKE SURE TO PROPERLY DISPOSE DEAD BATTERIES IN ACCORDANCE WITH STATE AND LOCAL LAWS.
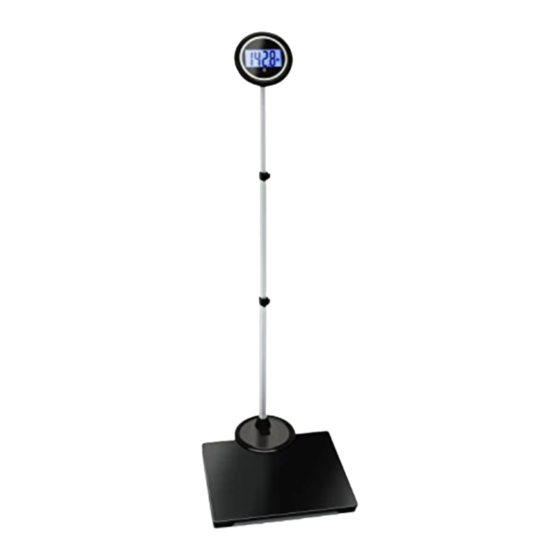
- Page 3 Parts List: E. x 2 J. x 2...
- Page 4 Technical Specification: • Maximum Capacity: 550 LBS (250 kg) • Minimum Capacity: 22 LBS (10 kg) • Weight Mode: kg (kilograms), st (stones), and lb (pounds). Assembly without Pole: 1. Place scale on a flat surface. Gently pull the monitor (A) upward to detach.
- Page 6 Assembly with Pole: 1. Follow steps 1 and 2 from Assembly without Pole section. 2. Pass the bottom end micro USB cable (G) through the display base (I). 3. Screw into place by turning clockwise. Note: make sure to screw pole (D) in straight. Do not over tighten. 4.
- Page 7 Assembly Instructions with Pole:...
- Page 8 Cleaning: Occationally clean with a damped cloth. For additional assistance or trouble-shooting help, please email info@jobar.com © 2018 Jobar International, Inc. Carson, CA 90745 Made in China JB8099 [061118]...
Need help?
Do you have a question about the JB8099 and is the answer not in the manual?
Questions and answers
I can NOT get a weight reading on the scale. I turned it on and I see 0 but it does NOT say how much I weigh when I step on it. it just turns off!
The IdeaWorks JB8099 scale may not display a weight reading when stepped on due to the following reasons:
1. Scale Not Turning On – If the scale does not automatically turn on, press the On button manually.
2. Battery Issues – Ensure that 2 AAA batteries are correctly inserted, matching the indicated polarities. Replace exhausted batteries.
3. Incorrect Assembly – Verify that the USB cables are properly connected to the correct ports and secured with adhesive tape.
4. Improper Surface – Place the scale on a flat, stable surface to ensure accurate readings.
5. User Movement – Stand still on the scale until the numbers stabilize and flash twice.
If the issue persists, check all connections and battery conditions.
This answer is automatically generated