Blueprint Subsea artemis pro Quick Reference Manual
Hide thumbs
Also See for artemis pro:
- Training manual (43 pages) ,
- System manual (126 pages) ,
- Technical manual (40 pages)
Advertisement
Quick Links
artemis
GETTING STARTED
Check that your ArtemisPRO system contains
the following items...
Transit and storage case
ArtemisPRO
Battery Pods (x2)
Battery Charger & Mains Lead
Satellite Receiver Float
USB Adapter & USB Lead
‡
Chassis Rear Cover
ˆ
USB Blanking Plug
‰
User Manuals, Software Media
(CD or USB stick) and
ENC S-57/S-63 Dongle«
‡
« if specified at the time of ordering
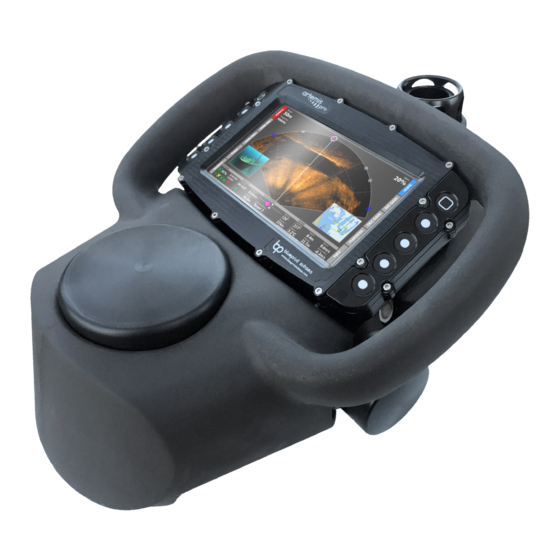
CONSOLE FEATURES
ˆ
Display Navigation
Turn On
Power
Charge:
Estimated Life:
73%
04:18
Voltage:
Power Drain:
14.5V
26.1W
System Status:
SONAR
DVL
FLOAT
CAMERA
LIGHT
Power:
Heading:
Depth:
Selected Marker:
217°
8.4m
Target 2
Power Management Display
Sensor Status
Indicators
Quick Reference
pro
‰
Chassis
Console
(Display and Keypad)
Battery Pod
Navigation Pod
(DVL, AHRS, GNSS)
‡
‰
Power
Sonar System:
Sonar
ON
Vision System:
Navigation
OFF
Power Mode:
Vision
LOW POWER
Distance:
Altitude:
DiveLog:
Diver
374m
32.7m
Main Information
Displays
Guide
ˆ
Forward-looking
Multibeam Sonar
Dive-Light«
‡
Video Camera «
ˆ
DVL Transducers
‰
Chassis Cover &
USB Blanking Plug
« if specified at the time of ordering
23/04/2016
Tools
15:45:01
Missions
artemis
pro
Markers
Dive Logs
Start Dive
www.blueprintsubsea.com
v2.0.1234
Home Screen
Before using the ArtemisPRO system for the first time,
please read the full User Manual as this contains important
safety and operational information.
l
Do not rely on this product or its sensors as a primary
means of life-support during or after a dive. Artemis is
designed as a survey tool, and not as an alternative or
replacement for dive-computers or similar apparatus.
l
Do not submerge the console, unless the USB Blanking Plug
is fitted and the battery pressure valve has been checked.
l
Do not use this product if any of the cabling, or housings of
its component parts appear to be damaged or
compromised for the ingress of water (where required to be
watertight).
Maintenance & Storage
When you have finished using your ArtemisPRO system, you
should:
l
Remove any weed, or other detritus, that may have been
collected during its operation.
l
Wash the system in fresh water, if it has been used in salt-
water, to prevent corrosion and damage to rubber
mouldings.
l
Store in a well ventilated location after use, to allow any
moisture on system components to evaporate before
closing the case.
For long-term storage (more than a couple of weeks):
l
Remove the Battery Pod
l
Charge batteries and store in a fully charged state
l
Every 6-12 months inspect system parts and recharge
batteries.
Button Functions
Power Button
(Power On / Power Management Display)
Home Button
(Home Screen / Tools Screen)
Function Buttons
(F1 to F8 - function depends on display)
Combined Button Functions
(Press both buttons at the same time)
F1+F2
SNAPSHOT
23/04/2016
Power
Snapshots
artemis
Satellites
Diagnostics
Tools Screen
Mission & Dive-Log
Management Display
F3+F4
BRIGHTNESS
Home
15:45:01
Settings
Compass
pro
Calibration
Scuttle
Help
www.blueprintsubsea.com
v2.0.1234
Advertisement

Related Manuals for Blueprint Subsea artemis pro

Summary of Contents for Blueprint Subsea artemis pro
- Page 1 artemis Quick Reference Guide GETTING STARTED Before using the ArtemisPRO system for the first time, please read the full User Manual as this contains important safety and operational information. Check that your ArtemisPRO system contains the following items... Do not rely on this product or its sensors as a primary Transit and storage case means of life-support during or after a dive.
- Page 2 BATTERY PODS & POWER Connecting Batteries Charge Status Indicators Charging Press Pressure Relief Valve firmly PRESS approx 4h before use to check it is sealed. BEFORE Batteries Insert Battery Pod fully into the chassis. Not Connected or Initialising Ensure connectors Yellow align and mate fully.
- Page 3 MISSION FILES & MARKERS Move the list selection Mission Manager up and down Markers are geographic locations such as waypoints (defining a swim Missions Current Mission route), targets, hazards or other points of interest. Filename: Diver Training Area Harbour Inspection Use the highlighted Mission Files contains lists of markers that are relevant to a dive.
- Page 4 USING NAVIGATION Navigation Display Chart backgrounds are shown if included in a NavPoint created Position: Mission File. Set Diver Position 54° 13' 54.273" N -3° 2' 37.178" E To reset the divers Grid: Nav Mode: Where do you want to set your position to? WAYPOINT 1 dead-reckoning WAYPOINT 8...
Need help?
Do you have a question about the artemis pro and is the answer not in the manual?
Questions and answers