Table of Contents
Advertisement
Quick Links
Heating Professionals:
H
R
Request a copy of our product installation
g
guide for our complete product range:
w
www.hep2o.co.uk
Want
Want More Information?
More
Inf
Call our support team on: 0844 856 5152/3
Or visit our website: www.hep2o.co.uk
PDF
FAQ
Twitter: hep2o
Facebook:
Video
facebook.com/hep2o
Touchpad Control
Model: TFT
1
Advertisement
Table of Contents

Summary of Contents for Hep2O Touchpad
- Page 1 Request a copy of our product installation guide for our complete product range: www.hep2o.co.uk Want More Information? Want More Call our support team on: 0844 856 5152/3 Or visit our website: www.hep2o.co.uk Twitter: hep2o Facebook: Video facebook.com/hep2o Touchpad Control Model: TFT...
-
Page 2: Table Of Contents
Model: Touchpad Table of Contents Set-Up 1-10 Programmable Zones 20-24 Product Image oduc mage mage Temperature Hold empe empe ra ratu tur e Ho Hold Table of Contents History Installation Procedure nsta nstall lla tion tion edur Temperature Control Initial Setup... - Page 3 Do not push hard on the LCD screen as this may cause irreparable damage. (minimum depth) to be sunk into the wall prior to installation. Step 1 Carefully separate the front half of the Touchpad from the back plate by placing a Step 2 Place the Touchpad front somewhere safe.
-
Page 4: Initial Setup
Initial Setup Adding thermostats to your system Up to 32 thermostats can be connected to the Touchpad and these are added by performing a network scan. Prior to performing the scan, a communication number needs to be entered in each of the thermostats on the system. -
Page 5: Setting The Clock Etti
Note: You must perform a new network scan after adding additional thermostats to your system. Here you can set the current time and date and select whether the Touchpad should observe GMT Correction. GMT correction will automatically change the clock on the Touchpad and Thermostats in March and October as the clocks change for Winter/ Summer time. -
Page 6: Lcd Display
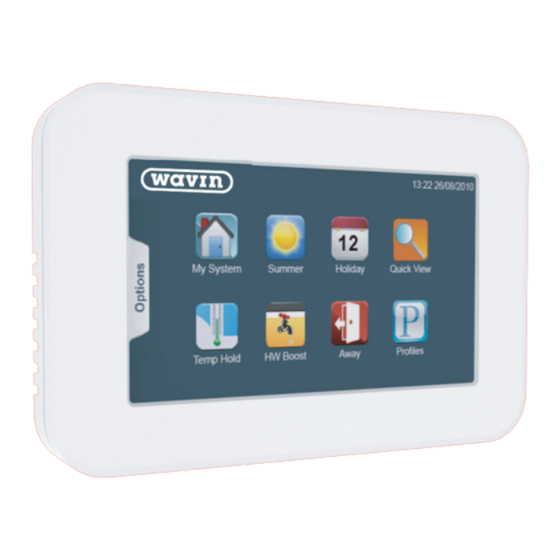
Date and Time: Displays current date and time. Options tab: Provides access to Clock, Settings and Power icons. Temperature Hold: Overrides target temperature outside the programme schedule for a set duration. Hot Water Boost: Overrides the timer output to on for a set duration. Touchpad... -
Page 7: My System
Select one or more thermostats by pressing the Zone name. When selected the zone will display green. Alternatively, press the Functions tab to use the Select / UnSelect All function. Press Done. Functions tab The function tab gives access to the global functions such as Lock, Hold and Setback. Touchpad... -
Page 8: Temperature Hold
Press the Hold icon ..........................Pressing EDIT from the Set Back screen allows you to adjust this setting and then Press the Cancel Hold key ....................select which thermostats this should apply to. Select the thermostats to apply the cancel to ............. Touchpad... -
Page 9: Timer Zones
This is displayed in a bar chart and gives you an indication of which zones are using the most energy. The time clock view screen displays the current status and provides a function to Zone Name History Current Icon Temperature Edit Icon Override Key Touchpad... -
Page 10: Editing The Switching Times
This mode can be changed on the time clock, and will be updated automatically on the Touchpad. Please consult the time clock manual for instructions on how to change this. There are 4 settings per day, these are called Wake, Leave, Return and Sleep. -
Page 11: Ide
To apply an override follow these steps. Temp Hold Zone Name Set Temperature Press the Override key ....................Icon and Control Using the arrow keys set the override duration ............ Press the Done key ........................ History Current Icon Temperature Edit Icon Touchpad... -
Page 12: History
The exported data is saved to csv format and can be edited in Excel. The thermostat and zone screen will show the hold time remaining. To cancel a hold in operation, press Temp Hold icon and then the Cancel Hold key .. Touchpad... -
Page 13: Temperature Control
This mode can be changed on the thermostat, and will be updated automatically on To Copy and apply comfort levels follow these steps. the Touchpad. Please consult the thermostat manual for instructions on how to change this. Press the Copy key ....................... -
Page 14: Programmable Zones With Hot Water Output
Zones that can be selected will be blue and will turn green when selected. There are 4 settings per day, these are called Wake, Leave, Return and Sleep. Zones in grey cannot be selected. For each setting an ON time and an OFF time can be programmed................. Touchpad... -
Page 15: Holid D A Y
Press the Next key ......................When Select which zones the holiday is applied to ..........the program mode. Up to 8 holidays can be scheduled using the Touchpad To program a holiday follow these steps; Holiday Status The holiday screen indicates the scheduled holidays. -
Page 16: Summer Mode
To set a temperature hold follow these steps. The set back temperature can be set on each thermostat between 07-17°C or this can be done from the Touchpad (See page xx) Press the Temp Hold icon ....................As an indication, the heating zone screens will display the frost icon whilst the summer Using the Up/Down arrow keys, set the hold temperature and duration ... -
Page 17: Hot Water Boost
Toggle the switch to the on position. setting. Press the Edit key ......................Select zones to apply the Away mode to ..........Zones buttons in green will follow the Away mode and zones in blue will not Press the Done key ......................Touchpad... - Page 18 Using the Group function, zones can be assigned into groups allowing them to be can be quickly applied to all zones within a group. Up to 8 groups can be setup in the Touchpad. To create a group, follow these steps. Press the Groups icon ......................
- Page 19 See page 33 for information on how to create a group. Press the Next key ........................levels for the Weekday/Weekend. See pages 23-24 for programming instructions. Press the Next key ........................ levels for each day of the week. See pages 23-24 for programming instructions. Touchpad...
- Page 20 See page 33 for information on how to create a group. Press the Next key ........................levels for the Weekday/Weekend. See pages 23-24 for programming instructions. Press the Next key ........................ levels for each day of the week. See pages 23-24 for programming instructions. Touchpad...
-
Page 21: Touchpad Settings
Delete History Press the Options tab. Press the Settings icon ....................... The Touchpad can store 4 weeks of data per zone. To delete the history, use the delete history function. Press the System Info icon ....................This screen displays the current version of your Touchpad... - Page 22 Check the latest version by visiting the Support Section on www.heatmiser.com The set back temperature function enables you to set this for individual or all To perform the update the Touchpad has to remain powered up. thermostats. Connect the Touchpad to a laptop using the USB cable provided.
- Page 23 Notes Wiring Diagram - Touchpad to 52UH108 ....................................................................................................................................................................................................................................................................................................................................................................................TOUCHPAD CONNECTIONS TO 52UH108 ....................................................................and comply with local installation regulations. Touchpad...
- Page 24 Notes Notes ................................................................................................................................................................................................................................................................................................................................................................................................................................................................................................................................................................................................................................................................................................................................................................................................................................................................................................................Touchpad...
Need help?
Do you have a question about the Touchpad and is the answer not in the manual?
Questions and answers