Table of Contents
Advertisement
Available languages
Available languages
Quick Links
Advertisement
Chapters
Table of Contents

Subscribe to Our Youtube Channel
Related Manuals for Fracarro FIRENZE


Summary of Contents for Fracarro FIRENZE
- Page 1 Quick Reference DVR FIRENZE 1/141...
- Page 2 Specifiche tecniche / Technical Specifications / Caractéristiques téchniques / Características técnicas / Características técnica / Τεχνικά χαρακτηριστικά/ Specyfikacja techniczna/ Technische specificaties DVR FIRENZE Input 16 BNC with loop out n° Output VGA / S-Video / 2 BNC (monitor e spot)
- Page 3 phone/ status monitoring, output relay activation (home automation Smartphone/ facility) Event management Detected events Type Motion detection, video loss, input alarms Input Alarms (TTL/CMOS n.° selectable polarity) Output 2 NO, 2 NC Buzzer Programmable for each event Connections Serial communication RS485 (D+, D-), RS-232 Pelco D, Pelco P, Samsung SCC-641P, Kalatel Cyber Dome, PTZ control...
- Page 4 Connessioni – Connections – Connexions Conexiones – Conexões –Συνδέσεις – Connecties Fig.1 4/141...
- Page 5 Fig.2 Fig.3 For 4-line devices (such as keyboard) For PTZ cameras Fig.4 5/141...
- Page 6 Fig.5 Fig.6 6/141...
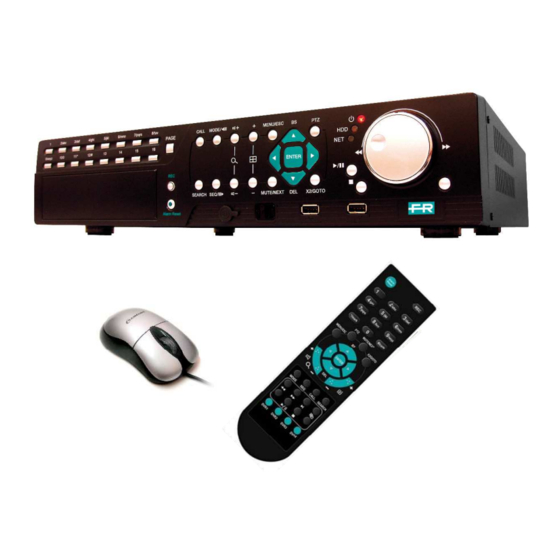
- Page 7 Telecomando – Remote control - Télécommande Mando a distancia - Controlo remoto – Τηλεχειριστήριο - Pilot Zdalnego Sterowania - Afstandsbediening 7/141...
-
Page 8: Table Of Contents
Guida rapida DVR FIRENZE ATTENZIONE: Questo manuale rappresenta una guida rapida alla prima installazione del DVR, fare riferime nto al manuale utente per la descrizione completa di tutte le singole funzioni. Indice: 1- .. Avvertenze di sicurezza ......................pag.6 1.1 –... -
Page 9: Avvertenze Di Sicurezza
Guida rapida DVR FIRENZE 1. Avvertenze per la sicurezza: L’installazione del prodotto deve essere eseguita da personale qualificato in conformità alle leggi e normative locali sulla sicurezza. Il prodotto è di Classe II, secondo la norma EN 60950-1. IMPORTANTE: Solo personale addestrato e autorizzato può aprire il prodotto. In caso di guasto non tentate di ripararlo altrimenti la garanzia non sarà... -
Page 10: 2- Descrizione Del Prodotto
Guida rapida DVR FIRENZE 2. Descrizione prodotto: Il DVR FIRENZE è stato progettato per realizzare un sistema di videosorveglianza affidabile, sicuro e interfacciabile con diversi tipi di monitor, PC e telefoni cellulari. Il nuovo tipo di compressione dinamica utilizzata e la possibilità di impostare il livello di qualità della registrazione garantiscono un lungo tempo di registrazione nel disco e un ottima qualità... -
Page 11: Panello Posteriore
Guida rapida DVR FIRENZE 3.2 Panello posteriore (vedi figura 2): ْ ْ Connector Connector Connettori ingresso Video BNC Ingressi d’allarme Connettori uscita Video BNC Uscite d’allarme 4 ingressi Audio RCA Connettore Ethernet RJ45 2 uscite Audio RCA Selettore NTSC/PAL Porta USB 75Ω... -
Page 12: Mouse
Guida rapida DVR FIRENZE Alto / Backspace Visualizza il menu ricerca Seleziona il DVR (1-4) da Basso / Delete controllare con il telecomando Sinistra 3.4 Mouse: Il DVR può facilmente essere gestito da mouse. Per accedere al menu di configurazione portare il cursore del mouse verso la parte inferiore dello schermo. -
Page 13: Prima Configurazione Del Dvr
Guida rapida DVR FIRENZE Ritornare al punto numero 4 per l’installazione degli altri 3 dischi fissi che dovranno essere collegati come in figura a lato. Come opzione è possibile installare un masterizzatore DVD al posto del terzo disco fisso. Per procedure all’installazione rimuovere le due viti e il coperchio in plastica mostrato in figura. - Page 14 Guida rapida DVR FIRENZE Il DVR prevede 4 diverse tipologie di utente: Amministratore, Supervisore, Operatore e Custom. L’utente configurato come operatore è consentita la sola gestione in live del DVR, al supervisore la gestione del registrato, all’amministratore tutta la programmazione e gestione del DVR e al custom tutto ciò che è stato impostato dall’amministratore.
- Page 15 Guida rapida DVR FIRENZE • Formattazione disco fisso: Seguire fedelmente i passi riportati di seguito per la formattazione del disco fisso: Premere il tasto “MENU” per accedere al menu di configurazione; Muovere il cursore sulla voce “IMPOSTAZIONI” e confermare con il tasto “ENTER”;...
-
Page 16: 5- Utilizzo Basico Del Dvr
Guida rapida DVR FIRENZE Muovere il cursore sulla voce “REGISTRAZIONE PROGRAMMATA” e confermare con il tasto “ENTER” ; Premere il tasto “MODE”; Apparirà la seguente schermata: Tale schermata permette all’amministratore un semplice e veloce modo per impostare la pianificazione registrazione. Per ogni singola ora della settimana è... -
Page 17: Backup
Guida rapida DVR FIRENZE Seguire fedelmente i passi riportati di seguito per effettuare una ricerca delle immagini Premere il tasto “SEARCH” per accedere al menu di ricerca; Muovere il cursore sulla voce “RICERCA PER DATA” e confermare con il tasto “ENTER”;... -
Page 18: Visualizzazione Delle Immagini
Guida rapida DVR FIRENZE Durante tutta la procedura di backup verrà visualizzata un icona e un messaggio indicante l’avanzamento della procedura stessa. Una volta terminata la procedura sarà necessario disconnettere il dispositivo agendo sull’apposito menu: Premere il tasto “MENU” per accedere al menu del sistema;... -
Page 19: Tabella Di Registrazione
Guida rapida DVR FIRENZE completato. Ora è possibile spegnere il sistema”, sarà possibile spegnere il DVR utilizzando l’apposito tasto posto nel pannello posteriore del DVR. 7 Appendice: 7.1 Tabella di registrazione: Al fine di scegliere la corretta dimensione del disco fisso da installare nel DVR si riporta una tabella con i tempi massimi di registrazione alla risoluzione HALF D1 (720*288) e qualità... - Page 20 Guida rapida DVR FIRENZE Net type Static IP E-mail Adv. Ritornare DVR, premere tasto MENU quindi IP Address 192.168.1.15 IMPOSTAZIONI e RETE per accedere a tutta la configurazione Net Mask 255.255.255.0 Static IP di rete del DVR. In questa videata inserire un indirizzo IP (Ex.
- Page 21 Guida rapida DVR FIRENZE Ora il DVR è correttamente connesso alla rete Ethernet ed è possible procedere al collegamento dello stesso sulla rete Internet in modo tale da poter accedere alle stesse informazioni consultabili da rete Ethernet anche su rete Internet (Fig. C).
-
Page 22: Connessione Con Dispositivo Mobile
Guida rapida DVR FIRENZE Utilizzando il browser web Internet Explorer inserire l’indirizzo IP del router (Gateway) e confermare con il tasto “Invio”. Apparirà una finestra di login alle impostazioni del router. Se non si dispone di tali dati fare riferimento al manuale di installazione del router . -
Page 23: Connessione Telecamere Ptz
Guida rapida DVR FIRENZE Istruzioni Figure Inserire l’indirizzo creato sito www.dyndns.org (“hostname”.dyndns.org) nella barra di ricerca del web browser. Apparirà una finestra di login nella quale dovranno essere inseriti nome utente e password dell’utente configurato sul DVR. Scegliere la risoluzione video più adatta alle dimensioni dello schermo del dispositivo mobile e confermare premendo il tasto “OK”. - Page 24 Guida rapida DVR FIRENZE Connettere il BUS RS-485 della telecamera al pannello posteriore del DVR come indicato in figura. RS-232/ 422 /485 Setup Premere “MENU” quindi “IMPOSTAZIONI” e “RS- COM Port RS-232 RS-422/485 232/422/485 Setup” sul DVR per accedere alle Device Type impostazioni del BUS RS-485.
- Page 25 Quick Reference DVR FIRENZE ATTENTION: This user manual is a quick guide for the first installation of the DVR please refer to the user manual to know the complete information of all the single functions. Table of contents: 1- Safety warnings ........................pag.23 1.1 –...
-
Page 26: 1- Safety Warnings
Quick Reference DVR FIRENZE 1. Safety warnings: The installation of the product must be performed by qualified personnel in accordance with local laws and regulations on safety. The product is a Class II, according to EN 60950-1. IMPORTANT: Only traine d and authorized personnel can open the product. In case of failure do not try to repair it otherwise the warranty will no longer be valid. -
Page 27: 2- Product Overview
Quick Reference DVR FIRENZE 2. Product Overview: The DVR FIRENZE is digital video/audio recorders designed to realize a powerful and secure surveillance system that can be interfaced with different kind of monitors, pc and smartphones. The new type of compression and the configurable quality guarantee a long time recording on the Hard Disk and a good quality of the images during the playback. -
Page 28: Remote Controller
Quick Reference DVR FIRENZE 3.3 Remote Controller (refer to figure 3): The remote controller is an optional accessory to ease the user’s operations. You can do all the operations by the remote controller instead of the buttons on the front panel. The effective distance is about 10 meters without any obstacle. - Page 29 Quick Reference DVR FIRENZE Nْ Instructions Picture Take the DVR and disconnect all the cables. Remove all the screws (7) on the rear (3) and lateral panel (2+2). Remove the cover as shown. From the bag of DVR accessories take the 2 brackets and fix them on the HDD using the 4 screws.
-
Page 30: First Access To The Dvr
WARNING: In case of loss of the system password please contact your local distributor who will contact Fracarro Radioindustrie S.p.A. - Page 31 Quick Reference DVR FIRENZE • Adjust Date / Time: Faithfully follow the steps below to adjust the date / time: Press the “MENU” button to access the configuration menu; Move the cursor to "SETUP" and confirm by pressing "ENTER"; Move the cursor to the "SYSTEM" and confirm by pressing "ENTER";...
- Page 32 Quick Reference DVR FIRENZE •Setting the record: The DVR allows different recording modes: alarm, motion, continuous or scheduled. Using the last mode, the system administrator can define, for each hour of the week, the type of registration. In order to customize the recording schedule every day is divided into a maximum of 16 segments (T1, .., T16) which can be configured in 3 different recording modes to choose from: recording video, audio+video recording or absence of registration.
-
Page 33: 5- Basic Use Of The Dvr
Quick Reference DVR FIRENZE Press these buttons to select the recording mode. Press ENTER button to activate the mode. Recording modea are: “1” – Alarm+Motion+Normal, “2” – Alarm+Motion, “3” – Alarm, “4” – Motion, “5” – Normal, “6” – No Recording. -
Page 34: Viewing The Images
Quick Reference DVR FIRENZE Move the cursor on "BACKUP SPEED" and select the value of the backup rate from 1 (slow) to 9 (fast) using the keys "+/-"; Move the cursor on "CAMERAS" to select the camera that you want to backup using the keys "+/-";... -
Page 35: Pc Network Connection
Quick Reference DVR FIRENZE In order to choose the correct size of hard disk to install on the DVR is a table showing the maximum recording time at CIF resolution (360x288) and maximum quality (9) for each type of DVR and hard drive size:... - Page 36 Quick Reference DVR FIRENZE Username (Ex.192.168.1.1) and Net mask (Ex. 255.255.255.0) of the Password DDNS Type Dynamic PPPoE ATTENTION: The IP Address that will be assigned to the DVR must be different from the PC one only in the last DDNS Username numbe r.
- Page 37 Quick Reference DVR FIRENZE Please follow the steps below to configure the connection: Instructions Picture Please access to the website www.dyndns.org and press “Create Account”. An E-mail with all the informations will be sent to the E- mail address inserted. Please follow the instructions to activate the new account.
- Page 38 Quick Reference DVR FIRENZE Please follow the installation manual of the Router to create a rule for the 67, 68 and 80 port for the DVR IP Address and TCP protocol. NOTE: Please refer to the www.portforwarding.com website to know the correct way to configure the router...
- Page 39 Quick Reference DVR FIRENZE 7.3 Mobile phone network connection: The image of the DVR can be viewed using a mobile phone, smartphone or PDA connected to the internet network. Follow the steps below to create the connection: Instructions Picture Enter the Hostname of the DVR on the search bar of the browser of the mobile phone or PDA.
- Page 40 Quick Reference DVR FIRENZE Connect the BUS RS-485 of the camera to the back panel of the DVR. RS-232/ 422 /485 Setup Press “MENU”, than “SETUP” and “RS-232/422/485 Setup” on the DVR for enter to the BUS configuration and COM Port...
- Page 41 Guide rapide DVR FIRENZE ATTENTION: Ce manuel est une guide rapide pour la première installation du DVR; se référer à le Manuel d'installation pour les informations completes. Index: 1- Avertissements de securité ......................pag.38 1.1 – Contenu de l'emballage ....................... pag.38 2- Description du produit.......................pag.39...
- Page 42 Guide rapide DVR FIRENZE 1. Avertissements de sécurité: L'installation du produit doivent être effectués par du personnel qualifié, conformément aux lois et règlements locaux sur la sécurité. Le produit est de classe II, selon la norme EN 60950-1. IMPORTANT: Seule ment un personnel formé et autorisé peut ouvrir le produit. En cas d'échec n'essayez pas de le réparer sinon la garantie ne sera plus valide.
- Page 43 Guide rapide DVR FIRENZE 2. Description du produit L’enregistreur numérique (DVR) video/audio FIRENZE est conçu pour des systèmes d’installations avancés et secures et peut s’interfacer avec plusieurs types de moniteurs, PC et smartphones. Le nouveau type de compression dynamique et la possibilité...
- Page 44 Guide rapide DVR FIRENZE 3.2 Panneau arrière (voir la figure 2): Nْ Connecteur Nْ Connecteur Connecteur d'entrée vidéo BNC Connecteurs d'entrée d'alarme Connecteur de sortie vidéo BNC Sortie d'alarme Connecteurs 4 Connecteur d'entrée audio RCA Ethernet Connector 2 Connecteur de sortie audio RCA NTSC / PAL Selector Switch Terminaison 75Ω...
- Page 45 Guide rapide DVR FIRENZE Gauche 3.4 Souris: Le DVR peut être facilement géré par la souris. Bouger le curseur en bas de l'écran pour afficher le menu de configuration. 4 Installation: 4.1 Configuration du disque dur (HDD): Suivre les étapes suivantes pour une correcte installation d’un ou plus d’HDD ou du graveur DVD dans le DVR.
- Page 46 Guide rapide DVR FIRENZE Prendre (entre les accessoires DVR) les 2 appuis, les fixer sur le graveur de DVD et installer le dispositif sur le DVR en connectent les cables des donnés et d’alimentation. En utilisant toutes les vis fermer le couvercle, connecter le moniteur et l'alimentation.
- Page 47 Guide rapide DVR FIRENZE Appuyez sur le bouton "MENU" pour accéder au menu de configuration; Déplacez le curseur sur "SETUP" et confirmez en appuyant sur "ENTRER"; Déplacez le curseur sur le «système» et confirmez en appuyant sur "ENTRER"; Utiliser les touches fléchées déplacent le curseur vers le «langage» et appuyez sur les touches "+/-" pour définir la langue souhaitée;...
- Page 48 Guide rapide DVR FIRENZE Appuyez sur le bouton "MENU" pour accéder au menu de configuration; Déplacez le curseur sur "SETUP" et confirmez en appuyant sur "ENTRER"; Déplacez le curseur sur la rubrique "HDD" et confirmez en appuyant sur "ENTRER"; Appuyez sur le bouton "MODE";...
- Page 49 Guide rapide DVR FIRENZE Description de la pièce: ▲▼◄► Appuyez sur ces boutons pour déplacer le curseur. Numériques 1-6 (souris: Cliquez sur le bouton gauche de la souris) Appuyez sur ces touches pour sélectionner le mode d'enregistrement. Appuyez sur la touche ENTER pour activer le mode.
- Page 50 Guide rapide DVR FIRENZE pendrive, auto-alimenté disque dur ou DVD enregistrable. S'il vous plaît se référer à la section précédente pour savoir comment installer et raccorder tous les appareils: Appuyez sur le bouton "Rechercher"; Déplacez le curseur sur «RECHERCHE PAR TEMPS" et confirmez en appuyant sur "ENTRER";...
- Page 51 Guide rapide DVR FIRENZE 5.3 Affichage des images: Lors de la sauvegarde du DVR crée deux dossiers sur l'appareil, l'un contenant les fichiers de sauvegarde et l'autre contenant l'affichage d'images (SelfPlayer). Suivez les étapes ci-dessous pour visualiser les images: Branchez le périphérique de sauvegarde utilisé sur un PC;...
- Page 52 Guide rapide DVR FIRENZE Sur l'écran, entrer "ipconfig / all" et appuyer sur Enter. L'écran affiche toutes les informations du réseau du PC et il sera possible de savoir, par ex. le gateway (ex. 192.168.1.1), Subnet Mask (255.255.255.0) et l’adresse IP du PC (ex.
- Page 53 Guide rapide DVR FIRENZE Maintenant, on peut accéder à l’interface Internet du DVR. Voir le manuel de l'utilisateur pour connaitre toutes les fonctionnalités disponibles. En utilisant un smartphone, PDA ou tout autre navigateur que Internet Explorer, on peut accéder à...
- Page 54 Guide rapide DVR FIRENZE Cliquer sur "Add Host Services" Sélectionner un nouvel Hostname du DVR, cliquer sur “Use auto detect IP Address” («Utiliser la détection automatique des adresses IP") et confirmer toutes les demandes d'activer le nouvel host. En utilisant Internet Explorer entrer l'adresse IP du router (Gateway) et appuyer sur Enter.
- Page 55 Guide rapide DVR FIRENZE Maintenant, le DVR est correctement connecté au réseau Internet. S'assurer que l'adresse IP du DVR soit inséré sur les "Trusted sites”/Sites de confiance" d'Internet Explorer Entrer l’adresse web obtenu par le site www.dyndns.org (“hostname”.dyndns.org) sur la barre de recherche d'Internet Explorer: il sera possible visualiser l’interface web du DVR.
- Page 56 Guide rapide DVR FIRENZE 7.4 Connexion Caméra PTZ: Le DVR peut être utilisé pour gérer jusqu'à 4-9-16 caméras PTZ en utilisant le BUS RS-485 (Fig. D). Suivre les étapes ci-dessous pour connecter les caméras PTZ à le DVR: Instructions Image Suivre les instructions du manuel de la caméra PTZ...
- Page 57 Guìa ràpida DVR FIRENZE ATENCIÓN: Este manual es una guía para la primera instalación del DVR. Consulte el manual del usuario para la descripción completa de todas las funciones. Índice: 1- Advertencias de seguridad ....................pág. 53 1.1 – Contenido del embalaje ..................... pág. 53 2- Descripción del producto ......................
-
Page 58: 1- Advertencias De Seguridad
Guìa ràpida DVR FIRENZE 1. Advertencias de seguridad: La instalación del producto debe ser realizado por personal cualificado de acuerdo con las leyes y reglamentos locales en materia de seguridad. El producto es de Clase II, según EN 60950-1. IMPORTANTE: Sólo personal capacitado y autorizado puede abrir el producto. En caso de avería, no intente reparar en caso contrario la garantía no será... - Page 59 Guìa ràpida DVR FIRENZE 2. Descripción del producto: El nuevo DVR FIRENZE se ha concebido para realizar un sistema de videovigilancia fiable, seguro e interconectable con distintos tipos de monitores, ordenadores y teléfonos móviles. El nuevo tipo de compresión dinámica utilizada y la posibilidad de ajustar el nivel de calidad de la grabación garantizan un largo tiempo de grabación en el disco y una óptima calidad de las imágenes durante la reproducción.
- Page 60 Guìa ràpida DVR FIRENZE 3.2 Panel trasero (véase la figura 2): N.ْ Conectores N.ْ Conectores Conectores BNC Entradas de alarma Conector BNC de salida de vídeo Salida de alarma 4 entradas RCA Conector RJ45 Ethernet 2 RCA de audio Selector NTSC / PAL Terminación de 75Ω...
-
Page 61: Ratón
Guìa ràpida DVR FIRENZE Abajo/Borrar Seleccione el DVR para ser controlado por mando a distancia Izquierda 3.4 Ratón: El DVR puede dirigirse fácilmente desde el ratón. Para acceder al menú de configuración ponga el cursor del ratón hacia la parte inferior de la pantalla. -
Page 62: Encendido Y Apagado
Con el fin de aume ntar el nivel de seguridad que deben utilizar ese usuario para el acceso sólo la prime ra y cambiar la contraseña tan pronto como sea posible. ADVERTENCIA: En caso de pérdida de la contraseña de sistema, por favor contacte con su distribuidor local, que se pondrá en contacto Fracarro Radioindustrie SpA 62/141... - Page 63 Guìa ràpida DVR FIRENZE • Ajuste del Idioma Seguir fielmente los pasos siguientes para configurar el idioma del DVR: Pulse el botón "MENU" para acceder al menú de configuración; Mover el cursor a "setup" y confirme pulsando "ENTER"; Mover el cursor al "sistema" y confirmar pulsando la tecla "ENTER";...
- Page 64 Guìa ràpida DVR FIRENZE Pulse el botón "MENU" para acceder al menú de configuración; Mover el cursor a "setup" y confirme pulsando "ENTER"; Mover el cursor a la rúbrica "duro" y confirme pulsando "ENTER"; Pulse el botón "MODE"; Pulse el botón "Llamar" para formatear el disco duro;...
-
Page 65: Búsqueda
Guìa ràpida DVR FIRENZE Descripción Key: ▲▼◄► Pulse estos botones para mover el cursor. Numéricos 1-6 (ratón: Haga clic en el botón izquierdo del ratón) Pulse estos botones para seleccionar el modo de grabación. Pulse el botón ENTER para activar el modo. Los procedimientos para el registro son: "1"... - Page 66 Guìa ràpida DVR FIRENZE Pulse el botón "BUSCAR"; Mover el cursor en "búsqueda por hora" y confirme pulsando "ENTER"; Mueve el cursor sobre el título "Año", "mes", "Fecha", "hora" y "HORA" para seleccionar la fecha de inicio de la investigación mediante las teclas de "+/-";...
- Page 67 Guìa ràpida DVR FIRENZE vez a la solicitud de confirmación de la orden. Sólo cuando el DVR muestra el mensaje "Apagado completado. Ahora puede apagar el sistema, puede desactivar el DVR con la tecla adecuada en el panel trasero del DVR.
- Page 68 Guìa ràpida DVR FIRENZE Vuelva al DVR, pulse el botón MENÚ, luego AJUSTES y RED Net type Static IP E-mail Adv. IP Address 192.168.1.15 para acceder a toda la configuración de red del DVR. En esta Net Mask 255.255.255.0 Static IP pantalla introduzca una dirección IP (Ej.
- Page 69 Guìa ràpida DVR FIRENZE ATENCIÓN: Si la conexión se efectúa con un cable de red cruzado no introduzca ningún Gateway. Así el DVR está conectado correctamente a la red Ethernet y se puede conectar en la red Internet de forma que se pueda acceder a la misma información que se puede consultar desde la red Ethernet también en la red Internet.
- Page 70 Guìa ràpida DVR FIRENZE Elija un nuevo Hostname para el DVR, haga clic en “Use auto detect IP Address” y confirme todas las solicitudes posteriores para activar el nuevo Host. Utilizando el navegador web Internet Explorer introduzca la dirección IP del router (Gateway) y confirmare con la tecla “Enviar”.
-
Page 71: Conexión Con Dispositivo Móvil
Guìa ràpida DVR FIRENZE Introduzca la dirección web que se ha creado con el sitio web www.dyndns.org (“hostname”.dyndns.org) en la barra de búsqueda de Internet Explorer para poder acceder a la interfaz web del DVR. 7.3 Conexión con dispositivo móvil: Las imágenes del DVR pueden visualizarse en dispositivos móviles como: teléfono inteligente, PDA o teléfonos móviles... - Page 72 Guìa ràpida DVR FIRENZE Siga los pasos que se indican a continuación para conectar correctamente las cámaras: Instrucciones Figuras Consulte el manual de instalación de la cámara PTZ para configurar el protocolo de comunicación Pelco-D (o Pelco-P), velocidad de transmisión de baudios: 4.800 Bps y dirección ID (de 1 a 255) que tendrá...
- Page 73 Guia ràpido DVR FIRENZE ATENÇÃO: Este manual é um guia rápido para a primeira instalação do DVR, consulte o manual do utilizador para a descrição completa de todas as funções. Índice: 1- Advertências de segurança .....................pag.71 1.1 – Conteúdo da embalagem ....................pag.71 2- Descrição do produto ........................pag.72...
-
Page 74: 1- Advertências De Segurança
Guia ràpido DVR FIRENZE 1. Advertências de segurança: A instalação do produto deve ser realizada por pessoal qualificado, em conformidade com as leis locais e regulamentos sobre segurança. O produto é uma classe II, de acordo com EN 60950-1. IMPORTANTE: Somente pessoal treinado e autorizado pode abrir o produto. Em caso de falha não tente repará-lo caso contrário, a garantia não será... -
Page 75: 2- Descrição Do Produto
Guia ràpido DVR FIRENZE 2. Descrição do produto: O DVR FIRENZE foi projectado para realizar um sistema de vídeo-vigilância fiável, seguro e que permita a interface com diversos tipos de ecrãs, PCs e telemóveis. O novo tipo de compressão dinâmica utilizada e a possibilidade de configurar o nível de qualidade da gravação garantem um longo tempo de gravação no disco e uma óptima qualidade das imagens durante o playback. - Page 76 Guia ràpido DVR FIRENZE 3.2 Painel traseiro (ver figura 2): Nْ Conectores Nْ Conectores Conectores BNC Entradas de alarme Conector BNC de saída de vídeo Saída de Alarme 4 entradas RCA Conector Ethernet RJ45 2 RCA Audio Selector NTSC / PAL Terminação de 75Ω...
-
Page 77: Rato
Guia ràpido DVR FIRENZE Baixo / Delete Selecione o DVR para ser controlado por controle remoto Esquerda 3.4 Rato: O DVR pode ser facilmente controlado com o rato. Para ter acesso ao menu de configuração, coloque o cursor do rato na parte inferior do ecrã. -
Page 78: Primeiro Acesso Ao Dvr
Guia ràpido DVR FIRENZE Como opção é possível instalar um gravador de DVD no lugar do terceiro disco rígido. Para instalar, remova os dois parafusos e a tampa de plástico mostrada na figura. Pegue as duas placas fornecidas com os acessórios do DVR, fixe- as nas laterais da unidade óptica e fixe o dispositivo na base do... - Page 79 Guia ràpido DVR FIRENZE Pressione o botão "MENU" para acessar o menu de configuração; Move o cursor para "SETUP" e confirme pressionando "ENTER"; Move o cursor para o "sistema" e confirmar pressionando "ENTER"; Usando as teclas de seta mover o cursor para o idioma "e pressione as teclas "+/-" para definir o idioma desejado;...
- Page 80 Guia ràpido DVR FIRENZE Pressione o botão "MENU" para acessar o menu de configuração; Move o cursor para "SETUP" e confirme pressionando "ENTER"; Move o cursor para a posição "HDD" e confirme pressionando "ENTER"; Pressione o botão "MODE"; Pressione o botão "Call" para formatar o disco rígido inteiro;...
- Page 81 Guia ràpido DVR FIRENZE Esta tela dá ao administrador uma forma rápida e fácil de configurar a gravação da programação. Para cada hora da semana, você pode definir uma modos de gravação diferentes para escolher entre: Alarme + Movimento + Normal, Alarme + Movimento, Alarme, Movimento, Normal e sem entrada.
- Page 82 Guia ràpido DVR FIRENZE Seguir fielmente os passos abaixo para fazer uma pesquisa de imagens: Pressione o botão "Pesquisa" para aceder ao menu Procurar; Move o cursor sobre "Procura por hora" e confirme pressionando "ENTER"; Mova o cursor sobre o título "ANO", "MONTH", "Data", "hora" e "minuto" para selecionar a data de início da pesquisa utilizando as teclas "+/-";...
-
Page 83: Visualizando As Imagens
Guia ràpido DVR FIRENZE Pressione o botão "MENU" para aceder ao menu do sistema; Move o cursor sobre "dispositivo de backup" e confirme pressionando "ENTER"; Mova o cursor sobre os títulos "USB Drive", "USB DVD" ou "SD Card" para selecionar o tipo de dispositivo conectado e pressione "ENTER"... -
Page 84: Conexão De Rede
Guia ràpido DVR FIRENZE ATENÇÃO: O DVR dividir o disco rígido em duas partições diferentes, a maior (70% da capacidade máxima do disco rígido) é usado para a gravação normal eo outro (30%) para a pré-alarme e pré-gravação de movime nto. - Page 85 Guia ràpido DVR FIRENZE Insira o endereço IP do DVR (Ex. 192.168.1.15) na barra de busca de Internet Explorer e pressione “Enter”. Quando o browser Web pedir para instalar os controles ActiveX, confirme a instalação. ATENÇÃO: O fluxo de dados que será instaurado entre o DVR e o PC poderá...
- Page 86 Guia ràpido DVR FIRENZE Siga escrupulosamente as etapas indicadas a seguir para configurar a conexão: Instruções Figuras Aceda ao sítio www.dyndns.org e crie uma nova conta gratuita pressionando a tecla “Create Account”. O sítio internet enviará um Email para o endereço electrónico inserido para confirmar a criação da nova conta.
-
Page 87: Conexão Com Dispositivo Móvel
Guia ràpido DVR FIRENZE Consulte o manual de instalação do router para criar uma regra para as portas 67, 68 e 80 relacionadas ao endereço IP do DVR e protocolo TCP. NOTA: Consulte o sítio internet www.portforwarding.com para conhecer o procedime nto correcto para a configuração do router. -
Page 88: Conexão Com Câmara Ptz
Guia ràpido DVR FIRENZE Aparecerá uma janela de login na qual deverão ser inseridos o nome do utilizador e a senha do utilizador configurado no DVR. Escolha a resolução vídeo adequada às dimensões do ecrã do dispositivo móvel e confirme com a tecla “OK”. - Page 89 Guia ràpido DVR FIRENZE Pressione “MENU”, então “CONFIGURAÇÕES” Pre-Camera Setup e “Pre-Camera Setup” no DVR para ter acesso às REC Resolution 720x288 configurações da câmara. Insira o endereço ID da √ Watermark Group câmara PTZ conectada à respectiva entrada vídeo...
- Page 90 ΓΡΗΓΟΡΟΣ Ο∆ΗΓΟΣ ΧΡΗΣΗΣ ΓΙΑ DVR FIRENZE ΠΡΟΣΟΧΗ : Το εγχειρίδιο αυτό αποτελεί ένα γρήγορο οδηγό για την πρώτη εγκατάσταση του DVR. Για την πλήρη περιγραφή όλων των επι µέρους λειτουργιών βλέπε το εγχειρίδιο χρήσης Περιεχόµενα 1- Συµβουλές για ασφαλή χρήση............σελ. 85 1.1 - Το...
-
Page 91: Το Περιεχόµενο Της Συσκευασίας
ΓΡΗΓΟΡΟΣ Ο∆ΗΓΟΣ ΧΡΗΣΗΣ ΓΙΑ DVR FIRENZE 1 - Συµβουλές για ασφαλή χρήση : Η εγκατάσταση του προϊόντος πρέπει να εκτελούνται από ειδικευµένο προσωπικό, σύµφωνα µε τους τοπικούς νόµους και κανονισµούς για την ασφάλεια. Το προϊόν ανήκει στην κλάση ΙΙ, σύµφωνα µε το ΕΝ 60950-1. -
Page 92: Περιγραφή Του Προϊόντος
ΓΡΗΓΟΡΟΣ Ο∆ΗΓΟΣ ΧΡΗΣΗΣ ΓΙΑ DVR FIRENZE 2 - Περιγραφή του προϊόντος Η σειρά των DVR FIRENZE σχεδιάστηκε για την δηµιουργία ενός ασφαλούς και σίγουρου συστήµατος παρακολούθησης µε κάµερες που µπορεί να συνδεθεί µε διαφορετικού τύπου οθόνες, µε PC και µε κινητά τηλέφωνα. - Page 93 ΓΡΗΓΟΡΟΣ Ο∆ΗΓΟΣ ΧΡΗΣΗΣ ΓΙΑ DVR FIRENZE 3.2 Πίσω όψη (βλ. Σχήµα 2): Αρ. Συνδέσεις Αρ. Συνδέσεις Είσοδοι συναγερµού BNC Connectors BNC υποδοχή εξόδου βίντεο Έξοδος Συναγερµού 4 είσοδοι RCA RJ45 Ethernet connector Επιλογέας NTSC / PAL 2 RCA Audio τερµατισµούΩ75 Κύρια...
-
Page 94: Ποντίκι
ΓΡΗΓΟΡΟΣ Ο∆ΗΓΟΣ ΧΡΗΣΗΣ ΓΙΑ DVR FIRENZE Κάτω / ∆ιαγραφή Επιλέξτε το DVR που πρέπει να ελέγχονται από το τηλεχειριστήριο Αριστερά 3.4 Ποντίκι: Το DVR µπορεί να διαχειριστεί εύκολα µε το ποντίκι. Για να εισέλθετε στην διαµόρφωση φέρτε το κέρσορα του ποντικιού... -
Page 95: Πρώτη Επαφή Με Το Dvr
να αλλάξετε τον κωδικό πρόσβασης, το συντοµότερο δυνατό. ΠΡΟΕΙ∆ΟΠΟΙΗΣΗ: Σε περίπτωση απώλειας του κωδικού πρόσβασης του συστήµατος επικοινωνήστε µε τον τοπικό διανοµέα σας, ο οποίος θα επικοινωνήσει Fracarro Radioindustrie SpA • Ρύθµιση γλώσσας Ακολουθήστε πιστά τα παρακάτω βήµατα για να ρυθµίσετε τη γλώσσα της DVR:... - Page 96 ΓΡΗΓΟΡΟΣ Ο∆ΗΓΟΣ ΧΡΗΣΗΣ ΓΙΑ DVR FIRENZE Πατήστε το "MENU" κουµπί για να αποκτήσετε πρόσβαση στο µενού ρύθµισης; Μετακινήστε το δροµέα στο "SETUP" και επιβεβαιώστε πατώντας το πλήκτρο "ENTER"; Μετακινήστε το δροµέα στο "σύστηµα" και επιβεβαιώστε πατώντας το πλήκτρο "ENTER"; Χρησιµοποιώντας τα βέλη για να µετακινήσετε το δροµέα στη "γλώσσα" και πιέστε τα πλήκτρα "+/-" να ρυθµίσετε...
- Page 97 ΓΡΗΓΟΡΟΣ Ο∆ΗΓΟΣ ΧΡΗΣΗΣ ΓΙΑ DVR FIRENZE Πατήστε το "MENU" κουµπί για να αποκτήσετε πρόσβαση στο µενού ρύθµισης; Μετακινήστε το δροµέα στο "SETUP" και επιβεβαιώστε πατώντας το πλήκτρο "ENTER"; Μετακινήστε το δροµέα στην επικεφαλίδα "HDD" και επιβεβαιώστε πατώντας το πλήκτρο "ENTER";...
-
Page 98: Αναζήτηση
ΓΡΗΓΟΡΟΣ Ο∆ΗΓΟΣ ΧΡΗΣΗΣ ΓΙΑ DVR FIRENZE Η οθόνη αυτή δίνει στον διαχειριστή ένα γρήγορο και εύκολο τρόπο για να ρυθµίσετε το πρόγραµµα καταγραφής. Για κάθε ώρα της εβδοµάδας, µπορείτε να ορίσετε διαφορετικούς τρόπους εγγραφής να επιλέξει µεταξύ: Συναγερµός Motion + Normal, Συναγερµός + Motion, Συναγερµός, Motion, Κανονική, και δεν εισόδου. Σε κάθε περίπτωση θα πρέπει να... -
Page 99: Backup
ΓΡΗΓΟΡΟΣ Ο∆ΗΓΟΣ ΧΡΗΣΗΣ ΓΙΑ DVR FIRENZE Press "PLAY" για να ξεκινήσει η αναπαραγωγή; Πιέστε το πλήκτρο "◄" και "►" για να αυξήσετε ή να µειώσετε την ταχύτητα της οθόνης και το κουµπί "► / ▐ ▐" για να διακόψετε ή να παίξει το βίντεο;... -
Page 100: Recording Πίνακα
ΓΡΗΓΟΡΟΣ Ο∆ΗΓΟΣ ΧΡΗΣΗΣ ΓΙΑ DVR FIRENZE αρχεία αντιγράφων ασφαλείας και τα άλλα που περιέχει την εµφάνιση των εικόνων (SelfPlayer). Ακολουθήστε τα παρακάτω βήµατα για να προβάλετε εικόνες: Συνδέστε την εφεδρική συσκευή που χρησιµοποιείται σε ένα PC; 2. Έναρξη του λογισµικού "Selfplayer" που περιέχονται στο φάκελο "SelfPlayer";... - Page 101 ΓΡΗΓΟΡΟΣ Ο∆ΗΓΟΣ ΧΡΗΣΗΣ ΓΙΑ DVR FIRENZE Πληκτρολογήστε “ipconfig / all και πιέστε Invio Θα εµφανιστεί η οθόνη που (αποστολή). παρουσιάζεται δίπλα η οποία περιέχει όλες τις πληροφορίες του δικτύου του PC όπως Gateway (Ex.192.168.1.1), Subnet Mask (255.255.255.0) και την διεύθυνση IP του PC (Ex.192.168.1.14) Επιστρέψτε...
- Page 102 ΓΡΗΓΟΡΟΣ Ο∆ΗΓΟΣ ΧΡΗΣΗΣ ΓΙΑ DVR FIRENZE Τώρα µπορείτε να εισέλθετε στο Interface web του DVR. Συµβουλευτείτε το εγχειρίδιο του χρήστη για την κατανόηση όλων των διαθέσιµων λειτουργιών. Κάνοντας χρήση ενός smartphone, PDA ή ενός οποιαδήποτε browser web διαφορετικό του Internet Explorer θα...
- Page 103 ΓΡΗΓΟΡΟΣ Ο∆ΗΓΟΣ ΧΡΗΣΗΣ ΓΙΑ DVR FIRENZE Κάντε κλικ στο “Add Host Services” Επιλέξτε το νέο Hostname για το DVR, κάντε κλικ στο “Use auto detect IP Address” και επιβεβαιώστε όλες τις επόµενες ερωτήσεις για να ενεργοποιήσετε το νέο Host Με το Browser web Internet Explorer τοποθετήστε την διεύθυνση IP του...
-
Page 104: Σύνδεση Με Κινητή Συσκευή
ΓΡΗΓΟΡΟΣ Ο∆ΗΓΟΣ ΧΡΗΣΗΣ ΓΙΑ DVR FIRENZE Τώρα το DVR είναι σωστά συνδεδεµένο µε το δίκτυο internet. Εισάγετε την διεύθυνση web που δηµιουργήθηκε µε το side (“hostname”.dyndns.org) στον κατάλογο µε τα www.dyndns.org αξιόπιστα side του Internet Explorer Προσθέστε την διεύθυνση web που δηµιουργήθηκε µε το side στην... - Page 105 ΓΡΗΓΟΡΟΣ Ο∆ΗΓΟΣ ΧΡΗΣΗΣ ΓΙΑ DVR FIRENZE 7.4 Σύνδεση κάµερας ΡΤΖ: Το DVR µπορεί να διαχειριστεί µέχρι και 4-9-16 κάµερες ΡΤΖ χρησιµοποιώντας το bus RS-485 (Εικ. ∆):. Ακολουθήστε πιστά τις παρακάτω οδηγίες για να συνδέσετε σωστά τις κάµερες: Οδηγίες Εικόνες Συµβουλευτείτε το εγχειρίδιο εγκατάστασης της...
- Page 106 Snelle handleiding DVR FIRENZE UWAGA: Niniejszy podręcznik uŜytkownika stanowi jedynie skrócony przewodnik. Przy pierwszej instalacji rejestratora DVR naleŜy skorzystać z właściwego podręcznika uŜytkownika, który pozwoli zapoznać się z kompletnymi informacjami dotyczącymi wszystkich dostępnych funkcji rejestratora. Spis treści: 1- Zasady bezpiecznego uŜytkowania ..................str.23 1.1 –...
-
Page 107: Zawartość Opakowania
Snelle handleiding DVR FIRENZE 1. Zasady bezpiecznego uŜytkowania: Instalacja produktu musi zostać przeprowadzona przez wykwalifikowanych pracowników serwisu zgodnie z lokalnym prawem i przepisami bezpieczeństwa. Niniejszy produkt jest produktem Klasy II, zgodnie z normą EN 60950-1. OstrzeŜenia dotyczące montaŜu i eksploatacji - NaleŜy uŜywać... -
Page 108: 2- Informacje O Produkcie
4 szt. Śruby mocujące dysku twardego; 2. Informacje o produkcie: Cyfrowe rejestratory wideo/audio DVR FIRENZE zaprojektowano z myślą o zapewnieniu wydajnego i zarazem bezpiecznego systemu ochrony, który moŜe współpracować z róŜnego rodzaju monitorami, komputerami osobistymi oraz urządzeniami mobilnymi typu ‘smartphone’. Nowy rodzaj kompresji oraz moŜliwość konfigurowania jakości gwarantują... -
Page 109: Mysz
Snelle handleiding DVR FIRENZE 3.3 Panele i pilot zdalnego sterowania (patrz rysunek 3): Pilot zdalnego sterowania stanowi opcjonalne wyposaŜenie, którego celem jest ułatwienie działań uŜytkownika związanych z obsługą funkcji rejestratora. Wszystkie działania moŜna wykonywać przy pomocy pilota zdalnego sterowania bez konieczności korzystania z przycisków na panelu czołowym. Efektywna odległość działania pilota wynosi około 10m, bez Ŝadnych przeszkód blokujących sygnał... - Page 110 Snelle handleiding DVR FIRENZE Instrukcja Picture Odłącz wszystkie kable. Usuń wszystkie śruby (7) z tyłu (3) i po bokach (2+2). Zdejmij pokrywę. Z akcesorii rejestratora weź płytki montaŜowe i przymocuj je do boków twardego dysku przy pomocy 4 śrub. Z akcesorii rejestratora weź 4 śruby i przykręć nimi twardy dysk w rejestratorze a następnie podłącz kabel zasilający i sata.
- Page 111 Aby zwiększyć poziom bezpieczeństwa naleŜy wykorzystać konfigurację tego uŜytkownika tylko przy uzyskiwaniu dostępu do sytemu rejestratora po raz pierwszy a następnie naleŜy jak najszybciej zmienić hasło. OSTRZEśENIE: W przypadku zagubienia hasła systemowego naleŜy skontaktować się z lokalnym dystrybutorem, który skonsultuje się z Fracarro Radioindustrie S.p.A. • Ustawienia języka Aby dokonać...
- Page 112 Snelle handleiding DVR FIRENZE • Ustaw Datę / Czas: Aby ustawić datę / Czas, naleŜy postępować ściśle według przedstawionych poniŜej wskazówek: Naciśnij przycisk “MENU” aby uzyskać dostęp do menu konfiguracji; Przesuń kursor do ‘USTAWIENIA’ ("SETUP”) i zatwierdź poprzez naciśnięcie przycisku "ENTER";...
- Page 113 Snelle handleiding DVR FIRENZE • Ustawienia nagrania: Rejestrator umoŜliwia realizowanie róŜnych trybów nagrywania: alarmowy, detekcja ruchu, ciągły lub kalendarz (terminarz). Korzystając z ostatniego z wymienionych trybów, administrator moŜe definiować, dla kaŜdej godziny tygodnia, rodzaj nagrywania. Aby stworzyć moŜliwość personalizacji terminarza nagrywania, kaŜdy dzień jest podzielony na maksymalnie 16 segmentów (T1, ...
-
Page 114: Archiwizacja
Snelle handleiding DVR FIRENZE Rejestrator DVR pozwala korzystać 4 róŜnych sposobów wyszukiwania obrazów, takich jak: wyszukiwanie według czasu, wyszukiwanie według zdarzenia, inteligentne wyszukiwanie lub wyszukiwanie w plikach zarchiwizowanych. Znajdujący się poniŜej zrzut ekranu dla trybu ‘WYSZUKIWANIE WEDŁUG CZASU’ (“SEARCH BY TIME”), pokazuje datę... -
Page 115: Podgląd Obrazów
Snelle handleiding DVR FIRENZE W trakcie całego procesu archiwizacji widoczna będzie ikona oraz komunikat wskazujący na postęp procedury. Kiedy procedura będzie wymagała odłączenia urządzenia, wówczas korzystając z odpowiedniego menu postępuj zgodnie z poniŜszymi wskazówkami: Naciśnij przycisk “MENU” aby uzyskać dostęp do menu systemu;... - Page 116 Snelle handleiding DVR FIRENZE HDD (GB) DVR FIRENZE (godz.) 1000 2000 12.6 UWAGA: Rejestrator DVR dzieli twardy dysk na dwie róŜne partycje, z których największa (70% maksymalnej pojemności twardego dysku) jest uŜywana do normalnego nagrywania zaś druga partycja (30%) uŜywana jest do nagrywania w trybie pre-alarmowym i trybie pre-motion (rejestracji momentu przed wykryciem ruchu).
- Page 117 Snelle handleiding DVR FIRENZE Rodzaj Statyczny E-mail Adv. Następnie naleŜy wrócić do rejestratora DVR, Address IP 192.168.1.15 nacisnąć przycisk MENU następnie Statyczny Maska Podsieci 255.255.255.0 USTAWIENIA (SETUP) oraz USTAWIENIA Brama 192.168.1.1 SIECIOWE (NETWORK SETUP) aby uzyskać dostęp do menu ‘Ustawienia Sieciowe’. Na tym Nazwa UŜytkownika...
- Page 118 Snelle handleiding DVR FIRENZE Korzystając z przeglądarki Firefox lub innej przeglądarki moŜliwy jest podgląd obrazu, podgląd stanu sygnałów alarmowych z wejścia , oraz stanu alarmowych wyjść rejestratora DVR. Uwaga : JeŜeli połączenia dokonano za pomocą kabla ethernetowego (skrosowanego), wówczas nie naleŜy wprowadzać...
- Page 119 Snelle handleiding DVR FIRENZE Następnie naleŜy kliknąć na ‘Dodaj Usługi Hosta’ (“Add Host Services”) Wybierz nową nazwę hosta (Hostname) rejestratora DVR, kliknij na ‘Skorzystaj z autodetekcji adresu IP’ (“Use auto detect IP Address”) i zatwierdź wszystkie zapytania aby aktywować nowego Hosta.
-
Page 120: Połączenie Z Kamerami Ptz
Snelle handleiding DVR FIRENZE Teraz rejestrator DVR jest poprawnie podłączony do sieci. Upewnij się, Ŝe Adres IP rejestratora DVR został wprowadzony do ‘Zaufanych stron’ (“Trusted sites”) przeglądarki Internet Explorer Kiedy wprowadzisz nazwę hosta (Hostname) rejestratora DVR na pasku wyszukiwania przeglądarki Internet Explorer, uzyskasz dostęp do podglądu ze wszystkich... - Page 121 Snelle handleiding DVR FIRENZE Rejestratora DVR moŜna uŜywać do zarządzania kamerami PTZ z moŜliwością obserwacji rotacyjnej po 4-9-16 ekranów z wykorzystaniem kabla PTZ RS-485. (Rys D:) Aby podłączyć kamerę PTZ do rejestratora DVR, naleŜy postępować zgodnie z przedstawionymi poniŜej wskazówkami:...
- Page 122 Snelle handleiding DVR FIRENZE OPGELET: Deze gebruikshandleiding is een korte samenvatting voor de eerste installatie van de DVR. A.u.b. gelieve de volledige handleiding te gebruiken voor de uitleg van alle functies. Inhoudstabel: 8- Veiligheidswaarschuwingen ....................blz. 6 1.1 – Inhoud van de verpakking ....................blz. 6 9- Productoverzicht ........................blz.
-
Page 123: Inhoud Van De Verpakking
Snelle handleiding DVR FIRENZE 1. Veiligheidswaarschuwingen: De installatie van dit produkt dient uitgevoerd te worden door gekwalificeerd personeel zoals vastgelegd door de lokale wetten en regels wat betreft veiligheid. Dit produkt is klasse II in de Europese EN 60950-1 norm. -
Page 124: Voorpaneel
Snelle handleiding DVR FIRENZE 2. Product Overzicht: De DVR FIRENZE digitale video/audio recorder is ontworpen om krachtige en veilige camerabewakingssystemen te creeeren die kunnen geconnecteerd worden met verschillende types monitors, pc’s en smartphones. Het nieuwe type compressie en de configureerbare kwaliteit garanderen lange opnametijden op de harde schijf en een goede kwaliteit gedurende het visualiseren van de beelden. -
Page 125: Muis
Snelle handleiding DVR FIRENZE MAIN/AUX connectoren Ventilator voor koeling CALL monitor uitgang connector Netschakelaar CALL/AUX connectoren Ingang voeding RS-232 connector VGA Connector RS-422/485 selecteur schakelaar Connector voor aftand sensor RS-422/485 connector 3.3 Afstandsbediening (zie beeld 3): De afstandsbediening is een accessoire dat optioneel gebruikt kan worden om de handelingen van de gebruiker te vereenvoudigen. - Page 126 Snelle handleiding DVR FIRENZE De DVR kan gemakkelijk beheerd worden met de muis. Gelieve de muis aan te sluiten vooraleer de voedingskabel aan te sluiten en beweeg de cursor vervolgens naar de bodem van het scherm om het setup menu op te roepen.
- Page 127 U het fabriekspaswoord best enkel gebruiken voor de ingebruiksname, en het daarna dadelijk veranderen. WAARSCHUWING: In het geval van het verlies van het systeempaswoord, gelieve uw locale verdeler te contacteren die op zijn beurt Fracarro Radioindustrie S.p.A. zal contacteren. • Taalkeuze Volg de volgende stappen zonder uitzondering om de taal van de DVR te configureren.
- Page 128 Snelle handleiding DVR FIRENZE 11. Druk op de “MENU” toets om terug te keren naar het voorafgaande menu, de DVR zal de veranderde instelling activeren bij het drukken op de “ENTER” toets; 12. Druk op “ENTER” om de taalkeuze te bevestigen. Het systeem zal zich heropstarten met de nieuwe instelling.
- Page 129 Snelle handleiding DVR FIRENZE • Opname-Instelling: De DVR laat toe verschillende opname-types te kiezen: alarm, beweging of gepland. Met deze laatste instelling kan de administrator het type opname bepalen, voor elk uur van de week. Om de opnameschema’s te personaliseren is elke dag verdeeld in 16 segmenten (T1, ..,T16). Bovendien kunnen er 3 verschillende opnameinstellingen kunnen gekozen worden tussen: video, audio+ video of geen opname.
- Page 130 Snelle handleiding DVR FIRENZE Numerische toetsen 1-6 (Met de muis: klik op linkertoets) Druk op deze toetsen om de opnamewijze te selecteren. Druk op de “ENTER” toets om de modus te activeren. De verschillende opnamewijzen zijn:: “1” – Alarm + Beweging + Normaal, “2” – Alarm + Beweging, “3” – Alarm, “4”...
-
Page 131: Bekijken Van De Beelden
Snelle handleiding DVR FIRENZE Beweeg de cursor over de titels “ALARM”, “BEWEGING”, “VIDEO VERLIES” en “NORMAAL” om het type opname te kiezen waarop U will zoeken d.m.v. de “+/-“ toetsen; Druk op “KOPIE/COPY” toets; Beweeg de cursor naar “BACKUP SPEED/ BACKUP SNELHEID” en selecteer de waarde van backup ratio die U verkiest tussen 1 (traagst) en 9 (snelst) d.m.v. -
Page 132: Bytes T.o.v. Uren Registratie
Snelle handleiding DVR FIRENZE drukken om verder te gaan met het uitschakelen. Pas wanneer de DVR de boodschap “Afsluiten OK. U mag het systeem nu uitschakelen.” kan U de DVR uitschaklen via de desbetreffende schakelaar op het achterpaneel van de DVR. - Page 133 Type in dit venster “ipconfig /all” in en druk vervolgens o Enter. Dit scherm zal nu al de PC Netwerk gegevens visualiseren en dus ook de Gateway (Bijv. 192.168.1.1) en het PC IP Address (Bijv. 192.168.1.14). Net type Static IP E-mail Adv.
- Page 134 Nu is het mogelijk met Internet Explorer beelden van de DVR te visualiseren en tot 4 verschillende DVR’s te beheren. Met Firefox of andere Web browsers is het mogelijk beelden te visualiseren, de staat van de alarm-ingang na te gaan en de alarm-uitgang van de DVR te beheren. AANDACHT: Wanneer de connectie wordt gemaakt met een cross cable, gelieve dan NIET het Gateway IP adres in te voeren.
- Page 135 Klik op “Add Host Services” Selecteer een nieuwe Hostname voor de DVR, klik op “Use auto detect IP Address” en bevestig al de verzoeken om de nieuwe Host te activeren. Met Internet Explorer, gelieve het IP Adres van de router (Gateway) in de zoekbar in te voeren, een scherm zal U vragen het User ID en paswoord in te voeren van de router, gelieve...
- Page 136 Nu is de DVR correct aangesloten op het netwerk. Gelieve nog eens na te kijken indien het IP adres van de DVR ingevoerd is in de “Trusted sites” van Internet Explorer. Voer de Hostname van de DVR in in de zoekbar van Internet Explorer en U zal al de aangesloten cameras kunnen visualiseren.
- Page 137 7.4 PTZ Came ra connectie: De DVR kan gebruikt worden om tot 4 PTZ cameras te beheren gebruik makend van de RS-485 kabel (Fig. D). Gelieve de volgende stappen te volgen om een PTZ camera op de DVR aan te sluiten: Instructies Afbeelding Gelieve de gebruikershandleiding van de Camera te volgen om hem te...
- Page 138 Notes: ……………………………………………………………………………………………… ……………………………………………………………………………………………… ……………………………………………………………………………………………… ……………………………………………………………………………………………… ……………………………………………………………………………………………… ……………………………………………………………………………………………… ……………………………………………………………………………………………… ……………………………………………………………………………………………… ……………………………………………………………………………………………… ……………………………………………………………………………………………… ……………………………………………………………………………………………… ……………………………………………………………………………………………… ……………………………………………………………………………………………… ……………………………………………………………………………………………… ……………………………………………………………………………………………… ……………………………………………………………………………………………… ……………………………………………………………………………………………… ……………………………………………………………………………………………… ……………………………………………………………………………………………… ……………………………………………………………………………………………… ……………………………………………………………………………………………… ……………………………………………………………………………………………… ……………………………………………………………………………………………… ……………………………………………………………………………………………… ……………………………………………………………………………………………… ……………………………………………………………………………………………… ……………………………………………………………………………………………… ……………………………………………………………………………………………… ……………………………………………………………………………………………… 138/141...
- Page 139 Notes: ……………………………………………………………………………………………… ……………………………………………………………………………………………… ……………………………………………………………………………………………… ……………………………………………………………………………………………… ……………………………………………………………………………………………… ……………………………………………………………………………………………… ……………………………………………………………………………………………… ……………………………………………………………………………………………… ……………………………………………………………………………………………… ……………………………………………………………………………………………… ……………………………………………………………………………………………… ……………………………………………………………………………………………… ……………………………………………………………………………………………… ……………………………………………………………………………………………… ……………………………………………………………………………………………… ……………………………………………………………………………………………… ……………………………………………………………………………………………… ……………………………………………………………………………………………… ……………………………………………………………………………………………… ……………………………………………………………………………………………… ……………………………………………………………………………………………… ……………………………………………………………………………………………… ……………………………………………………………………………………………… ……………………………………………………………………………………………… ……………………………………………………………………………………………… ……………………………………………………………………………………………… ……………………………………………………………………………………………… ……………………………………………………………………………………………… ……………………………………………………………………………………………… 139/141...
- Page 140 Notes: ……………………………………………………………………………………………… ……………………………………………………………………………………………… ……………………………………………………………………………………………… ……………………………………………………………………………………………… ……………………………………………………………………………………………… ……………………………………………………………………………………………… ……………………………………………………………………………………………… ……………………………………………………………………………………………… ……………………………………………………………………………………………… ……………………………………………………………………………………………… ……………………………………………………………………………………………… ……………………………………………………………………………………………… ……………………………………………………………………………………………… ……………………………………………………………………………………………… ……………………………………………………………………………………………… ……………………………………………………………………………………………… ……………………………………………………………………………………………… ……………………………………………………………………………………………… ……………………………………………………………………………………………… ……………………………………………………………………………………………… ……………………………………………………………………………………………… ……………………………………………………………………………………………… ……………………………………………………………………………………………… ……………………………………………………………………………………………… ……………………………………………………………………………………………… ……………………………………………………………………………………………… ……………………………………………………………………………………………… ……………………………………………………………………………………………… 140/141...
- Page 141 SPA - Garantia par Fracarro Radioindustrie S.p.A., Via Cazzaro n.3, 31033 Castelfranco Veneto (TV) Italia. PORT – Garantia por da Fracarro Radioindustrie S.p.A., Via Cazzaro n.3, 31033 Castelfranco Veneto (TV) Italia. GRE - εγγύηση Fracarro Radioindustrie S.p.A., Via Cazzaro n.3, 31033 Castelfranco Veneto (TV) Italia.
Need help?
Do you have a question about the FIRENZE and is the answer not in the manual?
Questions and answers