
Related Manuals for Dogtra RR DELUXE/QL


Summary of Contents for Dogtra RR DELUXE/QL
- Page 1 RR DELUXE/QL/PL REMOTE RELEASE BIRD LAUNCHER Owner's Manual Please read this manual thoroughly before operating the RR DELUXE/QL/PL.
- Page 2 Consult your Dogtra product or other property. physician or medical device maker before using your medical device with a Dogtra product. If you think that PRODUCT SAFETY your Dogtra product is interfering with your pacemaker,...
-
Page 3: Table Of Contents
..............MAINTENANCE Auto Charger ....WARRANTY AND REPAIR INFORMATION Dogtra's auto chargers are designed for use with a 12 volt car outlet. European Charger Dogtra’s European chargers are designed for use with a 230 volt AC electrical outlet. To purchase accessories, please visit www.dogtra.com or... -
Page 4: Main Features
MAIN FEATURES IMPORTANT PRODUCT INFORMATION • Multiple receivers: up to 16 launchers controlled from one transmitter • DO NOT use the bird launcher until you have read this manual. • Multiple sound modes: a receiver emits a duck call and beep sound •... -
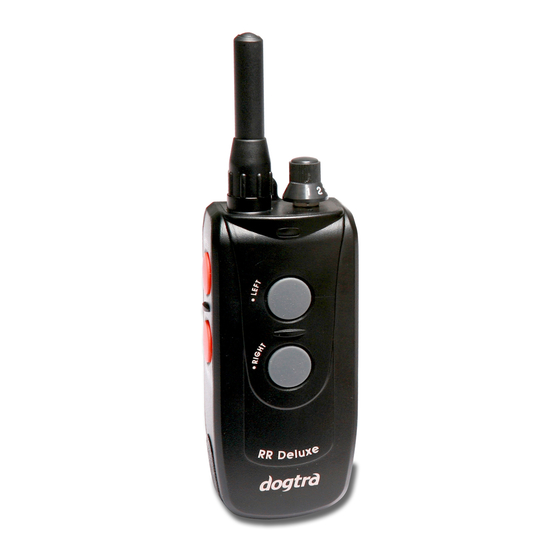
Page 5: Description Of Transmitter Parts
DESCRIPTION OF 1. Antenna: A 2 inch antenna is supplied with the Dogtra RR DELUXE transmitter. The antenna must be fastened TRANSMITTER PARTS to the transmitter before using the unit. 2. LED Indicator Light: The color of the light indicates the status of battery life. -
Page 6: Description Of Receiver Parts
DESCRIPTION OF RECEIVER PARTS 1. Flexible Antenna: Flexible antenna is located on the top of the receiver. Please do not bend the antenna forcibly since it may cause reduction in the range. 2. Speaker Horn: Sound horn emits loud beep tone or quacking sound when you press Beeper or Duck Call button. -
Page 7: Description Of Launcher Parts (Ql, Pl)
DESCRIPTION OF LAUNCHER Launcher size PARTS (QL, PL) Dogtra QL Launcher - 8.6" × 4.5" × 4.3" - Designed for quail or barn pigeon sized birds. Dogtra PL Launcher - 13.2" × 6.9" × 6.9" - Designed for pheasant and chukar sized game birds. -
Page 8: Ql, Pl Assembly And Operation
Dogtra QL/PL ASSEMBLY AND 1. Launcher Mesh: The launcher mesh holds a dummy or bird for launching. OPERATION 2. Cradle Bar: The cradle bar supports the arms and ASSEMBLY levers of the basket. 3. Launcher Basket: The launcher basket contains large holes for maximum air flow and scent distribution. - Page 9 ASSEMBLY FOR TWO LAUNCHERS Figure 2. Plugging solenoid cable into the receiver 2) Plug the solenoid cable into the receiver's left jack. Figure 3. Assembling two launchers on one receiver 1) Mount the receiver to the launcher. 2) Plug the solenoid cable into the receiver’s right jack. The other receiver will be plugged into the receiver's left jack.
- Page 10 How to launch the Dogtra Remote Release Bird Launchers • First, test the launcher without any dummy or bird inside. WARNING! Keep your head away from the top of the launcher when it is loaded. You could be injured if the dummy or bird is launched accidentally.
- Page 11 Figure 7. Using the external speaker (optional) Figure 6. Remote launcher released 6) Plug the external speaker cable to the external speaker 4) Press the transmitter’s left or right launcher button depending on which jack (left or right) it’s connected jack located on the bottom right side of a receiver.
-
Page 12: Ql, Pl Spring Strength Settings
Dogtra QL/PL SPRING STRENGTH SETTINGS Figure 9. Positioned for low launch 2) Turning counter-clockwise will move the springs up for a low and quiet launch; the very top being the lowest. Figure 8. Positioned for high launch 1) The bird launcher is shipped with the springs adjusted in the bottom setting. -
Page 13: Charging The Battery
CHARGING THE BATTERY Battery Charging Procedure NOTE: The unit has a partial charge when it leaves the Dogtra facility, upon receipt of the launcher systems, be sure to give it a full 14-hour initial charge before the first use. 1. Attach the charging cables to both the transmitter and receiver(s), as shown on page 24. -
Page 14: Maximizing The Distance
MAXIMIZING THE DISTANCE ACCESSORIES The Dogtra RR DELUXE has a range of 1 mile. Depending The following items may be purchased separately by on the way you use your transmitter, the transmitter range calling our customer service at (888) 811-9111 or go to may vary. -
Page 15: Maintenance
No dealer of Dogtra products, nor any employee or agent of Dogtra, is authorized to make any additions, changes, or extensions to the Warranty. Dogtra, at its sole discretion and at any time, reserves the right to modify the Warranty. - Page 16 Dogtra’s liability is limited to the cost of repair or replacement of the Dogtra fees, for products sent to Canada. Such costs, taxes, or fees will be borne by product under Warranty.
Need help?
Do you have a question about the RR DELUXE/QL and is the answer not in the manual?
Questions and answers