Table of Contents
Advertisement
Quick Links
Advertisement
Table of Contents

Summary of Contents for Linkam Scientific Instruments DSC450
- Page 1 Linkam Scientific Instruments DSC Dual Pan User Guide 1.1.0 USER GUIDE...
- Page 2 This page is intentionally blank...
-
Page 3: Table Of Contents
...................................8 Loading your sample into the stage ...................................9 Mounting the stage onto a microscope ...................................10 Connecting the liquid Nitrogen cooling ...................................11 Controlling the DSC450 in LINK ...................................12 Main Control Screen ........................................12 Sample Notes Screen ........................................12 Sampling Screen ........................................12 Data Collection ........................................ -
Page 4: Introduction
Thank you for purchasing your Linkam equipment, please take a moment to read this manual before setting up the equipment. If you have purchased control software, please install the software first. See your software manual for further installation instructions. v1.1.0 © 2017 Linkam Scientific Instruments... -
Page 5: Important Notices
Refer to your health and safety officer regarding instructions on how to handle liquid nitrogen safely and ensure that you have the correct safety equipment including gloves and safety goggles. Feedback Your feedback will be greatly appreciated, please email us directly info@linkam.co.uk v1.1.0 © 2017 Linkam Scientific Instruments... -
Page 6: Safety Precautions
Servicing should only be done by qualified service personnel. DANGER! · Surfaces with this symbol may get very hot. · Do not touch while in operation. Risk of severe burns or scalds. · Keep away from flammable or combustable materials. v1.1.0 © 2017 Linkam Scientific Instruments... -
Page 7: System Overview
The system consists of a DSC450 stage, a T96 System Controller and optional LNP liquid nitrogen cooling pump. LINK System control software and digital video capture can be added as an option to control from PC. The DSC450 stage can be mounted onto most microscopes by using either specific stage clamps or an adapter plate. v1.1.0... -
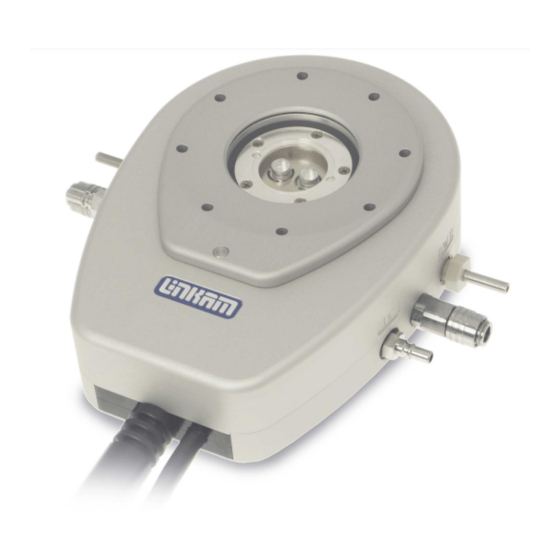
Page 8: Stage Anatomy
Lid O Ring seal Lid locator magnets DSC reference pan position DSC sample pan position Accessories · Certified Indium Sample and Reference Pan pair. · 22ø x 1mm Sapphire Furnace Lid · Stage clamps v1.1.0 © 2017 Linkam Scientific Instruments... -
Page 9: Loading Your Sample Into The Stage
Place your reference crucible on the (13) sensor plate position labeled R. Place your sample crucible on the (14) sensor plate position labeled S. Replace the sapphire furnace lid. Swing the stage lid back into position Connect the ECP water pump, LNP and purge gas. v1.1.0 © 2017 Linkam Scientific Instruments... -
Page 10: Mounting The Stage Onto A Microscope
Note: For other types of microscope substage, refer to the diagram included with the stage adapter. v1.1.0 © 2017 Linkam Scientific Instruments... -
Page 11: Connecting The Liquid Nitrogen Cooling
There is a second Gas Purge Valve on the opposite side of the stage to allow the gas to leave the stage. A Gas Insert must also be inserted into this Gas Purge Valve when purging. v1.1.0 © 2017 Linkam Scientific Instruments... -
Page 12: Controlling The Dsc450 In Link
Main Control Screen Main Control Screen When the DSC450 stage is connected to LINK, the only additional information displayed is the Dsc power, in milliwatts. Sample Notes Screen Enter information about the data run on this tab. Please note: The sample description will also form part of the filename. -
Page 13: Data Collection
Additional information about an experiment (such as the "Sample Notes" or the Microscope and Objective used) can be retrieved using the following procedure: 1. Right Click on the Chart and select "Toolbox" 2. Click on the "About" Tab. v1.1.0 © 2017 Linkam Scientific Instruments... -
Page 14: Overlaying Dsc Charts
1. Open a DSC data file by selecting Open Data File from the FIle menu. 2. A popup window will appear. Click "Yes", and select the second data file. Repeat step 2 to overlay a third trace, otherwise, Click "No" v1.1.0 © 2017 Linkam Scientific Instruments... -
Page 15: Exporting Data (Excel)
To do this, right click on the Chart and select "Export". Set the "Save as type" to "Text files (*.txt)". This file can now be opened in Excel from the "Open With" menu option. v1.1.0 © 2017 Linkam Scientific Instruments... -
Page 16: Chart Cursor
Select the 'Peak measurement' tab and the below window will appear. Click on the the measure button for the peak you wish to measure. Up to 5 peaks can be measured on any one data chart. v1.1.0 © 2017 Linkam Scientific Instruments... - Page 17 Left click to finalise the selection and the system will next ask you to select the extrapolation line start point. The extrapolation line is a tangent to the peak that is extrapolated so that it intersects with the hypothetical baseline.The start of the extrapolation line is the point at which the peak line is at it’s steepest. v1.1.0 © 2017 Linkam Scientific Instruments...
- Page 18 Left click to finalise the peak measurement and the chart will update. The peak measurements are added at the top of the graph under the file name. v1.1.0 © 2017 Linkam Scientific Instruments...
- Page 19 Unchecking the 'Lines' box will remove the black lines showing the base and extrapolation lines from the chart. This defaults to on when a peak is measured. Checking the 'Fill' box will fill the peak area with solid colour to make it more visible. This defaults to off when a peak is measured. v1.1.0 © 2017 Linkam Scientific Instruments...
-
Page 20: Stage Calibration Adjustment
When you are done, click on the red cross in the corner and tick the "Apply sample calibration" tickbox. Please refer to the "Sample Calibration" section of the LINK manual for further information on this. v1.1.0 © 2017 Linkam Scientific Instruments... -
Page 21: Connecting The Ecp Water Pump
(marked "OUT") and back into the ECP system. Take care to ensure that ECP system is connected the right way round. The direction of water flow is important to the functionality of the DSC stage. v1.1.0 © 2017 Linkam Scientific Instruments... - Page 22 Linkam Scientific Instruments Ltd Tel: +44(0)1737 363 476 Fax: +44(0)1737 363 480 Email: support@linkam.co.uk Unit 8 Epsom Downs Metro Centre Waterfield, Tadworth, Surrey, KT20 5LR, UK www.linkam.co.uk...
Need help?
Do you have a question about the DSC450 and is the answer not in the manual?
Questions and answers