Advertisement
Quick Links
PITSCO'S
SOLAR DESIGNER'S KIT
Welcome to the world of solar energy. With this kit, you will be able to build a
solar-powered car (all parts included; see list on back) and other solar energy projects
using the supplied parts and instructions. Follow the instructions below to build a solar
car. Then be inventive and design your own project.
Building Your Solar Car
Tools required: 9/64" drill bit, drill or drill press, ruler, and a utility or hobby knife or
sandpaper.
1. Use a drill (drill press is preferred) with
a 9/64" bit to drill two holes in the plastic
body as indicated in Figure 1. Hole A
should be drilled 1-3/4" from the back
end of the body (under the motor slot),
and 1/2" from the top of the body (the
top is opposite the grooved side). Drill
through all four plastic surfaces, keeping
the drill bit parallel to the top of the body
and perpendicular to the side of the body.
2. Hole B should be drilled in the same
manner, with the center of the hole
1-3/4" from the front of the body, and
1/2" from the top of the body (Figure 1).
3. Remove Gear O (10-tooth, 2 mm
bore) and Gear I (40-tooth, 1/8" bore)
from the gear font and use a knife or
sandpaper to remove any burrs. Push
Gear O onto the shaft of the motor.
4. Insert one axle through Gear I and
position it 5/8" from one end of the axle
(Figure 2). Slide one of the brass washers
onto the long end of the axle, and insert
the shorter end into one of the wide
wheels (Figure 1).
5. Insert the free end of the axle through
Hole A in the plastic body. Slide a brass
washer on the end of the axle, and push
the other wide wheel onto the axle. Make
sure the wheels turn freely (Figure 1).
Note:
The car will run on a smooth surface in full sunlight or under an incandescent
100-watt lightbulb. Fluorescent light will not produce enough energy to move the car.
P.O. Box 1708 • Pittsburg, KS 66762 • 800-835-0686 • www.pitsco.com
6. Use a knife or sandpaper to remove
any burrs from the front wheels. Insert
the other axle into a front wheel. Slide a
brass washer onto the free end of the axle
and insert the axle through Hole B in the
plastic body. Slide the remaining brass
washer onto the end of the axle, and push
the other front wheel onto the axle. Make
sure the wheels turn freely (Figure 1).
7. Connect the wires from the solar panel
to the motor by clipping the alligator clips
onto the motor terminals (Figure 3).
8. Lay the motor in the slot in the top of
the body so the gears from the motor and
the wheels mesh. The force of gravity will
keep the gears together. If necessary, apply
a couple drops of glue with a glue gun to
keep the motor in place (Figure 4). Adjust
the wires and alligator clips as needed to
make the motor lay in the slot.
9. Peel the paper backing from one side
of the adhesive tape and place it, with the
sticky side down, on the back of the solar
panel. Peel the paper backing from the
other side of the tab and press the panel
into place on top of the body (Figure 4).
10. Your solar car is now complete. If
your car runs backward, switch the black
and red wires on the motor.
Motor
Gear O
Hole A
Gear I
Wide Wheel
Figure 1
Figure 2
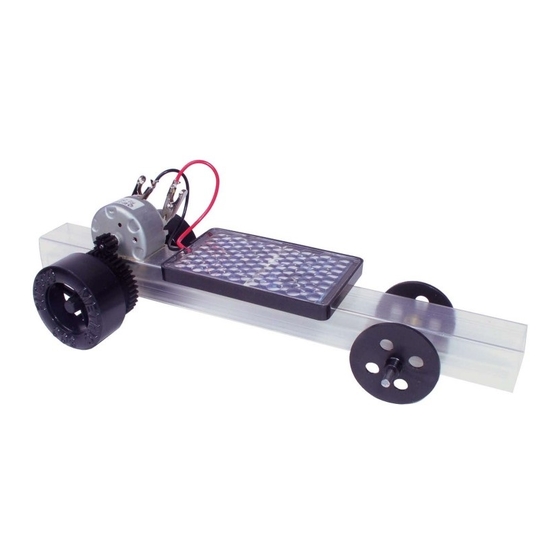
The finished solar vehicle.
Figure 4
End View
Hole B
Washer
Axle
Front Wheel
Motor
Red
5/8"
Indented
Figure 3
Black
Dot
Advertisement

Summary of Contents for pitsco SOLAR DESIGNER’S KIT
- Page 1 PITSCO’S SOLAR DESIGNER’S KIT Welcome to the world of solar energy. With this kit, you will be able to build a solar-powered car (all parts included; see list on back) and other solar energy projects Motor using the supplied parts and instructions. Follow the instructions below to build a solar Gear O car.
- Page 2 • Modify the car using different gears or combinations of gears to increase the speed or power of the vehicle. • Add more solar panels (available from Pitsco) in series to increase the voltage (and speed) or in parallel to increase power (see illustrations above).