Advertisement
Quick Links
Contents
1
................................................
.............................................
2
................................................
.5
...................................................
7
.............................................
13
6. Technical parameter
....................................
15
..........................................
17
1
Advertisement

Summary of Contents for Toolots Tekscope SZM
-
Page 1: Table Of Contents
Contents 1. Before use ………………………………………… 2. Nomenclature ……………………………………… 3. Assemblage ………………………………………… 4. Operation …………………………………………… 5. Configuration ……………………………………… 6. Technical parameter ……………………………… 7. Troubleshooting ……………………………………... -
Page 2: Before Use
1 Before use NOTICE 1) Microscope ought to be placed in a dry and clean place. Do not expose the microscope in the sun directly. Avoid high temperature and violent vibration. 2) As microscope is a precision instrument, handle with care, avoiding impact or abrupt movement during transportation. -
Page 3: Nomenclature
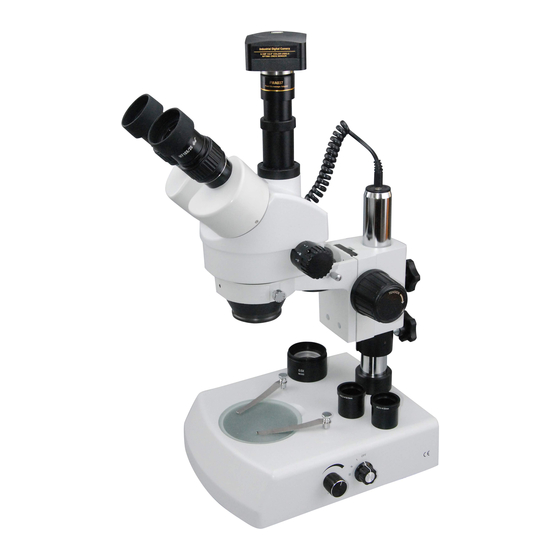
2 N o m e n c l a t u r e SZM-45B1BL2 Eyepiece shield Eyepiece Diopter adjusting ring Head Illumination device Zoom control knob Focusing Lamp lock-screw Glass stage Clip Base Top variable light control Fuse Bottom variable light control Switch... - Page 4 SZM-T1BL2 Diopter adjusting ring Eyepiece shield Zoom control knob Eyepiece Head lock-screw Head Focusing knob Glass stage Base Clip...
-
Page 5: Assemblage
3 A s s e m b l a g e SZM-45B1BL2 Eyepiece shield Eyepiece Head Head lock-screw Illumination device Clips Glass stage Base... - Page 6 SZM-45T1BL2 + SZM-PH OR SZM-CTV...
-
Page 7: Operation
mount Photo eyepiece mount Eyepiece shield Illumination device Eyepiec Head Clip Glass stage Base 4 O p e r a t i o n Use the glass stage... - Page 8 1) Press the glass stage on the sunken place then the other side of the glass stage will be lifted. (Fig.1) Fig.1 Adjust the degree of tightness of the focusing arm. 1) If you want to adjust degree of tightness of the focusing arm, can hold one of the focusing knobs and turn another one to attain a suitable position.
- Page 9 7) Do the step (4) and make the image clear which is observed through the left eyepiece by turning the left diopter adjusting ring ①. (Fig.3) Adjust the interpupillary distance 1) Adjust the prism housing along the direction of arrowhead of the Fig.4 till the observation is comfortable.
- Page 10 side toward the lock-screw② and tighten the lock-screw. (Fig.6) 2) Put the plug into the socket of the pillar stand③. Fig.6 Choose the optical system 1) You can alternate the binocular observation and video capture by pushing or pulling the pole. You can attain binocular Pole observation by pushing the pole inside, or attain video capture by pulling it...
- Page 11 2) For the monitor, the connect sign model must be chosen (C-video or S-video) and for TV, the channel must be set to the video channel. 3) Pull the pole out and adjust the focusing knob and then the image will appear on the screen clearly. 4-14 Connect with the computer 1) Plug one end of the PVA cable into the socket of the...
- Page 12 the focusing knob to make the image of the object clearly. 4) Move the digital head or the object gently to adjust the image agreeing with observer. 4-18 Brief instruction for the software 1) The program design of the software is up to date, and the Chinese/English interface can berth powerful delineation bar which be used much conveniently and rapidly.
- Page 13 4-21 Replace the lamps 1) Press the stage on the sunken place then the other side will lifted. (Fig.14) 2) Take the lamp out of the jack. 3) Put a new lamp into the jack thoroughly. Fig.14 4) Recover the stage plate. (Fig.15) Note: ①...
-
Page 14: Configuration
5 C o n f i g u r a t i o n SZM series configuration Parts Specification SZM-B1B6 SZM-B1BL2 SZM-B1STL1 SZM-B1STL2 SZM-B1STL3 SZMEWh10X20 Eyepieces SZMEWh15X15 SZMEHWh20X10 Binocular SZM7045 Tri-ocular SZM7045TR SZMAO0.5/165mm Auxiliary SZMAO1.5/45mm objective SZMAO2/30mm SZM-A1 Focusing arm SZM-A3 SZM-B6 SZM-BL2... - Page 15 Outside carton Note: The items marked“O”included and others for option Parts Specification SZM-T1B6 SZM-T1BL2 SZM-T1STL1 SZM-T1STL2 SZM-T1STL3 SZMEWh10X20 Eyepieces SZMEWh15X15 SZMEHWh20X10 Binocular SZM7045 Tri-ocular SZM7045TR SZMAO0.5/165mm Auxiliary SZMAO1.5/45mm objective SZMAO2/30mm SZM-A1 Focusing arm SZM-A3 SZM-B6 SZM-BL2 Stand SZM-STL1 SZM-STL2 SZM-STL3 Epi-illuminatorSZM-L1 TV adapter SZM-CTV 1/2...
- Page 16 6 T e c h n i c a l p a r a m e t e r SZM7045/SZM7045TR Auxiliary objectives Standard configuration 0.5X 1.5X Working Working Working distance Working distance Eyepie distance100mm distance165mm 45mm 30mm Fiel Fiel Fiel Fiel Magnificati d of...
-
Page 17: Troubleshooting
Bottom 12V/15W halogen 220/110V、7W light lamp fluorescent lamp 7 T r o u b l e s h o o t i n g The performance of the microscope can’t be made fully because of unfamiliar using, this table will give some advices. General troubleshooting Trouble Cause... - Page 18 8、The image on the monitor is Readjust the focus of The focus of video is not not clear when the focusing video to a correct correct knob is turned. position Diopter adjustment is not Adjust the diopter correct 9、Eyes fell tired easily Brightness of light is not Adjust the brightness correct...
- Page 19 12V DC power does not be Connect the 12V DC power 6、The software run slowly connect or the window of the view No input signal of A/D Reconnect the C-Video or does not come out board S-Video signal The input signal does not Choose the correct signal accord with the signal which model which match the...
Need help?
Do you have a question about the Tekscope SZM and is the answer not in the manual?
Questions and answers