Advertisement
Quick Links
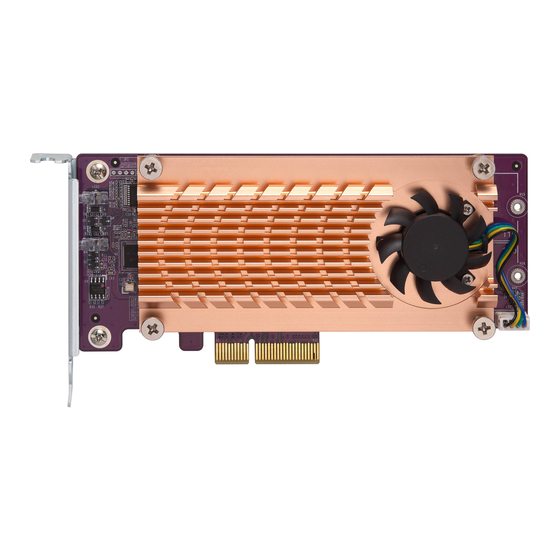
QM2 Installation Guide
Unpacking Instructions
Prior to unpacking your QM2 expansion card, ensure that all system requirements are met.
Inspect each item in the packet contents. Contact your reseller for any damaged or missing parts.
Package Contents
QM2 with cooling module;
Low-profile flat bracket
Full-height bracket
Low-profile bracket (preinstalled)
Advertisement

Subscribe to Our Youtube Channel
Summary of Contents for QNAP QM2 Series
- Page 1 QM2 Installation Guide Unpacking Instructions Prior to unpacking your QM2 expansion card, ensure that all system requirements are met. Inspect each item in the packet contents. Contact your reseller for any damaged or missing parts. Package Contents QM2 with cooling module; Low-profile flat bracket Full-height bracket Low-profile bracket (preinstalled)
- Page 2 M.2 SSD screw pack Thermal pad kit Rubber pad (black) kit...
- Page 3 Installing an M.2 SSD onto a QM2 Card 1. Prepare the M.2 SSD a. Remove protective film from both sides of thermal pad and place thermal pad on SSD controller. b. Remove protective film from rubber pad (black) and stick rubber pads on the bottom side of the SSD as needed.
- Page 4 2. Unscrew the cooling module from the QM2 board. 3. Remove the cooling module from the QM2 board without disconnecting the power connector. 4. Insert M.2 SSD onto QM2.
- Page 5 a. Insert M.2 SSD into M.2 socket. b. Secure M.2 SSD with screw.
- Page 6 Note: Ensure that the thermal sensor is in contact with the M.2 SSD. 5. Attach the cooling module to the QM2 board and secure screws. Installing a QM2 Card in a NAS 1. Power off the NAS. 2. Unplug the power cord from the electrical outlet. 3.
- Page 7 Use low-profile bracket Use low-profile flat bracket Use full-height bracket 5. Note: Refer to your Hardware User Guide for details. 6. Power off the NAS.
- Page 8 Use low-profile bracket Use low-profile flat bracket Use full-height bracket Remove the screw from the PCIe slot cover and then pull the cover off.
- Page 9 Use low-profile bracket Use low-profile flat bracket Use full-height bracket Identify the bracket required for your NAS.
- Page 10 Use low-profile bracket Use low-profile flat bracket Use full-height bracket Change PCIe bracket on the QM2 card if necessary.
- Page 11 a. Remove screws from existing bracket. b. Remove bracket from card.
- Page 12 c. Attach required bracket to card using the same screws. 10. Install the QM2 card.
- Page 13 Use low-profile bracket Use low-profile flat bracket Use full-height bracket Hold the expansion card by the edges. b. Insert the card into the slot.
- Page 14 c. Attach the screw 11. Attach the case cover. Use low-profile bracket Use low-profile flat bracket Use full-height bracket...
- Page 15 Attach the screws to the back side of the case. Use low-profile bracket Use low-profile flat bracket Use full-height bracket...
- Page 16 Connect all cables and external attachments. 14. Power on the NAS. 15. Verify that the SSD on the QM2 card is recognized by the NAS. a. Log on to QTS as administrator. b. Go to “Main Menu” > “Storage Manager” > “Disk/VJBOD”...
Need help?
Do you have a question about the QM2 Series and is the answer not in the manual?
Questions and answers