Table of Contents
Advertisement
Available languages
Available languages
Quick Links
Advertisement
Chapters
Table of Contents

Subscribe to Our Youtube Channel
Summary of Contents for ooma Smart Security Keypad
- Page 1 Keypad Quick Start Guide...
-
Page 2: Table Of Contents
Contents Prepare to Mount Your Ooma Keypad ..........9 What’s in the Box ............... 4 Mount with Adhesive Pads (Optional) ..........10 Install the App ................6 Mount with Screws (Optional) ............11 Activate Account ................ 6 How to Check Your Current Mode ............ 13 Start Pairing Process ..............7... -
Page 3: What's In The Box
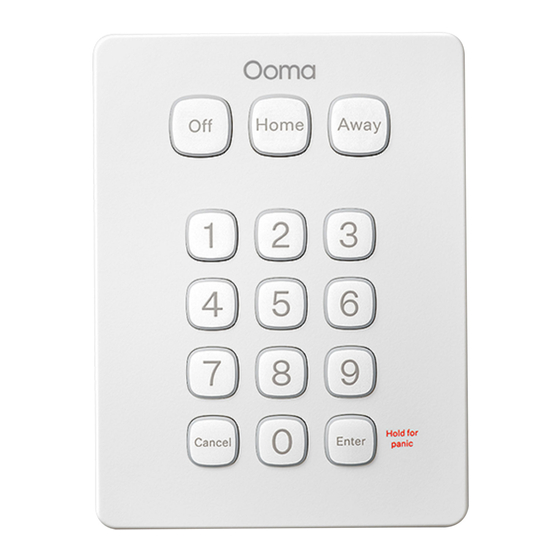
What’s in the Box Screws and Anchors Ooma Keypad Quick Start Guide Back Cover (1) CR123A Adhesive Battery Pads Success LED (hidden) Error LED (hidden) Back Cover Screw Tamper Sensor Spring... -
Page 4: Install The App
Stand within 10 feet of your Telo Base Station. Looking at and follow the steps in the app to set up your account. the back side of the Ooma Keypad, pull the clear battery tab. Doing this will activate the battery connection and the Ooma Keypad will automatically enter pairing mode. -
Page 5: Manually Start Pairing Mode (Optional)
Ooma Keypad Remove the CR123A battery and wait 10 seconds. After pairing your Ooma Keypad, the next step is to mount it d. Then, press and hold the “Enter” key. While holding near your main entryway. You will want it within easy reach down the Enter key, re-insert the battery. -
Page 6: Mount With Adhesive Pads (Optional)
Ooma Keypad. b. If you had to remove the Ooma Keypad’s back b. Using the back cover as cover during the pairing process, place it back a stencil, mark the screw (optional) on the Ooma Keypad now and secure the screw. -
Page 7: How To Check Your Current Mode
Ooma Keypad. After a short delay, the key for the current mode will the screw holes over the pencil light up. Note that if your system is in another mode that isn’t on the Ooma marks (or the wall anchors). -
Page 8: How To Trigger A Panic Signal (Professional Monitoring Users Only)
The new mode button will blink continuously until the mode switch completes, then it will light up solid for a few seconds. If there is an Exit Delay for the mode switch, the Ooma Keypad will play periodic beeps as you exit the household. - Page 9 Reference (Continued) What Do You Want How to Do It What You See What You Hear to Do? Clavier green Solid if PIN Long beep if is valid PIN is valid Guide de démarrage rapide flashes if PIN Enter your PIN code Rapid short beeps Switch to is invalid...
- Page 10 Table des matières Contenu de la boîte ..............20 Préparatifs avant d’installer votre clavier.......... 25 Installation de l’application ............22 Fixation avec bandes adhésives (facultatif) ........26 Activation du compte ..............22 Fixation avec des vis (facultatif) ..........27 Lancement du processus de jumelage ..........23 Vérification du mode actuel ............
-
Page 11: Contenu De La Boîte
Contenu de la boîte Vis et ancrages Ooma Clavier Guide de démarrage rapide Couvercle arrière Voyant Bandes indiquant la 1 pile CR123A adhésives réussite de l’opération (caché) Voyant Vis du couvercle d’erreur arrière (caché) Ressort du détecteur anti-effraction... -
Page 12: Installation De L'application
Add Sensor (Ajouter un détecteur) sur le tableau de bord. Choisissez Keypad Recherchez Ooma Smart Security (Sécurité intelligente (Clavier) et suivez les étapes dans l’application. Ooma) dans la boutique Apple App Store ou Google Play Store. Téléchargez l’application et installez-la sur votre appareil. -
Page 13: Lancement Manuel Du Mode De Jumelage (Facultatif)
Lancement manuel du mode Fin du processus de jumelage de jumelage (facultatif) Suivez les étapes dans l’application mobile pour terminer le processus de jumelage. Si en tirant sur la languette, le mode de jumelage n’est pas automatiquement activé, vous devrez lancer le mode de jumelage manuellement. -
Page 14: Fixation Avec Bandes Adhésives (Facultatif)
Fixation avec bandes adhésives Fixation avec des vis (facultatif) (facultatif) Si ce n’est pas déjà fait, Utilisez un chiffon humide pour nettoyer l’endroit où vous voulez installer votre clavier afin que les dévissez le couvercle bandes adhésives collent correctement. arrière du clavier. b. -
Page 15: Vérification Du Mode Actuel
Après le jumelage de votre clavier et de votre unité de base les marques de crayon (ou les Ooma Telo, vous pouvez vérifier dans quel mode se trouve ancrages muraux). Placez les vis votre système en appuyant simplement sur n’importe quelle dans les trous et serrez. -
Page 16: Changement De Mode
Comment déclencher une alarme de Changement de mode panique (utilisateurs de la surveillance Vous pouvez changer de mode en entrant simplement votre professionnelle uniquement) NIP, suivi du mode que vous souhaitez utiliser. Si le NIP saisi est valide, le clavier émettra un long signal sonore et affichera un voyant lumineux vert fixe. -
Page 17: Interaction Avec Le Clavier - Référence
Interaction avec le clavier – Référence Que souhaitez-vous Ce que vous Que souhaitez-vous Ce que vous Comment le faire Ce que vous voyez Comment le faire Ce que vous voyez faire? entendez faire? entendez Voyant vert fixe si Deux courts signaux le NIP est valide sonores lorsque le Suivez les... - Page 18 Besoin d’aide Articles de soutien et manuels de l’utilisateur : support.ooma.com/security Forum communautaire : forums.ooma.com Service à la clientèle en direct : 1-877-629-1284 Pour des informations sur la garantie, la sécurité et autres informations juridiques, allez sur : ooma.com/legal Cet appareil est conforme à la Partie 15 des directives de la FCC. Son fonctionnement est soumis aux deux conditions suivantes : 1) Cet appareil ne doit pas provoquer de brouillage préjudiciable, et 2) cet appareil doit...
- Page 19 Need help? Support Articles and User Manuals: support.ooma.com/security Community Forum: forums.ooma.com Live Customer Care: 1-877-629-1284 For warranty, safety, and other legal information, visit ooma.com/legal This device complies with part 15 of the FCC rules. Operation is subject to the following two conditions: (1) This device may not cause harmful interference, and (2) This device must accept any interference received, including interference that may cause undesired operation.
Need help?
Do you have a question about the Smart Security Keypad and is the answer not in the manual?
Questions and answers