
Summary of Contents for lab12 dac1 reference
- Page 1 Owner’s Manual dac1 r e f e r e n c e Handcrafted Digital to Analog Converter www.lab12.gr manual v1.0...
- Page 2 Lab12 dac1 - Handcrafted Digital to Analog Converter Table of Contents It is yours………………………………………………………page 3 Unpacking and Warnings…………………………………..page 3 Features………………………………………………………..page 4 Installation & Placement…………………………………..page 4 Front Panel Indicators……………………………………...page 5 Rear Panel Connections…………………………………….page 6 Main Connections…………………………………………….page 7 For the safety of your equipment…………………….….page 8 Specifications………………………………………………….page 8...
- Page 3 Do not forget that your DAC is totally handcrafted with perfectly matched parts of the finest selections. In order to reach the optimal performance your dac1 reference needs at least 200 hours of listening. In this time all components go from “burn in” period to stable.
- Page 4 • Five Years Guarantee Installation & Placement Lab12 dac1 reference should be placed on a solid flat surface. You should avoid placing it near a heat source as this could compromise the performance and reliability. You should never place another component directly on top of this device.
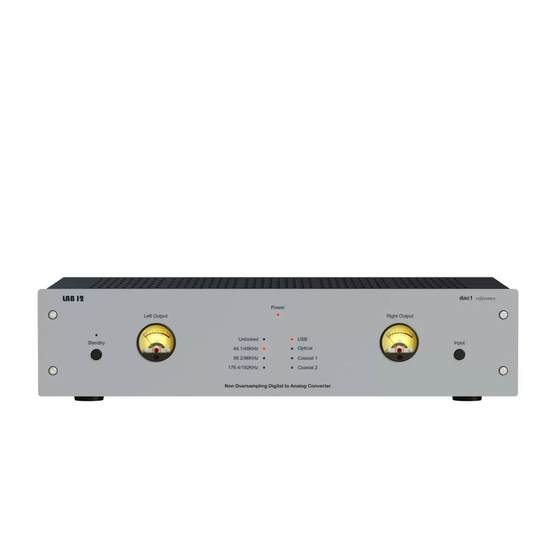
- Page 5 On the left of the front panel, you will find the Standby push button and indication LED (A). When active, it indicates that dac1 reference is in Standby Mode. You can leave the device in Standby Mode without the need to turn off the main power switch on the back panel.
- Page 6 Lab12 dac1 - Handcrafted Digital to Analog Converter Rear Panel Connections DAC1 Rear panel In rear panel you will find the connection inputs and outputs. On the left side, you will find a pair of single-ended RCA and a pair of unbalanced XLR (A & B) analog audio output connectors.
- Page 7 You can supply 230 to 240 AC Volts /50Hz (115 to 120 AC Volts / 60Hz). Every dac1 reference is calibrated and tested with the usage of a Lab12 Knack mk2 power cable. We strongly suggest using this cable.
- Page 8 ! Make sure that all your equipment is turned off before any connection. ! Please keep in mind that you have to turn on dac1 reference some seconds before turning on your amplifier and turn it off some seconds after turning off your amplifier.
Need help?
Do you have a question about the dac1 reference and is the answer not in the manual?
Questions and answers