Table of Contents
Advertisement
Quick Links
Advertisement
Table of Contents

Summary of Contents for INFRA-E-MOTION MOUSE-E-MOTION
- Page 1 MOUSE MOTION Mobile infrared activity-data logger with integrated clock Operating Instructions INFRA MOTION activity monitoring systems Hagendeel 33 Tel.: (0173) 6 13 91 85 D-22529 Hamburg Fax: (0 41 93 ) 75 45 59 www.infra-e-motion.de e-mail: contact@infra-e-motion.de...
-
Page 2: Table Of Contents
MOUSE MOTION Mobile infrared activity data-logger with integrated clock - TABLE OF CONTENTS - FEATURES NAMES AND FUNCTIONS OF PARTS POWER SUPPLY Battery Usage Battery Recharge OPERATION Power Start data logging Stop data logging Data transmission Erase stored data DEVICE STATUS USAGE Usage on top of a cage Stand-alone usage... -
Page 3: Features
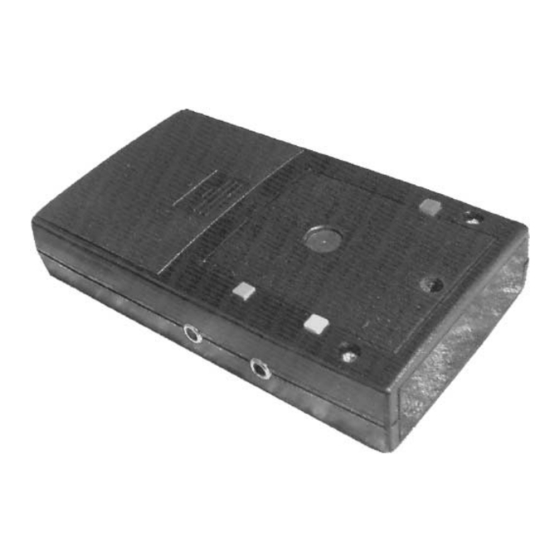
2. Names and Functions of Parts Bottom view: Page - 3 -... -
Page 4: Power Supply
3. POWER SUPPLY 1.5V x 2 (Mignon / AA / IEC R6 or equivalent, 1400mAh, e.g. 3.1 Battery Usage Varta „AccuPlus Ultra“ No. 5606). Use rechargeable batteries only. NEVER use normal alkaline batteries! A T T E N T I O N ! Never try to charge normal alkaline batteries as there is the risk of explosion! Place the batteries into the compartment in the rear bottom part... -
Page 5: Operation
Press the blue button to switch the device ON and OFF. Press the yellow button. The reversed triangle LED will light up for Data recording will begin after the reversed triangle LED has extinguished or, if the device‘s default settings have been changed via software configuration, after the specified initial delay period. -
Page 6: Data Transmission
The device has to be in standby mode to be able to execute the 4.4 Data transmission data transmission. If it is currently in logging mode, you have to stop the logging task by pressing the yellow button or switching the device off and on again (see 4.3). -
Page 7: Device Status
5. DEVICE STATUS The device‘s power status is indicated by pulses of the square 5.1 Stand-by mode LED: 3 pulses: Battery charge is 75% to 100% 2 pulses: Battery charge is 50% to 75% 1 pulse: Battery charge is 25% to 50% No pulse (but periodic blinking of the IR-interface LED indicating that the device is switched on): Battery charge is less than 25%... -
Page 8: Usage
6. USAGE MOUSE-E-MOTION is especially designed to be applied with the commonly used type 2 mouse cages. Usage of the device and the metal holder in connection with this cage type will exclude false detections of movements outside the cage. If you are in doubt with your special location, perform a test in place. -
Page 9: Connection To Pc
(for best performance distance should be not more than 10cm). Start the MOUSE-E-MOTION software (refer to the MOUSE-E-MOTION software documentation on how to install and use the software). Click on the ‚AutoDownload‘ button to automatically download data with the preset default parame- ters or click on the ‚Data Download‘... -
Page 10: Technical Specifications
The internal clock can be synchronized with the clock of a PC via the MOUSE-E-MOTION software configuration (refer to the MOUSE-E-MOTION software documentation). Operating Temperature Range: -10 to +40 °C StorageTemperature Range: -20 to +50 °C...
Need help?
Do you have a question about the MOUSE-E-MOTION and is the answer not in the manual?
Questions and answers