Advertisement
Quick Links
Shapeoko Assembly Guide
Introduction
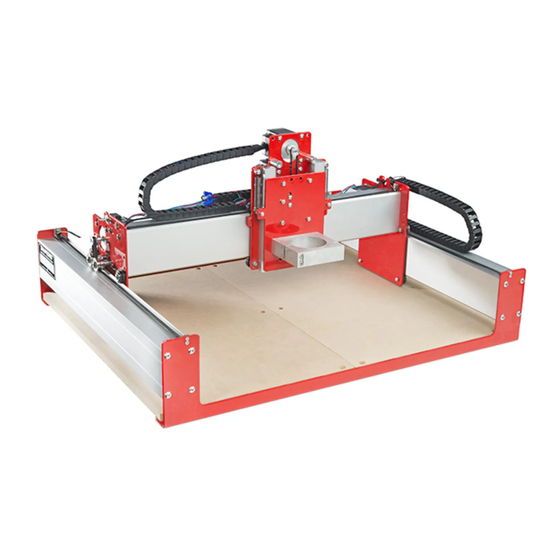
SparkFun's Deluxe Shapeoko kit is a Carbide3D Shapoko 3 in fancy
SparkFun red with our open source 3 axis mill driver, the Stepoko.
The full kit. In this picture, the Shapeoko parts have been assembled as per
the Shapeoko guide, and the SparkFun kit parts are shown beside it.
Guide Content
This guide directs you to the Shapeoko assembly instructions, then goes
through the final steps to add the electronics to the mill.
Required Materials
• Shapeoko assembly instructions - Download and read before
unboxing. It works well to print two pages per sheet in order to have
a copy on hand, and to save trees.
• Shapeoko Deluxe Kit Contents PDF - This list reflects exactly what
comes in the deluxe kit and can be used to verify the shipment
before starting assembly.
• A meter or so of spare wire.
• A soldering iron and some solder.
• A multimeter.
• A 2.5mm hex wrench for belt clips.
• Pliers or small adjustable wrench.
Suggested Reading
Stepoko guide - This guide talks about how the Stepoko control electronics
works. Important information is also linked below.
Assembly
Page 1 of 10
Advertisement

Summary of Contents for sparkfun Shapeoko
- Page 1 SparkFun’s Deluxe Shapeoko kit is a Carbide3D Shapoko 3 in fancy SparkFun red with our open source 3 axis mill driver, the Stepoko. The full kit. In this picture, the Shapeoko parts have been assembled as per the Shapeoko guide, and the SparkFun kit parts are shown beside it.
- Page 2 Set Aside Some Time It may take about four hours to complete the initial assembly. Once you’ve got it, continue on. 2. Install the Shapeoko into the enclosure. There are 10 4-40 screws for this purpose, but you’ll only need 8. Use a number 1 phillips screwdriver.
- Page 3 Page 3 of 10 Here the enclosure is ready to rotate up onto the mill into the correct orientation. This picture is shown with the wires installed. Don’t worry if yours are not installed yet, that will be covered later. 4.
- Page 4 8. Install the enclosure to the rail with the terminal connections at the top. Use the extra M6x12mm bolts provided with the Shapeoko. 9. Connect the X and Z axes to the Stepoko. For more information, check the Stepoko guide’s Hardware: Connecting the Motors section.
- Page 5 This is because the motor’s coils are not always wired the same internally. Shapeoko Belt Fix Take a quick look at this video to see, and hear, how the Y axis when wired incorrectly, and correctly.
- Page 6 Page 6 of 10 The trimpots are centered for 1 A drive in this photograph. 12. Mount the switch to a free hole on the gantry end plate and solder on leads. Here the switch has been mounted and the switch wires are being measured.
-
Page 7: Finishing Touches
Page 7 of 10 The Y axis wires have been twist tied together here. The X and Z axes are gently pulled out to see how long they are. With the X axis moved ofer to one end, I can see that my bound wires have enough slack so that they won’t be pulled on when the carriage moves. - Page 8 3. After you’ve located where the fixed end will be, cut a small piece of double-sided tape, and firmly squish the carrier down. For these Shapeoko mills, make sure nothing crosses the center line in the extrusion. Here, the tape is being dispensed directly onto the location and cut...
- Page 9 • Our Cable Carrier Product Video shows some alternate carrier installations. Or, head back to the The Stepoko and Shapeoko Landing page to see what accessories and tools are available. Now that you have built your Shapeoko Mill, check out these other SparkFun tutorials to learn how to use the SparkFun Stepoko Control board.
- Page 10 Once you’re familiar with the Stepoko, create your first project by following along with the Shapeoko SparkFun Coaster. Shapeoko Coaster Project N OVEM BE R 20, 2015 A step-by-step guide to cutting and engraving a coaster with the Shapeoko. https://learn.sparkfun.com/tutorials/shapeoko-assembly-guide?_ga=1.30113791.193945695... 5/2/2016...
Need help?
Do you have a question about the Shapeoko and is the answer not in the manual?
Questions and answers