
Summary of Contents for VivoLink VLCAPTURE1
- Page 1 User Manual VLCAPTURE1 HDMI to USB Video Capture Device All Rights Reserved Version: VLCAPTURE1_2020V1.3...
-
Page 2: Package List
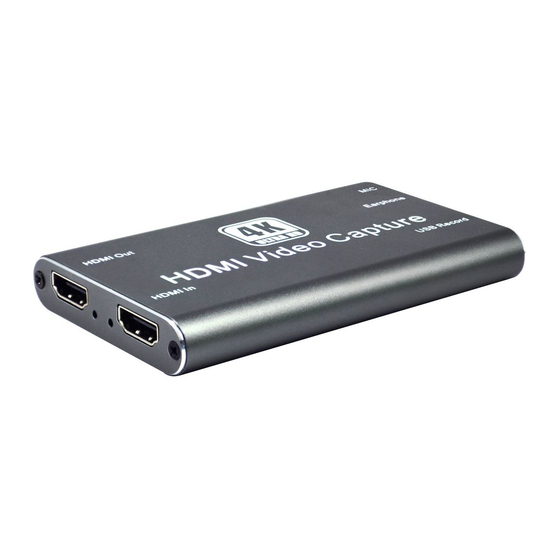
HDMI to USB Video Capture Device Introduction The VLCAPTURE1 is a HDMI to USB video capture device. The product is designed to capture video and audio signal from the HDMI source. The content captured can be saved to the PC/Laptop through a USB cable. -
Page 3: System Diagram
HDMI to USB Video Capture Device System Connection System Requirement The recording device with available type-A USB port. ▪ Microsoft Windows, Mac OS X or Linux. ▪ HDMI audio/video source with HDMI Cable (Camera, Xbox, PS4, DVD…etc.). ▪ System Diagram... - Page 4 HDMI to USB Video Capture Device Latency Testing Testing result ▪ VLC media OBS Studio Potplayer player Laptop 1 CPU: Intel i5-5200U 2.20 GHz 100ms 80ms 2500ms RAM: 8GB OS: Windows 10 64bit Laptop 2 CPU: Intel i3-7130U 2.70 GHz 80ms 80ms 2300ms...
- Page 5 HDMI to USB Video Capture Device Recording for Windows using OBS Note: The OBS Player is the first recommended software used for video capturing. Please visit https://obsproject.com/ to download the player for Windows, Mac OS X or Linux. 1. Click the “+” icon at “Sources” zone, and then click “Video Capture Device”.
- Page 6 HDMI to USB Video Capture Device 2. Type the new device name, and then click “OK” to create new source. 3. Select the video capture device and configure the video parameters, and then click “OK”.
- Page 7 HDMI to USB Video Capture Device 4. Click “Start Recording” at “Controls” zone, and the video and audio recording will start. 5. To stop recording, simply click the “Stop Recording”. 6. Select “File”, and then click “Show Recordings” at the top down menu. The saved recording video file can be found.
- Page 8 HDMI to USB Video Capture Device 7. To configure audio and video parameters, click “Settings” at “Controls” zone.
- Page 9 HDMI to USB Video Capture Device Recording for Mac using QuickTime The QuickTime Player is the software that comes with Mac PC, it can also be used for video recording. 1. Launch QuickTime Player, click “File” at the top menu and select “New Movie Recording”.
- Page 10 HDMI to USB Video Capture Device 4. Click the “Record” button to start recording. 5. To stop recording, simply click the square “Stop” button.
- Page 11 HDMI to USB Video Capture Device 6. Enter the recording file name and select where to save the file.
- Page 12 HDMI to USB Video Capture Device Recording for Windows using VLC VLC Media Player Initial Setting The VLC Media Player also can be used for video capturing. Please visit www.videolan.org/vlc/ to download VLC Media Player for Windows, Mac OS X or Linux. For initial use, the hardware accelerated decoding must be set at “Automatic”...
- Page 13 HDMI to USB Video Capture Device VLC Media Player Direct Show 1. Select “Media”, and then select “Open Capture Device” at the drop down menu. 2. For video device name, select “USB3.0 HD Video Capture”.
- Page 14 HDMI to USB Video Capture Device 3. For audio device name, select “Microphone (USB3.0 HD Audio Capture)”. 4. To set up the correct aspect ratio, click “Advanced options”.
- Page 15 HDMI to USB Video Capture Device 5. Enter the aspect ratio for the video source (e.g. 16:9). 6. Click “OK” to exit the “Advanced options” menu. 7. Click “Play”, the source screen will show in approximately several seconds.
- Page 16 HDMI to USB Video Capture Device VLC Media Player Recording Note: We recommend using the “Convert/Save” method to record the video from the device for best performance. 1. Select “Media”, and then select “Convert / Save” at the drop down menu. 2.
- Page 17 HDMI to USB Video Capture Device 4. To set the video resolution, type the resolution (e.g. 1920*1080) at “Video size” textbox. 5. To set the aspect ratio, click “Advanced options”.
- Page 18 HDMI to USB Video Capture Device 6. Enter the aspect ratio for the video source (e.g. 16:9). 7. Click “OK” to exit the “Advanced options” menu. 8. Click “Convert / Save”.
- Page 19 HDMI to USB Video Capture Device 9. Select “Display the output” check-box, and set the video format. 10. Then click “Browse” to choose where to save the destination file and enter the file name. 11. Click “Start”, and the video and audio recording will start in approximately several seconds.
- Page 20 HDMI to USB Video Capture Device...
-
Page 21: Specification
HDMI to USB Video Capture Device Specification Model VLCAPTURE1 Description HDMI to USB Video Capture Device Input (1) HDMI In, (1) Microphone Input Connector (1) Type-A HDMI, (1) 3.5mm jack Output (1) HDMI Out, (1) USB Record, (1) Earphone Output Connector (1) Type-A HDMI, (1) Type-A USB, (1) 3.5mm jack...
Need help?
Do you have a question about the VLCAPTURE1 and is the answer not in the manual?
Questions and answers