Advertisement
Available languages
Available languages
Quick Links
Installation and Maintenance Instructions for Appleton™ EHLED
Portable Handlamp
IMPORTANT: RETAIN THIS INSTRUCTION SHEET FOR FUTURE REFERENCE. For safe installation
and operation, please read these instructions carefully and with full understanding.
• This luminaire is designed for use in Class I, Div. 1, Groups C & D and Type 4X locations.
Product Safety
Signal Words Defined
DANGER indicates a hazardous situation which, if not avoided, will result in death or serious injury. WARNING
indicates a hazardous situation which, if not avoided, could result in death or serious injury. CAUTION indicates a
hazardous situation which, if not avoided, could result in minor or moderate injury. NOTICE is used to address practices
not related to physical injury.
Safety Instructions
WARNING:
• DO NOT OPEN FIXTURE WHILE IT IS ENERGIZED.
• DO NOT USE FIXTURE ON UN-GROUNDED CIRCUITS. Failure to ground this luminaire can result in an
electrical shock which may be fatal.
CAUTION:
• ELECTRIC SHOCK HAZARD: Disconnect from power (unplug) before re-lamping or servicing.
• Take note of caution labels on product.
• Inspect cord regularly for damage and replace if nexessary for user safety.
• Do not submerge any part of product in liquids.
• Do not hang fixture by its electrical cord. Use manufacturer's hooks or mounting brackets.
• Take care not to drop fixture as damage to the product may result.
• Power supply cord is UL Listed and meets OSHA requirements for grounding of hand-held tools.
Appleton • 1.800.621.1506 • www.appletonelec.com
APPLETON™ EHLED PORTAbLE HANDLAMP
DOC00038A000 INSTRUCTION SHEET
DOC00038A000 Rev. 00 02/13/20 MY6381 • Page 1 of 16
Advertisement

Summary of Contents for Emerson Appleton EHLED
- Page 1 DOC00038A000 INSTRUCTION SHEET Installation and Maintenance Instructions for Appleton™ EHLED Portable Handlamp IMPORTANT: RETAIN THIS INSTRUCTION SHEET FOR FUTURE REFERENCE. For safe installation and operation, please read these instructions carefully and with full understanding. • This luminaire is designed for use in Class I, Div. 1, Groups C & D and Type 4X locations. Product Safety Signal Words Defined DANGER indicates a hazardous situation which, if not avoided, will result in death or serious injury.
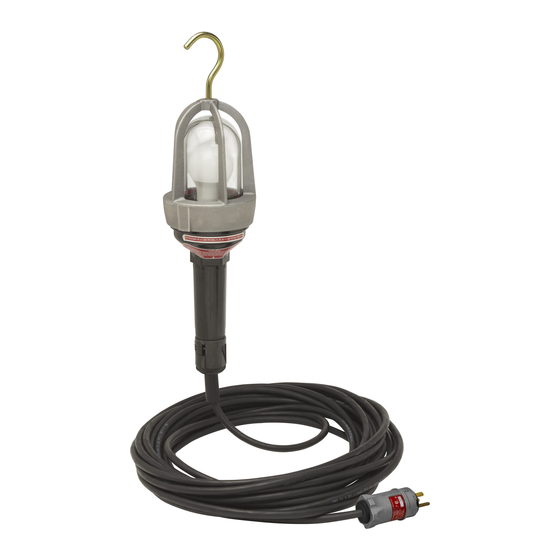
- Page 2 Product Features - Refer to Figure 1 Dimensions The overall length is 20" (508mm). Outside diameter is 4-7/8" (124mm). Guard The guard is made of non-sparking cast aluminum. The non-sparking metal hook is located on the outer end of the guard. Hook The hook shall swivel and fit over a 3/4"...
-
Page 3: Troubleshooting
Operating Instructions Locate a power source to be used for the handlamp. The EHLED is rated for 120–277 V AC 50/60Hz. NOTE: If the power source is WITHIN a Hazardous Location the handlamp must be connected to the power source with explosion proof fittings suitable for the Hazardous Location. - Page 4 Globe & Guard Assembly or Lamp Replacement Instructions First, be sure that you have all the parts necessary for your replacement project on hand before beginning this process. Reference the table below to order the replacement parts you'll need. Part No. Description Guard &...
- Page 5 Globe & Guard Assembly or Lamp Replacement Instructions (Continued) CAUTION: ELECTRIC SHOCK HAZARD: DISCONNECT handlamp from power source and remove to a safe area (beyond the hazardous operating environment) before inspection or repair work is attempted. NOTE: When performing the following replacement steps, avoid letting any liquid enter the handle. Ensure that the inside of the globe and handle are completely dry of ALL liquids before reassembling the handlamp.
- Page 6 Globe & Guard Assembly or Lamp Replacement Instructions (Continued) 3. Ensure that the EHLED handlamp is unplugged, then place into the jig as shown below. FIGURE 6: EHLED HANDLAMP INSERTED INTO jIG 4. With the handlamp guard seated firmly in the Guard Housing Jig, use the Wrench Tool to rotate the handlamp's handle COUNTER-CLOCKWISE until the handle separates from the handlamp guard.
- Page 7 Globe & Guard Assembly or Lamp Replacement Instructions (Continued) 5. Hand pressure along may not provide enough torque to unseat the handlamp's handle. If necessary, use a 3/4" socket wrench, as shown below, to provide additional leverage to unseat the handle. Do NOT use a hammer or other striking tool to apply impact force to the Wrench Tool as this may cause damage to the handle of the handlamp.
- Page 8 While every precaution has been taken to ensure accuracy and completeness in this manual, Appleton Grp, LLC. assumes no responsibility, and disclaims all liability for damages resulting from use of this information or for any errors or omissions. Specifications are subject to change without notice. The Appleton and Emerson logos are registered in the U.S. Patent and Trademark Office. All other product or service names are the property of their registered owners.
-
Page 9: Sécurité Du Produit
DOC00038A000 INSTRUCTION SHEET Instructions d’installation et d’entretien de la baladeuse Appleton™ EHLED IMPORTANT : CONSERvER CETTE FICHE D’INSTRUCTIONS POUR RÉFÉRENCE. Pour une installation et un fonctionnement en toute sécurité, lire attentivement les présentes instructions et s’assurer de les avoir bien comprises. • Ce luminaire est conçu pour une utilisation dans les zones de classe I, div. 1, groupes C et D, et type 4X. Sécurité... - Page 10 Présentation du produit – voir la Figure 1 Dimensions La longueur hors tout est de 508 mm. Le diamètre extérieur est de 124 mm. Grille de protection La grille de protection est composée d’aluminium moulé antiétincelant. Le crochet métallique antiétincelant se trouve à l’extrémité extérieure de la grille de protection. Crochet Il pivote et convient aux conduites de 19 mm.
-
Page 11: Instructions D'utilisation
Instructions d’utilisation Localiser la source d’alimentation à utiliser pour la baladeuse. La baladeuse EHLED est homologuée pour une alimentation 120-277 V CA, 50/60 Hz. REMARQUE : si la source d’alimentation est située AU SEIN d’une zone dangereuse, la baladeuse doit y être reliée au moyen de raccords antidéflagrants adaptés à la zone. Si la baladeuse est équipée d’un connecteur antidéflagrant, la prise de la source d’alimentation doit également répondre aux exigences de la zone dangereuse. - Page 12 Instructions de remplacement de l’ensemble globe/grille de protection ou de l’ampoule Avant de commencer, s’assurer d’avoir à portée de main toutes les pièces nécessaires pour le remplacement. Consulter le tableau ci-dessous pour commander les pièces de rechange nécessaires. Référence Description Ensemble grille de protection/globe AVEC kit d’outils. (Le kit d’outils contient un support de grille EHLEDTKG de protection et une clé.
- Page 13 Instructions de remplacement de l’ensemble globe/grille de protection ou de l’ampoule (suite) MISE EN GARDE : RISQUE DE CHOC ÉLECTRIQUE : DÉBRANCHER la baladeuse de la source d’alimentation et la placer dans une zone sûre (en dehors de l’environnement de fonctionnement dangereux) avant de procéder à toute inspection ou à...
- Page 14 Instructions de remplacement de l’ensemble globe/grille de protection ou de l’ampoule (suite) 3. Vérifier que la baladeuse EHLED est débranchée, puis la placer dans le support comme illustré ci-dessous. FIGURE 6 : INSERTION DE LA bALADEUSE DANS LE SUPPORT 4. Une fois la grille de protection de la baladeuse bien fixée dans le support, utiliser la clé pour tourner le manche de la baladeuse dans le SENS ANTIHORAIRE jusqu’à...
- Page 15 Instructions de remplacement de l’ensemble globe/grille de protection ou de l’ampoule (suite) 5. La pression manuelle peut ne pas suffire pour déloger le manche de la baladeuse. Utiliser si nécessaire une clé à douille de 19,05 mm, comme illustré ci-dessous, pour fournir un effet de levier supplémentaire afin de déloger le manche. NE PAS utiliser de marteau ou d’autre outil de frappe pour appliquer une force d’impact à...
- Page 16 Bien que toutes les précautions aient été prises pour garantir l’exactitude et l’exhaustivité du présent manuel, la société Appleton Grp, LLC. décline toute responsabilité, notamment en cas de dommages résultant de l’utilisation de ces informations ou de toute erreur ou omission. Les caractéristiques techniques peuvent être modifiées sans préavis. Les logos Appleton et Emerson sont enregistrés au Bureau américain des brevets et des marques de commerce. Tous les autres noms de produits ou de services sont la propriété...
Need help?
Do you have a question about the Appleton EHLED and is the answer not in the manual?
Questions and answers